
Quick Answer
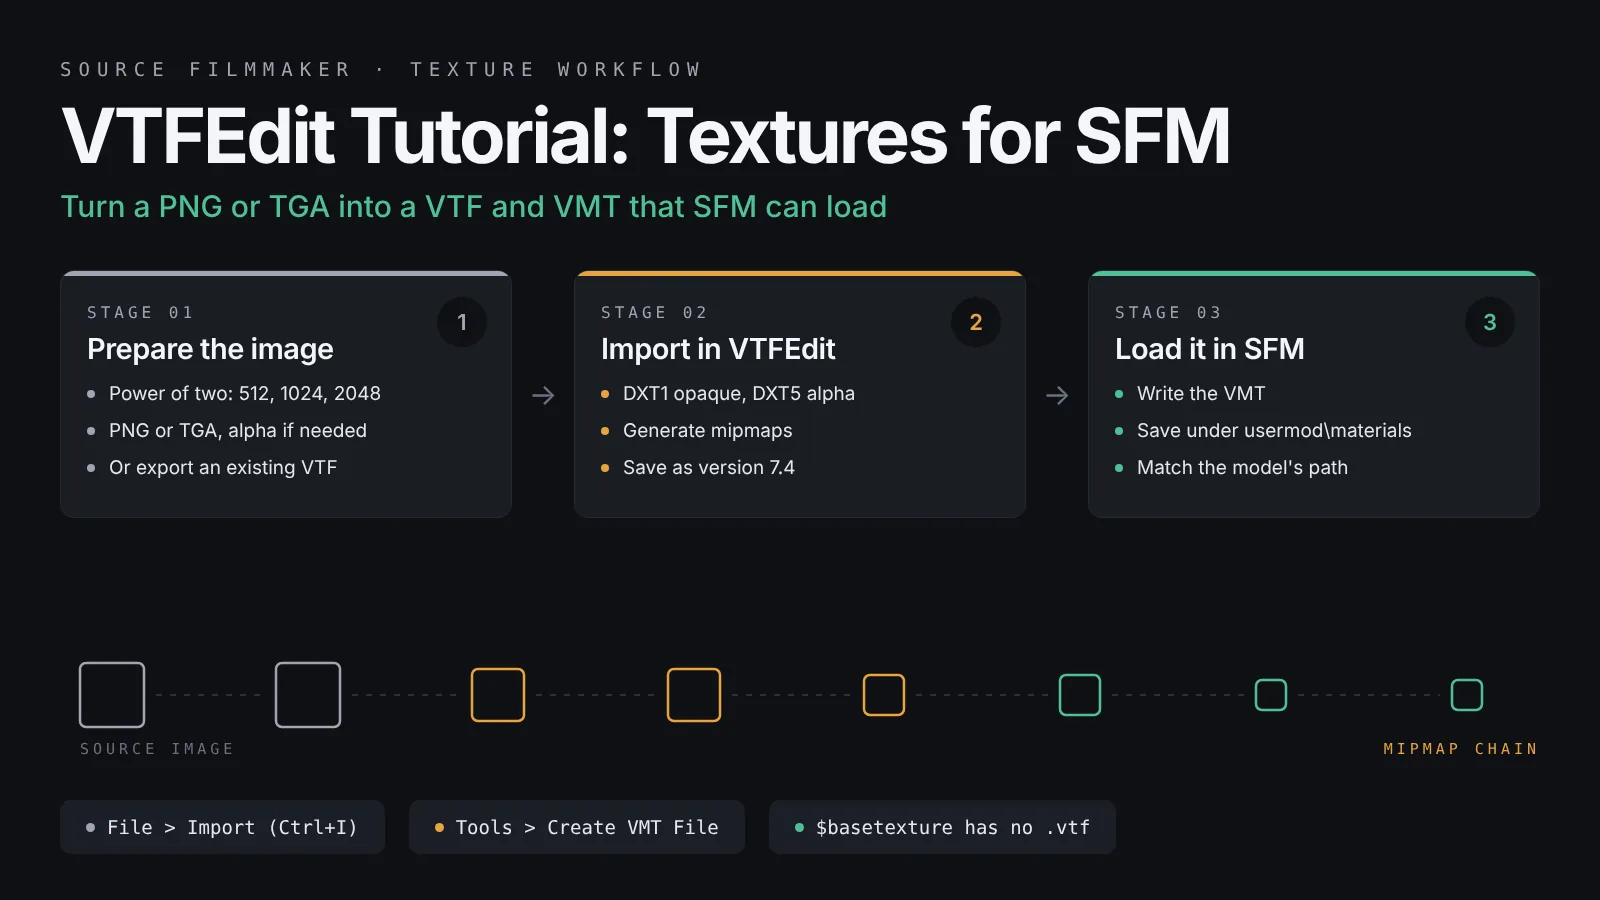
This VTFEdit tutorial turns an ordinary image into a texture SFM can load. Prepare a power-of-two PNG or 32-bit TGA, import it in VTFEdit with DXT1 for opaque or DXT5 for alpha, and save it as a VTF. Then write a VertexLitGeneric VMT, save both files under usermod\materials where the model expects them, and restart SFM.
Every texture you see in Source Filmmaker is a .vtf file wrapped in a small .vmt material script, and SFM cannot read a PNG or JPG on its own. This VTFEdit tutorial shows you how to turn an ordinary image into a VTF that SFM loads cleanly, how to write the VMT that goes with it, and how to edit an existing model texture without breaking the original. You will also learn which formats and flags to choose, where the files belong inside your SFM install, and how to fix the usual purple checkerboard or blurry result.
The short version:
Prepare a power-of-two image, such as 1024 by 1024, as a PNG or a 32-bit TGA with alpha.
Import it in VTFEdit with DXT1 for opaque or DXT5 for alpha, mipmaps on, and save as VTF version 7.4.
Create a VertexLitGeneric VMT whose $basetexture path has no .vtf extension.
Save both files in the folder the model expects under usermod\materials, then restart SFM.
What VTFEdit Does and Which Version to Use
VTFEdit is a Windows viewer and converter for the Valve Texture Format. It opens .vtf files, exports them to normal image formats, imports images back into VTF, and edits VMT material files in a built-in text editor.
VTF and VMT in plain terms
A VTF holds the pixels: the full-size image, a chain of smaller mipmaps, a tiny thumbnail and a set of flags. A VMT is a plain text file that tells the engine which shader to use and which VTF files feed it. Models never point at a VTF directly. They point at a material name, and the material points at the textures. That is why most missing texture problems are path problems.
Original VTFEdit vs VTFEdit Reloaded
The original VTFEdit was written by Neil Jedrzejewski and Ryan Gregg as part of VTFLib, and its last classic release was 1.3.3. It still works, but it is no longer updated. VTFEdit Reloaded is a community fork of the same code. It adds high DPI support, a dark VMT editor, sRGB-aware mipmaps and better DXT compression, and it fixes a green tint bug on exported textures. The menus are almost identical, so this guide applies to both. Reloaded is the better pick for new installs, and you can get it from the VTFEdit Reloaded GitHub page.
Installing it on Windows
Download the release, unzip it and launch VTFEdit.exe. Older builds need the Microsoft Visual C++ 2010 redistributable, so install it if the program closes straight away. Also make sure SFM has run once, because that creates the usermod folder. Our guide to installing Source Filmmaker on Windows covers that part.
Prepare Your Image Before Importing
Most texture problems start before VTFEdit is even open.
Use power-of-two dimensions
Source textures should be a power of two on each side: 256, 512, 1024, 2048 or 4096. Width and height do not have to match, so 2048 by 1024 is fine. Compressed formats also need sizes that divide by four. VTFEdit can resize on import, but it softens the image, so resize in your editor first.
Choose the right file type
For opaque textures, a PNG or a 24-bit TGA works well. For anything with transparency, save a 32-bit TGA with the alpha channel included. Older import code handles some PNG transparency badly, and a TGA avoids that. Keep your layered working file separately, because VTF is an output format.
Plan the alpha channel
On a model, the alpha channel often holds a phong or environment map mask instead of transparency. Decide its job before you export. If the texture needs neither, leave the alpha out so VTFEdit can use the smaller DXT1 format.
Getting a texture out of an existing model
To edit a stock texture, you first need the file. Game textures live inside VPK archives, which GCFScape or Crowbar’s unpack tool can extract. Workshop models arrive as loose files. Open the VTF in VTFEdit, choose File, Export, and save it as PNG or TGA for editing. Our Crowbar decompile tutorial shows how to find the exact material folder a model uses.
VTFEdit Tutorial: Importing and Converting a Texture
This is the core of the workflow. The import dialog has two tabs, and only a handful of fields matter for SFM work.
Open the import dialog
Choose File, Import, or press Ctrl+I, and select your image. Select several files only when you want an animated texture, because VTFEdit treats them as frames of one VTF.
General tab settings
The General tab controls format, size and mipmaps:
- Normal Format: the format used when the image has no alpha. Pick DXT1 for most color textures.
- Alpha Format: the format used when the image has an alpha channel. Pick DXT5 for most cases.
- Resize: use “To nearest power of 2” only as a safety net.
- Generate Mipmaps: keep it on. Mipmaps stop distant textures from shimmering and help SFM performance.
Advanced tab: version and normal maps
The Advanced tab holds the VTF version. Version 7.4 is the safe choice for SFM and for every Team Fortress 2 era asset you are likely to mix with it. VTFEdit Reloaded saves 7.4 by default. In the original VTFEdit, check this field every time. Version 7.5 was made for later engine branches and some older Source games reject it, so set 7.4 by hand. This tab can also generate a rough normal map from brightness, which is fine for a quick test.
Set flags and save
Click OK and the converted texture appears in the preview. Check the flags list in the left panel, tick any you need, and then use File, Save As. Give the file a lowercase name with no spaces, such as body_blue.vtf, and save it straight into the right materials folder so you do not have to move it later.
Choosing Formats and Flags for SFM
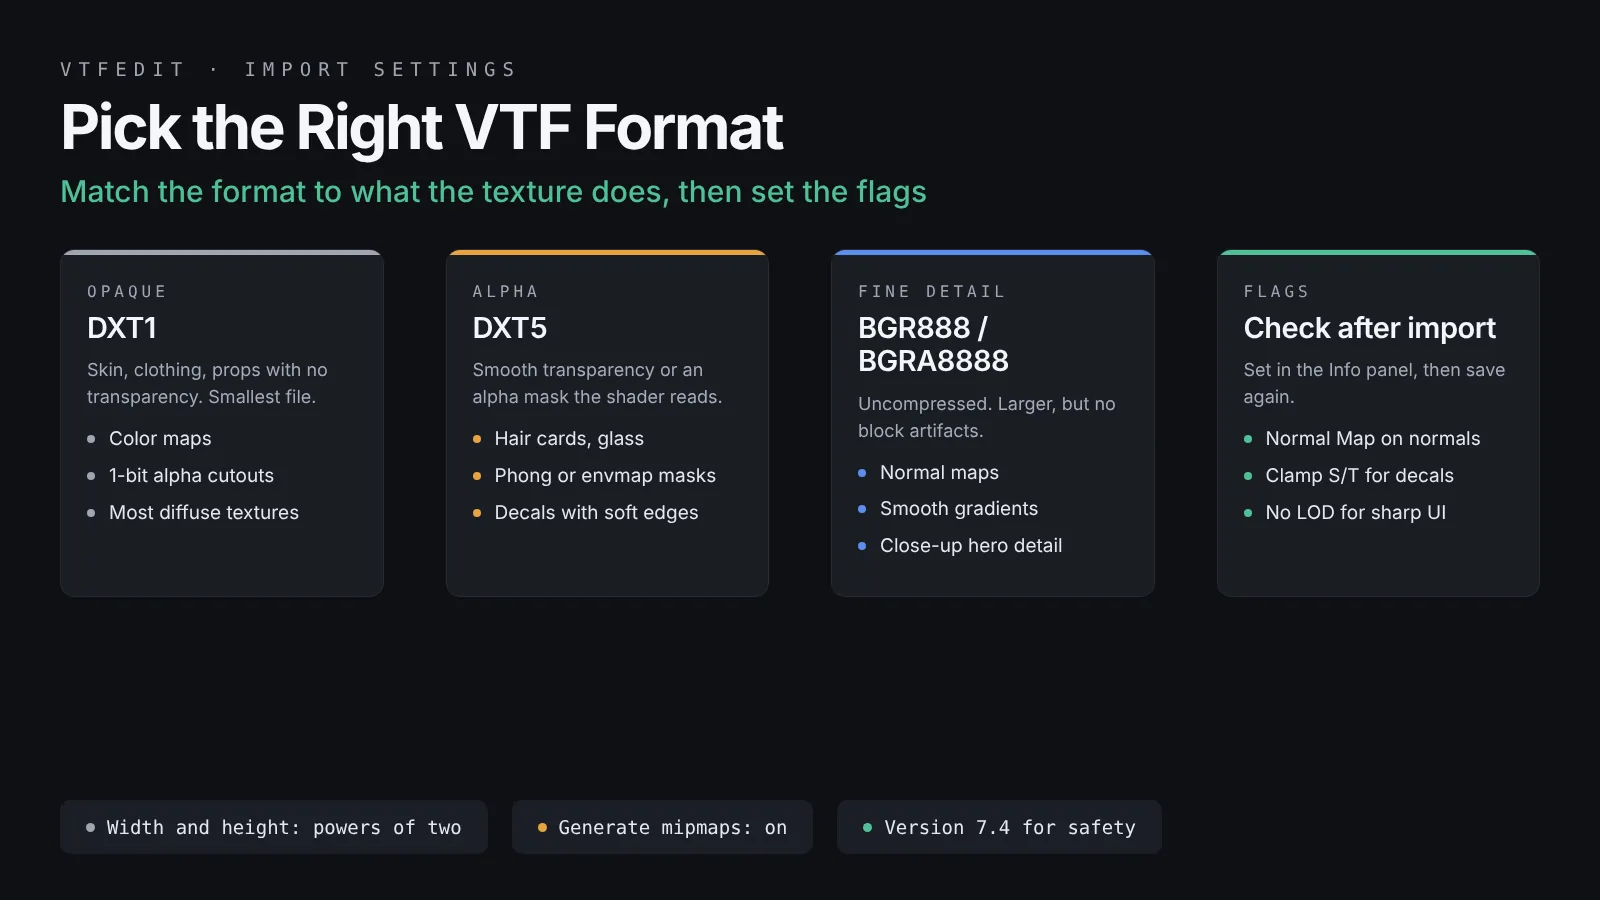
The format decides file size and how much detail survives compression. This table covers almost every SFM texture.
Format cheat sheet
| Texture type | Format | Why |
|---|---|---|
| Color map with no transparency | DXT1 | Smallest file, good quality for most surfaces |
| Color map with transparency or a mask in alpha | DXT5 | Keeps smooth alpha gradients |
| Hard cutout such as a fence or leaves | DXT1 with alpha or DXT5 | Both handle on and off transparency |
| Normal map | BGR888, or BGRA8888 with a phong mask in alpha | Avoids blocky compression artifacts in lighting |
| Smooth gradient such as a sky or glow | BGR888 or BGRA8888 | DXT compression shows banding on gradients |
| Grayscale mask | I8 | One channel, a quarter the size of BGRA8888 |
The Valve Developer Community VTF reference lists every format and flag if you need something unusual.
Flags worth knowing
You will leave most flags off, but a few come up often in SFM:
- Normal Map: tick it on every normal map so the engine treats it as direction data, not color.
- Clamp S and Clamp T: stop the texture from repeating. Use them on decals and on textures that should not tile.
- No Level Of Detail: keeps full resolution whatever the texture quality setting is. It suits screens, signs and anything the camera sees up close.
- No Mipmaps: only for textures that are always seen at one size. It causes shimmering on anything that moves away from the camera.
- Point Sample: disables smoothing for crisp pixel art. It also breaks mipmapping, so use it on purpose only.
Creating the VMT Material File
A VTF on its own does nothing. SFM loads materials, so every texture a model or map uses needs a VMT that names it.
Using Tools, Create VMT File
With your VTF open, choose Tools, Create VMT File. Pick the shader, check that the base texture path is right, and click Create. VTFEdit writes the VMT next to the VTF with the same name. You can also turn on Options, Auto Create VMT File so a basic VMT is written every time you save a VTF. The generated path is only correct if the VTF sits inside a materials folder.
Writing a model VMT by hand
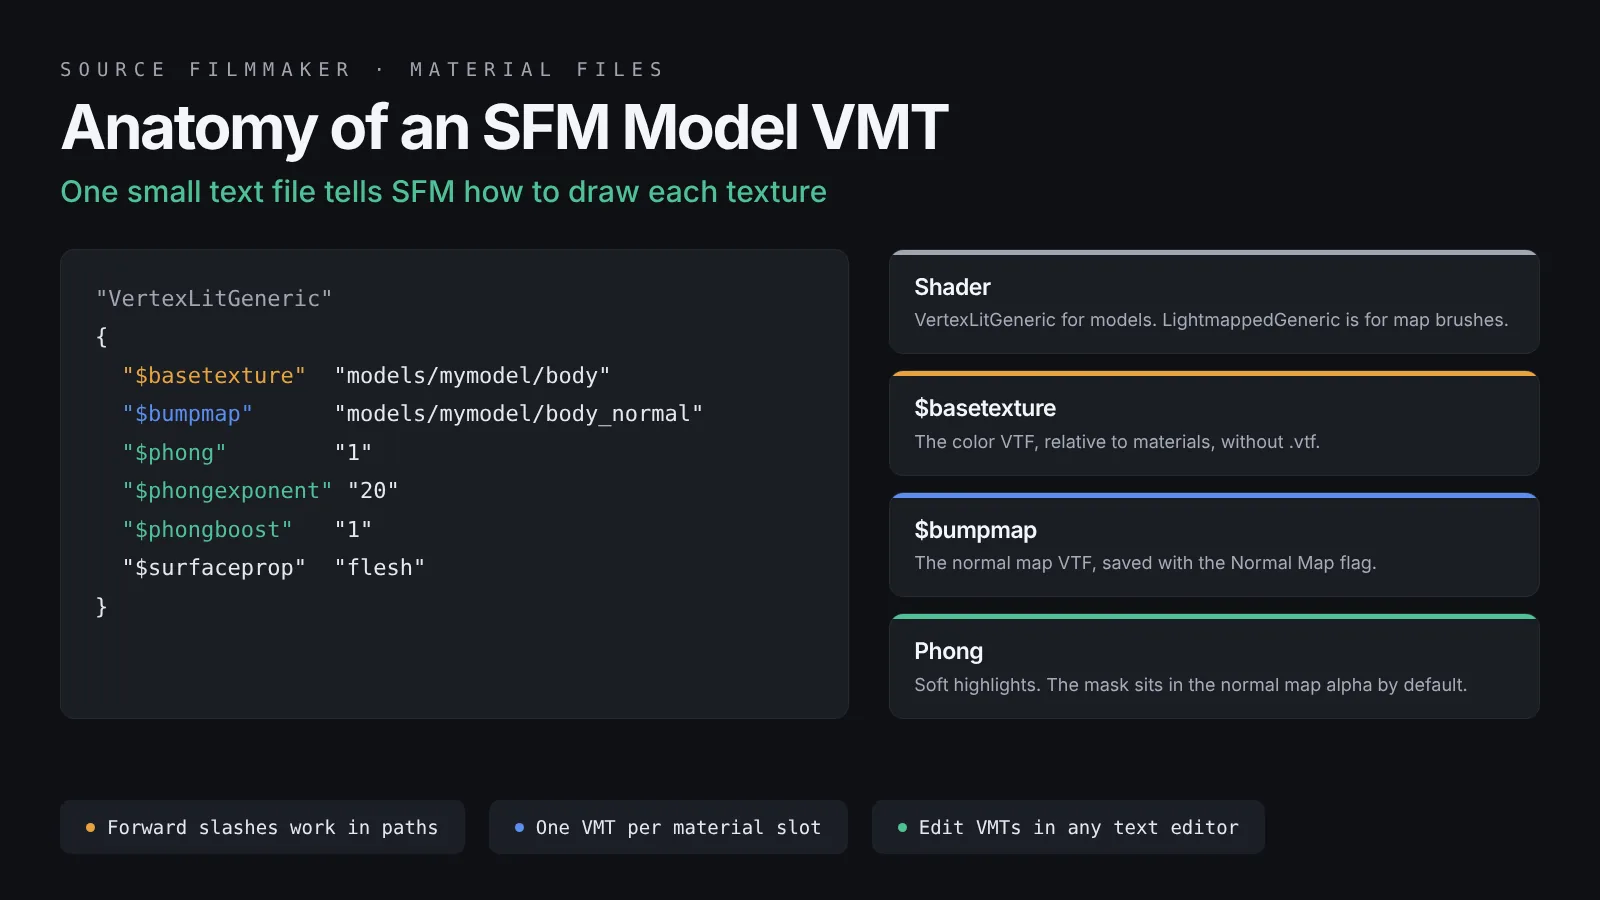
A VMT is plain text, so Notepad or VS Code works fine. For a model, the simplest working material is:
"VertexLitGeneric"
{
	"$basetexture" "models/mymodel/body"
	"$surfaceprop" "flesh"
}
The $basetexture path starts inside the materials folder and leaves off the .vtf extension. Use VertexLitGeneric for anything on a model. LightmappedGeneric is for map brushes built in Hammer, and UnlitGeneric ignores lighting completely, which suits screens and glowing signs.
Adding a normal map and phong
For better lighting, add a normal map with $bumpmap and switch on phong highlights:
"VertexLitGeneric"
{
	"$basetexture" "models/mymodel/body"
	"$bumpmap" "models/mymodel/body_normal"
	"$phong" "1"
	"$phongexponent" "20"
	"$phongboost" "1"
	"$phongfresnelranges" "[0.2 0.6 1]"
}
By default, the phong mask comes from the normal map’s alpha channel, so save that normal map as BGRA8888 if you want a mask. Lower $phongexponent values give broad, soft shine, and higher values give tight, glossy highlights. Test the result under real lights, since our SFM lighting guide explains how much shading depends on the light setup.
Putting Textures Where SFM Can Find Them
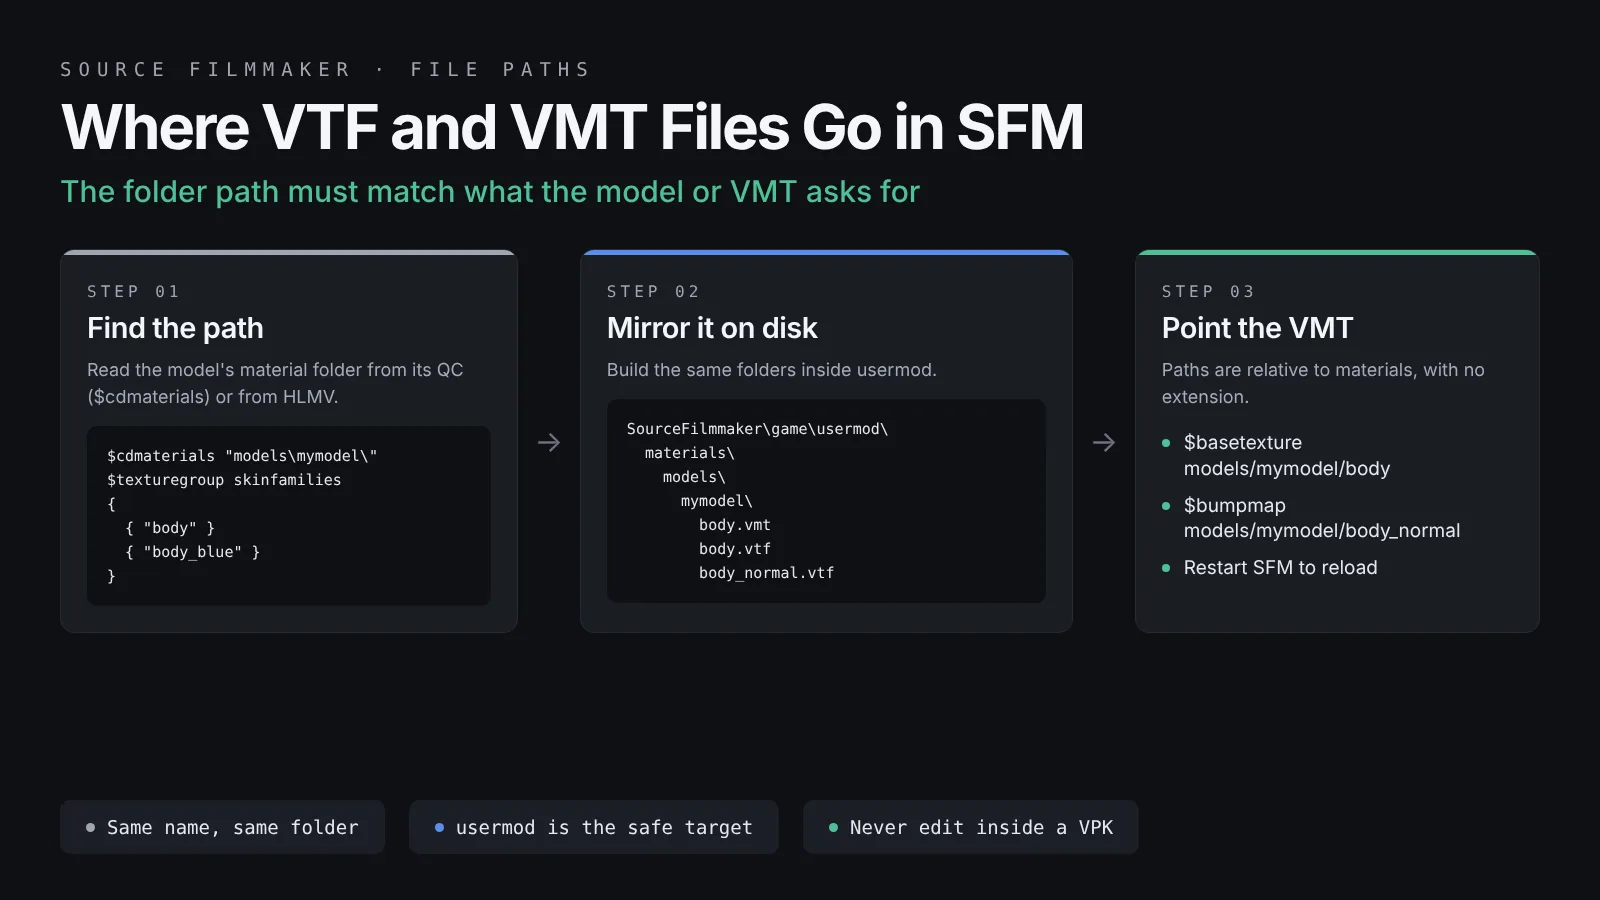
SFM looks for materials by path, so the folder structure on disk must match the path the model asks for, letter for letter.
Match the model’s material path
A compiled model stores one or more material folders, set by $cdmaterials in its QC file, plus the material names used by each mesh. If $cdmaterials is models\mymodel\ and the mesh uses a material called body, SFM looks for materials\models\mymodel\body.vmt. Read these values from the decompiled QC or from Half-Life Model Viewer.
Use the usermod folder
The safest place for your own files is SourceFilmmaker\game\usermod\materials, followed by the model’s path. Create the folders if they do not exist. Never edit files inside a game’s VPK, and avoid overwriting files in the tf folder, because a game update can replace them. If you are porting a model of your own, our Blender to SFM porting guide explains how to set $cdmaterials so the path is short and clean.
Reload and test
SFM caches materials, so save your session, restart SFM and load the model again. Check it under a light and zoom in and out to confirm the mipmaps look right.
Editing an Existing SFM Texture
Recoloring a character or adding a logo to a prop follows the same steps in reverse.
Export, edit, re-import
Open the original VTF in VTFEdit and use File, Export to save a PNG or TGA. Edit it in Photoshop, GIMP, Krita or Paint.NET, keeping the same size. Import it again with the same format the original used. You can see that format in the Info panel when the original is open. Save it with the same name in the matching usermod folder, and SFM uses your version when it finds that path.
Keep the original safe
A cleaner method is to save your texture under a new name, such as body_blue, copy the VMT under a new name too, and point the new VMT’s $basetexture at the new VTF. You can then apply that material in SFM with a material override, or add it as an extra skin when you recompile the model with a $texturegroup block. The stock texture stays untouched, and switching back takes one click.
Batch Conversion and Animated Textures
VTFEdit also handles two jobs that would be slow one file at a time.
Convert a whole folder
Tools, Convert Folder takes every image in a folder and writes a VTF for each one with the same import settings. Newer Reloaded builds can also write a VMT for each file in the same pass. This is the fastest way to convert a full set of textures from a model you made yourself. Spot-check a few results, because one setting applies to every file.
Make an animated texture
Number your frames in order, such as screen_000.tga to screen_023.tga, and select them all in the import dialog. VTFEdit builds one VTF with every frame inside, and the Play button in the preview runs through them. In the VMT, add an AnimatedTexture proxy:
"UnlitGeneric"
{
	"$basetexture" "models/myprops/screen"
	"Proxies"
	{
		"AnimatedTexture"
		{
			"animatedTextureVar" "$basetexture"
			"animatedTextureFrameNumVar" "$frame"
			"animatedTextureFrameRate" "24"
		}
	}
}
Keep frame counts and sizes modest, since every frame is stored at full resolution. For fire, smoke and sparks, a particle system usually beats an animated texture, and our SFM particles and effects guide covers that route.
Common VTFEdit Problems in SFM
Most texture faults show up as one of a few symptoms, and each has a short list of causes.
Symptom, cause and fix
| Problem | Likely cause | Fix |
|---|---|---|
| Purple and black checkerboard | SFM cannot find the VMT, or the VMT points at a missing VTF | Check the folder path and the $basetexture line letter by letter |
| Texture is black or very dark | Normal map saved without the Normal Map flag, or a broken $bumpmap path | Re-save the normal map with the flag and check its path |
| Texture looks blurry | Image upscaled on import, or the texture quality setting is low | Resize in your editor first, or tick No Level Of Detail for close-ups |
| Shimmering at a distance | Mipmaps turned off | Import again with Generate Mipmaps on |
| Blocky or banded colors | DXT compression on a gradient or normal map | Use BGR888 or BGRA8888 instead |
| Changes do not appear | SFM still has the old material cached | Save the session and restart SFM |
When the model shows the red ERROR sign
A red ERROR sign is a missing model, not a missing texture, so VTFEdit cannot fix it. Our SFM red ERROR model fix covers that case. For a deeper look at checkerboard faults, read our SFM missing textures fix, which goes through search paths and mounted games.
Frequently Asked Questions
Is VTFEdit free and safe to use?
Yes. VTFEdit and VTFEdit Reloaded are free, open source tools built on VTFLib. Download them from the project’s own release page, not from reupload sites. Neither tool needs Steam or the Source SDK.
Which VTF version should I use for SFM?
Use version 7.4. It loads in SFM and in the Team Fortress 2 era branches that most SFM assets come from. VTFEdit Reloaded saves 7.4 by default. In the original VTFEdit, set the version on the Advanced tab of the import dialog before saving.
Should I use DXT1 or DXT5?
Use DXT1 for textures with no transparency and no mask in the alpha channel, since it gives the smallest file. Use DXT5 when the alpha channel holds smooth transparency or a mask the shader reads. For normal maps and smooth gradients, use BGR888 or BGRA8888 to avoid compression artifacts.
Where do I put custom textures in SFM?
Save the VTF and VMT under SourceFilmmaker\game\usermod\materials, inside the same folders the model’s material path expects. For a model compiled with $cdmaterials models\mymodel\, that is usermod\materials\models\mymodel. The folder names must match exactly.
Why is my new texture purple and black in SFM?
The checkerboard means SFM found the material slot but could not load the material or its texture. Check that the VMT sits in the folder the model expects and that its $basetexture path is relative to materials with no .vtf extension.
Can VTFEdit make a normal map?
It can generate a rough normal map from an image’s brightness on the Advanced tab of the import dialog. That works for quick tests. For good results, bake the normal map in Blender or another 3D tool, import it as BGR888, and tick the Normal Map flag before saving.
Final Thoughts
Get the path right, then the pixels
VTFEdit is a simple tool once the pattern sticks. Prepare a power-of-two image, import it with DXT1 or DXT5 and mipmaps on, save it as version 7.4, write a VertexLitGeneric VMT, and place both files in the matching usermod folder. When something looks wrong, check the path first and the format second. With that order in mind, custom skins, recolors and new props become routine, and you can move on to importing more models into SFM to put them to use.