
Quick Answer
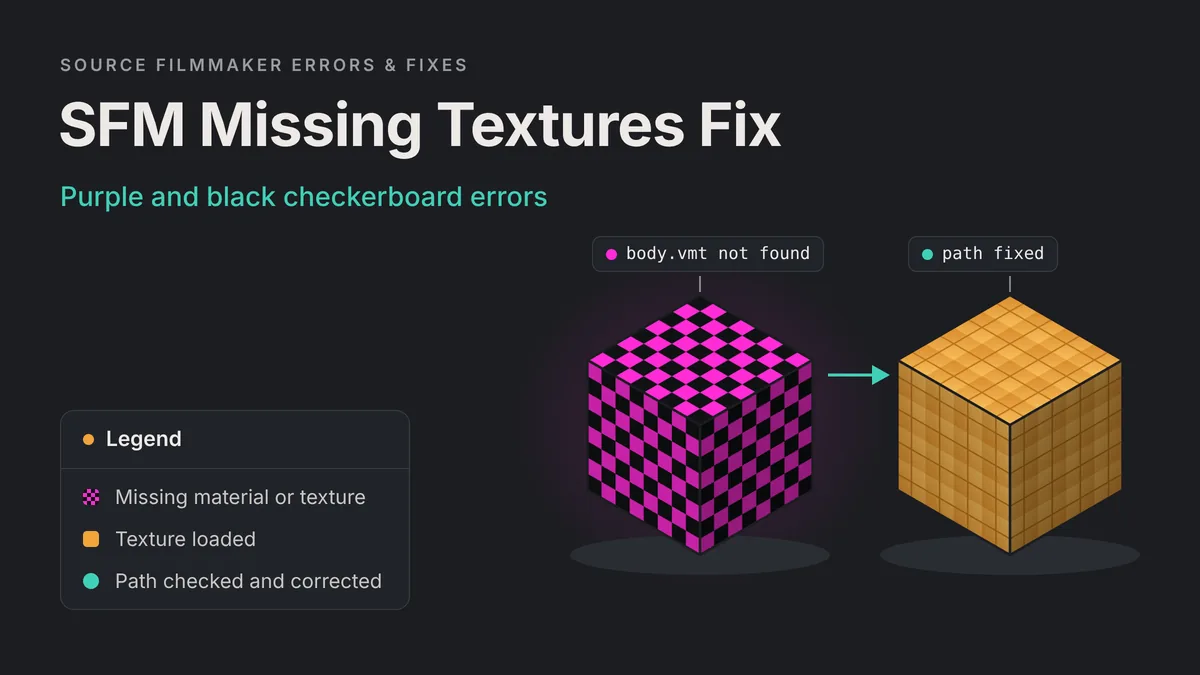
SFM missing textures show up as a purple and black checkerboard. It means Source Filmmaker loaded the model but could not find one of its materials: a VMT file is missing, or the VTF texture it points to cannot be found or read. The fix is almost always a path problem, so find the material SFM wants and correct the folder or path.
Read the console
Open Windows, then Console, and look for the material names SFM says it cannot find.
Check the files exist
Confirm the VMT and VTF files are on disk, inside a mod folder SFM has enabled.
Fix the paths
Match the folder to $cdmaterials, and make each $basetexture point to a real VTF.
Reload and test
Restart SFM or reload materials from the console, then load the model again.
What the Purple and Black Checkerboard Means
The checkerboard is Source’s placeholder for a material it cannot find. Valve’s VMT documentation says a missing material produces the “infamous Source pink and black checkered pattern.” Some people call it purple, pink or magenta. It is the same error.
The good news is what the pattern tells you. SFM found the model, read its mesh and drew it in the right place. Only the surface information is missing. So you do not need to re-download or rebuild the whole model. You need to find the broken link between the model and its material files.
Materials and Textures: VMT and VTF
Source splits a surface into two files. Knowing which one is missing tells you where to look.
| File | What it is | What it holds |
|---|---|---|
| .vmt (Valve Material) | A small text file | The shader name and parameters such as $basetexture, $bumpmap and $surfaceprop |
| .vtf (Valve Texture Format) | The image itself | Pixel data, mipmaps and compression, such as DXT1 or DXT5 |
The model only knows material names. Each name leads to a VMT, and the VMT names the VTF. If either step fails, you get the checkerboard. Both files live under a materials folder inside a mod folder, such as game\usermod\materials.
Checkerboard vs the Red ERROR Model
Two other errors look similar at a glance, but they have different causes. Valve’s missing content page lists missing models as flashing red 3D text reading “Error.” Its VMT page adds that a white wireframe is a missing shader, not a missing material.
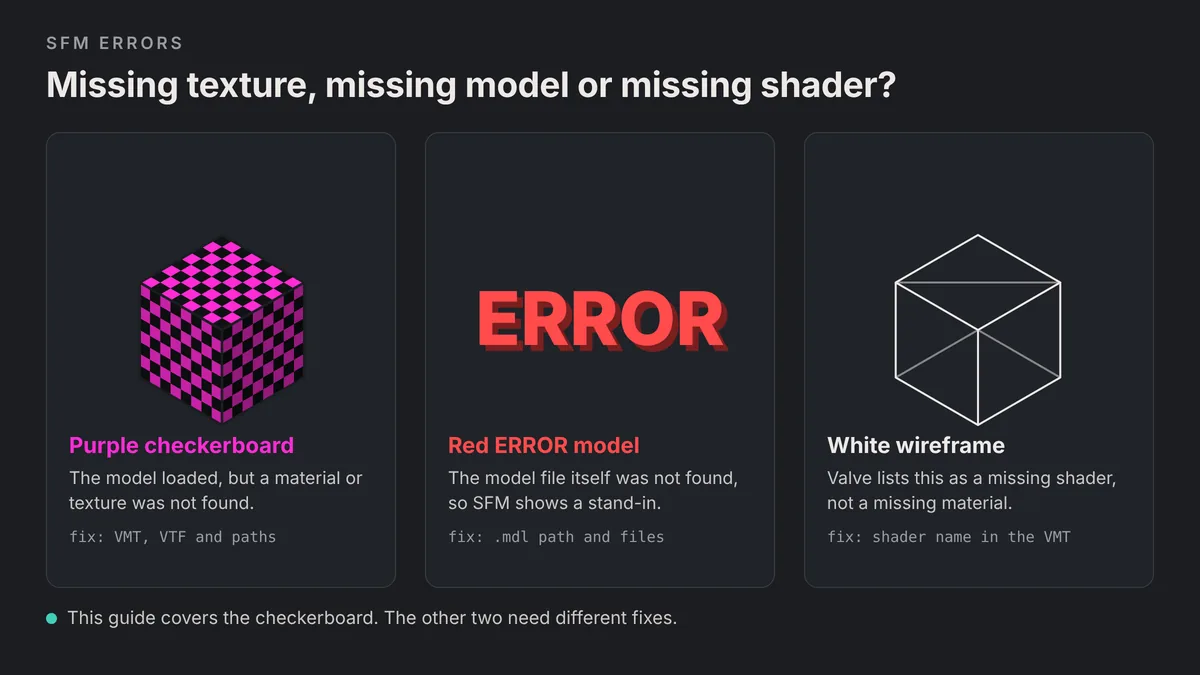
| What you see | What is missing | Where to look |
|---|---|---|
| Purple and black checkerboard | A material (VMT) or its texture (VTF) | The materials folder and the paths in the QC and VMT |
| Red ERROR model | The model file itself | The .mdl path, the models folder and search paths |
| White wireframe | The shader named in the VMT | The first line of the VMT |
| Invisible model | Often nothing; settings hide it | Community users point to scale, alpha settings or the wrong folder |
If you see the red ERROR model instead, the problem is the model path, not the textures. Our guide to importing SFM models from the Steam Workshop covers missing models and the model browser.
How SFM Finds a Material
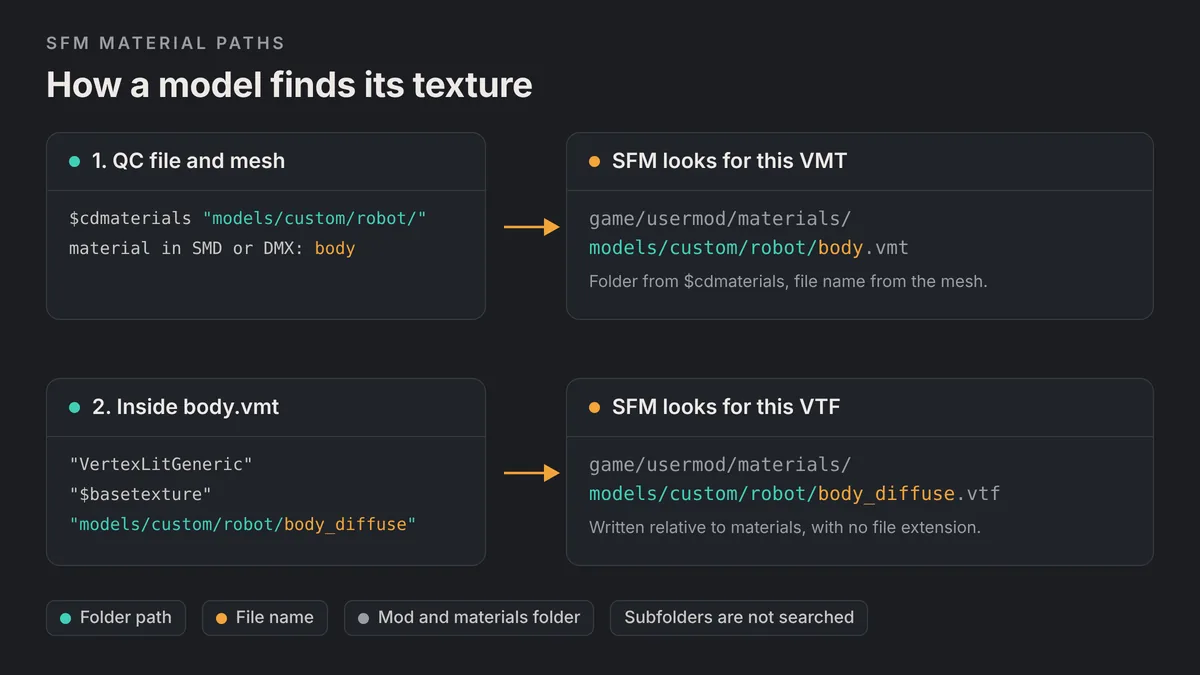
Every fix in this guide follows one chain. The model asks for a material by name. SFM builds a path to the VMT. The VMT then names a VTF, and SFM builds a second path to that file. A single wrong character anywhere breaks the chain.
From the Model to the VMT: $cdmaterials
When a model is compiled, the QC file sets $cdmaterials. Valve’s $cdmaterials reference says it defines the folders where the game searches for the model’s materials, relative to the materials folder. It also notes two details that cause many checkerboards:
- Subfolders are not searched. A VMT one folder too deep will not be found.
- File names come from the mesh. The material names are set in the SMD or DMX, not in $cdmaterials. A Blender material called
Body.001asks forBody.001.vmt.
So a model compiled with $cdmaterials "models/custom/robot/" and a mesh material named body asks for materials/models/custom/robot/body.vmt.
From the VMT to the VTF: $basetexture
Open any VMT in a text editor and you will see something like this:
"VertexLitGeneric"
{
    "$basetexture" "models/custom/robot/body_diffuse"
    "$bumpmap"     "models/custom/robot/body_normal"
}
The first line is the shader. VertexLitGeneric is the usual shader for models. The $basetexture value is a path to the VTF, written relative to the materials folder and without the .vtf extension. This example points to materials/models/custom/robot/body_diffuse.vtf. Other texture parameters, such as $bumpmap, follow the same rule.
Search Paths and Mod Folders
SFM does not search your whole drive. It loads content from mod folders inside SourceFilmmaker\game, such as usermod, workshop and tf. Each mod folder has its own gameinfo.txt, and its SearchPaths section lists where the engine looks.
Valve’s gameinfo.txt documentation explains the order. The engine walks the search paths and stops at the first match. VPK archives are checked before loose files. Loose files are then read from the top of the list down. This matters when a model shows the wrong texture rather than a checkerboard: another file with the same path won the race.
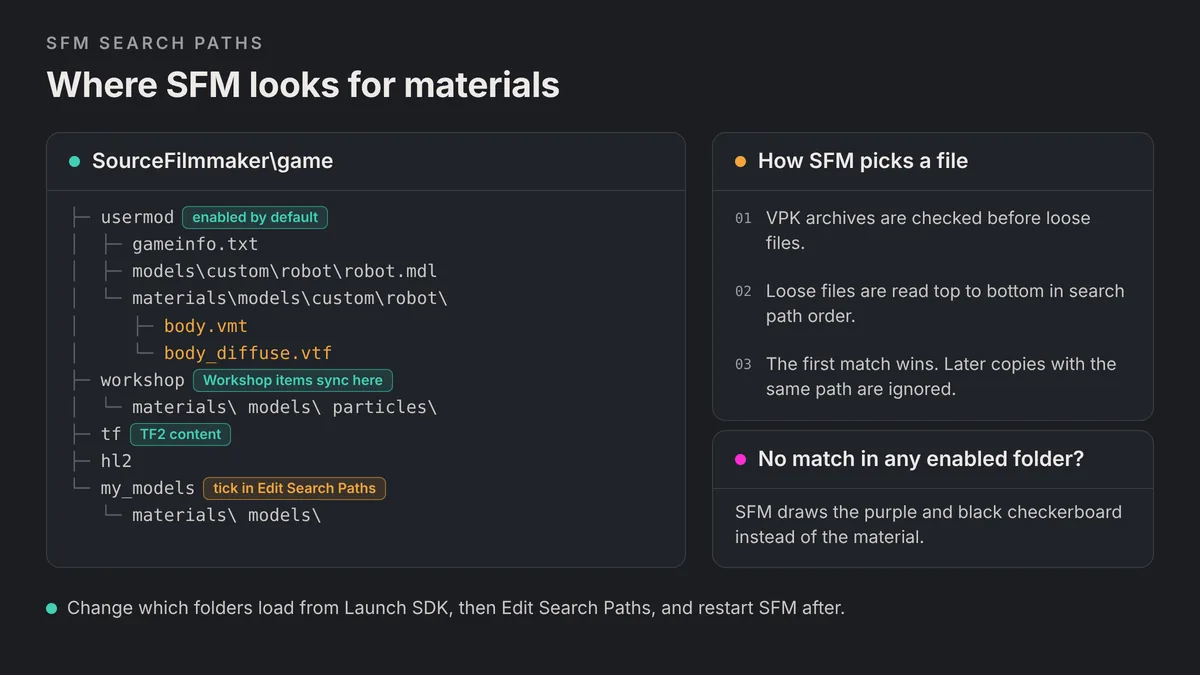
You choose which mod folders load from Steam. Community guides describe the route: right-click Source Filmmaker in your library, choose Launch SDK, then pick Edit Search Paths for the selected mod. Tick a folder to enable it, then restart SFM. Community users note that a folder only shows up there once it contains files.
Mounting TF2 and Other Game Content
SFM already ships with Team Fortress 2 content in its own tf folder, so TF2 materials load without extra setup. Content from other Source games is different. SFM does not read another game’s install folder, so a model that relies on that game’s textures turns purple.
The usual community method is to mount the content yourself. Open the game’s VPK files in a tool such as GCFScape and extract the materials, models, particles and sound folders. Place them in a new folder inside SourceFilmmaker\game, then tick that folder in Edit Search Paths. Community users recommend one folder per game, rather than dumping everything into usermod, so you can switch a game off and avoid overwriting files.
Common Causes of SFM Missing Textures
Most checkerboards come from a short list of mistakes. Match your situation to the table, then jump to the matching fix below.
| Cause | Typical sign | Fix |
|---|---|---|
| Materials folder missing | The download had only a models folder | Copy the materials folder that came with the model |
| Files in the wrong mod folder | VMTs exist, but outside any enabled folder | Move them into usermod or enable their folder |
| VMT not where $cdmaterials points | The console asks for a path you do not have | Move the VMT or fix $cdmaterials and recompile |
| $basetexture points to a missing VTF | The VMT loads, but the surface is still a checkerboard | Edit the path in the VMT |
| Texture from a game SFM does not load | Paths start with folders from CS:GO or another game | Get the texture into a loaded folder, or use a port that includes it |
| Workshop item not fully downloaded | Only some parts of the model are purple | Restart Steam and SFM, then resubscribe if needed |
| Typos, extra folders or stray extensions | One letter or slash differs from the real file | Compare the path with the folder, character by character |
| Patch material missing its base | The VMT uses the Patch shader with an include line | Install the base VMT the include line names |
| Broken or unsupported VTF | The console reports an error loading the texture | Open it in VTFEdit and re-export it |
Ported Models With Missing Materials
Ported models are the most common source of SFM missing textures. The porter may have shipped the models folder but not the materials folder. They may have compiled with a $cdmaterials path that does not match where the VMTs ended up. Or a material name in the mesh may not match its VMT file name.
Textures From Games SFM Does Not Load
A VMT can point to a texture that only exists in another game. A model ported from CS:GO might reference a texture that lives in that game’s files. SFM loads its own mod folders, not every Source game on your PC, so the path leads nowhere. Valve also notes that VTF version 7.5, used by the Portal 2 and CS:GO branches, does not work in Source 2004 to Source 2013 games without conversion.
Patch Materials and Their Base Files
Some VMTs do not use VertexLitGeneric at all. They start with Patch instead. Valve’s wiki describes Patch as a special shader that lets one material inherit from another. The include line names the base material with its full path, including materials\ and .vmt.
A patch only adds or overrides parameters. The base file still has to exist in a loaded folder. If a ported model ships patch VMTs but not the base materials from the original game, check that every include path leads to a real file.
Typos, Spaces and Extra Folders
Small mistakes cause big problems. Watch for a doubled folder such as materials/materials/, a .vtf extension left inside $basetexture, or a path copied from a porter’s own PC. Community users also advise replacing spaces in folder names with underscores. Keeping every path lowercase is a common habit that avoids mismatches.
How to Fix SFM Missing Textures Step by Step
Work through these steps in order. Each one rules out a cause, so you never edit files that were never broken.
Step 1: Read the Console First
The console usually tells you exactly which material is missing. Community users open it from Windows, then Console, at the top of SFM. Load the model again and look for lines that name materials SFM could not find. Write down each path it lists.
Those paths are the key to the whole fix. They show the folder and file name SFM expected, so you can compare them with what is really on disk.
Step 2: Verify Workshop Downloads
For Workshop models, check the download before you edit anything. Close SFM, open Steam’s Downloads page and wait until the queue is empty. Then relaunch SFM so it can sync the item into game\workshop.
If the textures are still missing, unsubscribe, restart Steam, subscribe again and relaunch SFM. Read the item description too. Many models need a separate texture or dependency pack. For damaged core files, Steam can verify the install from the tool’s Properties, under Installed Files.
Step 3: Check the Files and Search Paths
Open SourceFilmmaker\game and find the paths the console listed. Each VMT and VTF must sit inside the materials folder of a mod folder SFM loads. A material in Downloads\robot\materials does nothing until you move it.
If the files live in your own custom folder, enable that folder in Edit Search Paths and restart SFM. Our Source Filmmaker install guide shows where the game folder sits on a default install.
Step 4: Copy the Materials Into Usermod
For manual downloads, copy the materials folder from the download into game\usermod. Windows will merge it with the existing folder. Keep the subfolders exactly as they came, because the paths inside the model expect them.
Usermod is enabled by default, which makes it the quickest test. Some community users prefer a separate folder per model pack, enabled in Edit Search Paths, because it keeps content easy to remove. Either works, as long as the folder is enabled and the structure under materials is intact.
Step 5: Inspect the Model With Model Viewer and Crowbar
If the console paths look strange, inspect the model itself. Community users open the Model Viewer from Steam: right-click Source Filmmaker, choose Launch SDK, then click Model Viewer. Load the model there. If it is purple in the viewer too, the problem sits in the files, not in your SFM session.
Next, decompile the model with Crowbar and open the QC it writes. The $cdmaterials lines show every folder the model searches. The SMD or DMX files show the material names. Together they give you the exact VMT paths to recreate. Our Crowbar decompile and recompile tutorial shows how to run the decompile.
Step 6: Edit VMT Paths in a Text Editor
VMT files are plain text, so Notepad or Notepad++ can open them. Check the $basetexture line against the folder where the VTF really sits.
- Remove anything before
materials, such as a drive letter orC:\Users\...path. - Remove
materials/itself from the start of the value. - Remove the
.vtfextension at the end. - Check spelling, underscores and folder order letter by letter.
- Save, then fix any other texture lines such as $bumpmap the same way.
- For a Patch VMT, check that the include path points to a base VMT that exists.
A corrected line looks like "$basetexture" "models/custom/robot/body_diffuse". If the VMT itself is in the wrong folder, move it to where the console says SFM is looking.
Step 7: Check the Texture in VTFEdit
If the VMT path is right but the surface is still purple, test the VTF. VTFEdit is a free tool for creating and converting VTF and VMT files. Valve’s wiki notes the original is no longer maintained and points to an unofficial fork, VTFEdit Reloaded.
- Open the VTF. If it will not open, the file is damaged. Re-export it from the source image.
- Check the size. Valve says width and height should be powers of two, such as 1024 or 2048.
- Check the format. DXT1 suits opaque textures, while DXT5 suits textures with an alpha channel.
- Check the version. Files from newer branches may be version 7.5. Converting them to 7.4 is a community fix for textures that will not load in older Source branches.
If VTFEdit opens the file and every check passes, return to the paths. A healthy texture in the wrong folder still shows the checkerboard.
Step 8: Re-Port With the Correct $cdmaterials
If the console asks for a folder that makes no sense, the path is baked into the model. Moving files to match it works, but a clean recompile is often tidier. Take the QC from your Crowbar decompile and fix the path:
$modelname   "custom/robot/robot.mdl"
$body        "body" "robot_ref.smd"
$cdmaterials "models/custom/robot/"
Make sure each material name in the SMD or DMX matches a VMT file name in that folder. Then recompile and test again. Our Blender to SFM porting guide walks through material names, the QC and compiling into usermod.
Step 9: Reload Materials or Restart SFM
After any change, SFM needs to read the files again. Restarting SFM is the most reliable option. You can also try these Source console commands, which Valve documents on its material creation page:
| Command | What it does | Valve’s note |
|---|---|---|
mat_reloadmaterial name | Reloads every material with that name | Useful when you are testing one material |
mat_reloadallmaterials | Reloads all materials | Not recommended, because artifacts may appear |
mat_reloadtextures | Reloads textures | Described as very buggy |
Community users disagree on whether reloading materials also picks up an edited VTF in SFM. If the checkerboard stays after a reload, restart SFM before you assume the fix failed.
SFM Missing Textures Troubleshooting Flowchart
Use this order when you do not know where to start. Each question rules out one cause before you move to the next.
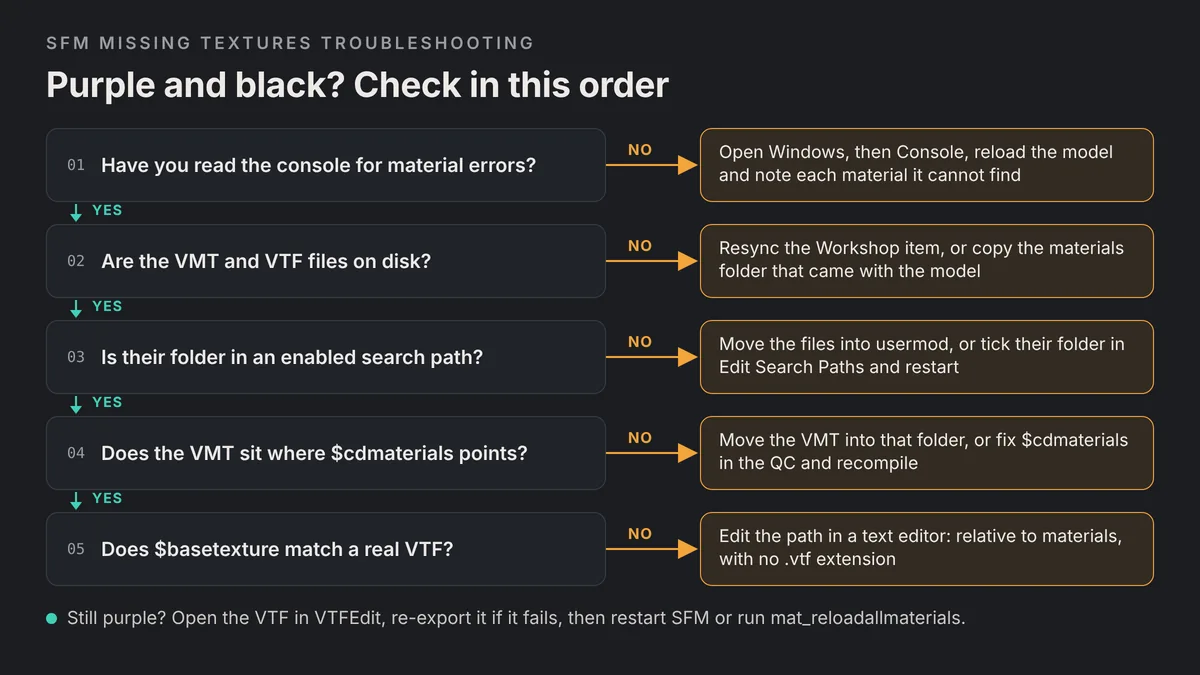
If every answer is yes and the model is still purple, the texture itself is the suspect. Open it in VTFEdit, re-export it, and run a quick test. Community users also report that some map materials use shaders SFM’s engine branch does not support. Those surfaces may stay broken whatever you do.
Missing Textures in Maps, Particles and Renders
Models are not the only things that turn purple. The same rules apply elsewhere, with a few twists.
- Maps. A map can depend on materials that were never packed into it. Extract any packed content, or install the texture pack the map author lists.
- Particles. Particle effects use materials too. If an effect draws as squares or a checkerboard, check the materials it uses in the Particle Editor. Our SFM particles guide covers where effect files live.
- Renders. A checkerboard in the viewport will appear in the export too. Fix it before you queue a long render with our best SFM render settings.
Preventing Missing Textures in Future Projects
A few habits stop most SFM missing textures before they start. They matter most when you port or share your own models.
Name materials cleanly
Use short, lowercase names with no spaces or dots, and match each one to its VMT file name.
Mirror the folder path
Place VMTs and VTFs in the exact folder that $cdmaterials names, under materials.
Keep paths relative
Write every $basetexture relative to materials, with no drive letters and no extension.
Ship both folders
When you share a model, include the materials folder alongside the models folder.
Test in a clean session
Load the model in a fresh session and read the console before you start animating.
SFM Missing Textures FAQs
Why is my SFM model purple and black?
The purple and black checkerboard means SFM loaded the model but could not find one of its materials or textures. A VMT file is missing, sits in the wrong folder, or points to a VTF that does not exist. Fix the paths and the textures return.
What is the difference between missing textures and the red ERROR model?
The checkerboard means the model loaded but a material is missing. The red ERROR model means SFM could not find the model file itself. Fix materials for the first problem, and fix the model path or files for the second.
Where do I put materials for SFM models?
Put them inside the materials folder of a mod folder SFM loads, such as game\usermod\materials. Keep the subfolders exactly as they came, so the paths set by $cdmaterials still match.
How do I find which texture is missing in SFM?
Open the console from the Windows menu, then load the model again. SFM lists the materials it could not find, with their full paths. Compare each path with the files on disk.
Why are my Workshop models missing textures?
The item may not have finished downloading or syncing, or it may need a separate texture pack. Close SFM, let Steam finish, and relaunch. If that fails, resubscribe and read the item description for dependencies.
Do I need to restart SFM after fixing textures?
Restarting is the most reliable way to make SFM read the fixed files. The console command mat_reloadallmaterials can work, but Valve warns it may cause artifacts, and community users report mixed results with edited textures.
How do I use textures from other Source games in SFM?
SFM only loads its own mod folders, so extract the materials and models from that game into a new folder inside SourceFilmmaker\game. Then enable that folder in Edit Search Paths from the SDK launcher and restart SFM.
Can VTFEdit fix SFM missing textures?
VTFEdit fixes textures that are damaged or saved in the wrong format. It cannot fix a wrong path. Check the VMT paths first, then use VTFEdit to open, check and re-export the VTF if the path is correct.
2 thoughts on “SFM Missing Textures Fix: Purple and Black Checkerboard Errors”