
Quick Answer
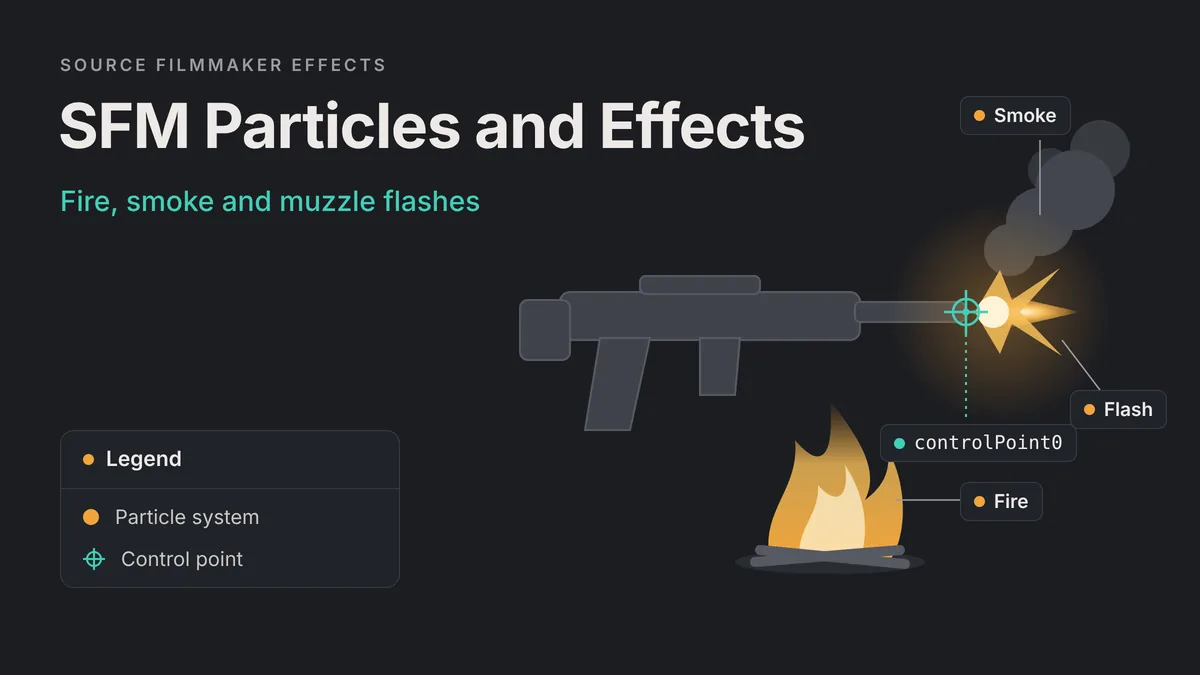
SFM particles are prebuilt effects such as fire, smoke, sparks, explosions and muzzle flashes, stored in .pcf files. Add one by creating an animation set for a new particle system in the Animation Set Editor, then pick the file and system name and set the start time, emission duration and lifetime. Lock controlPoint0 to a weapon or prop so the effect follows it.
Preview the effect
Open the Particle Editor, browse a .pcf file and note the exact name of the system you want.
Create the animation set
In the Animation Set Editor, add an animation set for a new particle system and pick that file and system.
Set its times
Enter the start time, emission duration and lifetime, then move the effect into place in the scene.
Attach and render
Lock controlPoint0 to the object that emits the effect, then check it in a short test render.
How Particle Systems Work in SFM
A particle system is a recipe for many small sprites that are born, move and die. Source games store these recipes in particle files with the .pcf extension. One .pcf file usually holds many systems, and each has its own name. SFM reads the same files the games use, so Team Fortress 2 effects are ready to use from day one.
The Parts of Every Particle System
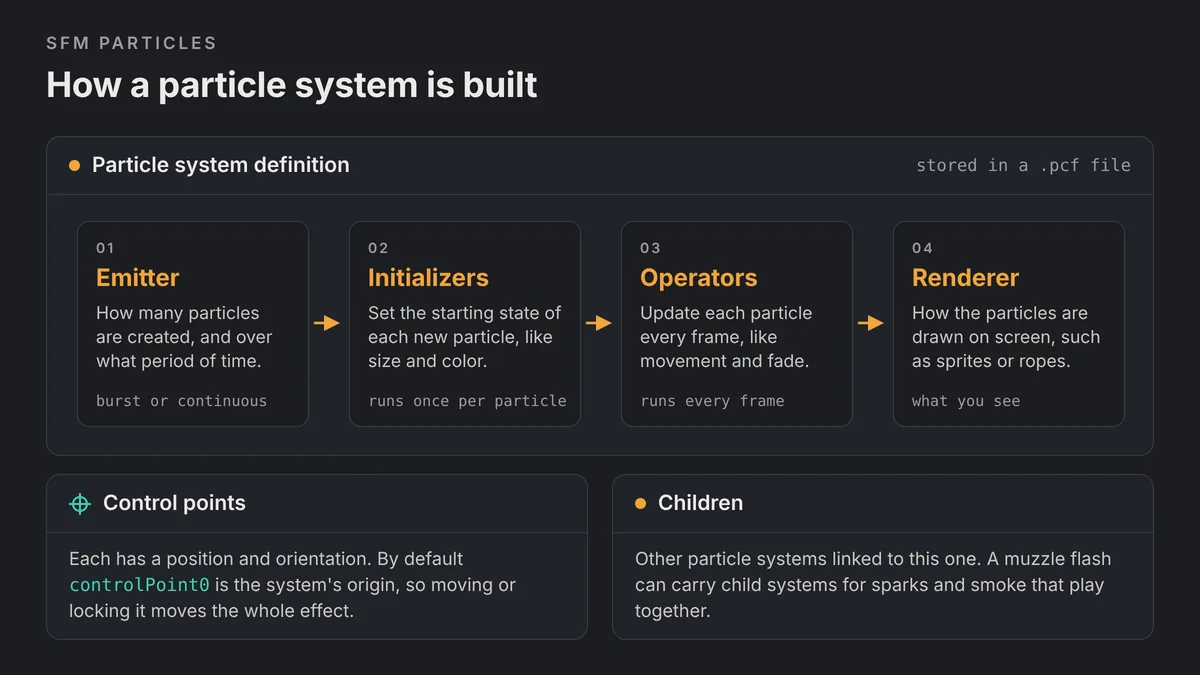
Valve splits each system into a few building blocks. Knowing them helps you guess why an effect behaves the way it does, and where to look when it misbehaves.
| Part | What it does | Why it matters in SFM |
|---|---|---|
| Emitter | Decides how many particles are created and over what period | A burst fires once, while a continuous emitter keeps going for the emission duration |
| Initializers | Set the starting state of each new particle | Size, color, lifetime and start position come from here |
| Operators | Act on every particle for each frame it exists | Movement, fading and decay happen here |
| Renderer | Decides how the particles are drawn | Sprites, ropes and other draw styles |
| Children | Other systems linked to this one | One effect can play sparks, smoke and glow together |
Control Points
Control points tell a system where to play. Each one has a position and an orientation. By default, control point 0 is the origin and orientation of the whole system. In SFM it appears as controlPoint0 inside the particle’s animation set. Move it, and the whole effect moves with it. Some systems also read extra control points, for example to set the far end of a beam.
Other settings decide whether a system is drawn at all. A system is not rendered when its bounding box is out of view, and it can also have a maximum draw distance. Valve lists these in its particle system properties reference, and several of them come back in the troubleshooting section below.
How to Add a Particle System in SFM
Adding an effect takes two stages. First you find the exact system name. Then you create an animation set for it in the current shot.
Find the Effect in the Particle Editor
SFM ships with a Particle Editor for previewing effects. Steam community guides open it from the Windows menu, then use File and Open to browse to a game’s particles folder, such as tf/particles for Team Fortress 2 effects. Open a .pcf file, click through its systems and preview each one. Write down the file name and the system name you want. When you are done, return to SFM through the editor’s Tools menu.
Create the Animation Set
In the Animation Set Editor, open the Add menu in the top-left corner, or right-click an empty area. Choose the option that creates an animation set for a new particle system. Browse to the .pcf file and pick the system name from the list. Valve’s guide to adding objects in SFM confirms that the same dialog sets three timing values:
- Start time. When the system begins, in the shot’s time.
- Emission duration. How long the emitter keeps creating new particles.
- Lifetime. How long the system lives in total. Community users suggest making it a little longer than the emission so the last particles can fade out.
New objects are added near the scene camera. Select the effect in the Animation Set Editor and move it into place with the move manipulator. Remember that animation sets belong to one shot. An effect added to one shot does not appear in any other.
Edit Start, Stop and End Times Later
Timing is rarely right on the first try. Right-click the particle system’s animation set and choose Edit Particle System Start/Stop/End Times. You can then shift the effect without rebuilding it. This is the main tool for syncing effects to the action.
Fire and Smoke Effects
Fire and smoke are usually continuous systems. They keep emitting for as long as the emission duration allows. That makes them easy to use for campfires, burning wreckage and smoking chimneys.
Fire
- Set the emission duration to cover the whole shot if the fire should burn throughout.
- If the flames take time to build, start the system earlier than the action you want to show. They will look established when the camera reaches them.
- Pair the fire with a warm light. Most fire effects do not light the scene around them by themselves. Our SFM lighting guide covers light color, falloff and flicker.
Smoke
Smoke reads best when it moves slowly and stays partly transparent. Place it behind or above the subject rather than in front of a face. Thick smoke between the camera and the character hides your animation.
Many fire and explosion effects already include smoke as a child system. Preview the full effect before you stack a separate smoke system on top. Also check the scale, since game effects can look too small or too large next to your models. Community advice for resizing is to edit a copy of the system in the Particle Editor and adjust its size-related initializers, including those in its children.
Explosions
Explosions are burst effects. Most of the action happens in the first few frames, and then smoke and debris fade out. The Team Fortress 2 particles folder includes explosion files such as explosion_high.pcf, plus building damage effects in buildingdamage.pcf.
- Start the system a frame or two before the impact, so the flash peaks on the hit frame.
- Give it enough lifetime for the smoke to clear naturally. A short lifetime makes debris vanish in mid-air.
- Add a light that spikes on the blast frame and decays over the next few frames. The flickering light section below uses the same method.
- Add a little camera motion after the blast. Our SFM camera tips explain how to key the shot camera and use motion blur.
Syncing SFM Particles to Weapon Fire: Muzzle Flashes
Muzzle flashes are the most common SFM particles in action scenes, and the most fiddly. Team Fortress 2 keeps them in muzzle_flash.pcf. Community users report better results with this file than with the dx80 fallback version.
One community animator sums up the core rule well: every muzzle flash is a separately timed particle. That is how the games handle it, and it keeps each flash in sync with the audio.
Place the Flash at the Muzzle and Lock controlPoint0
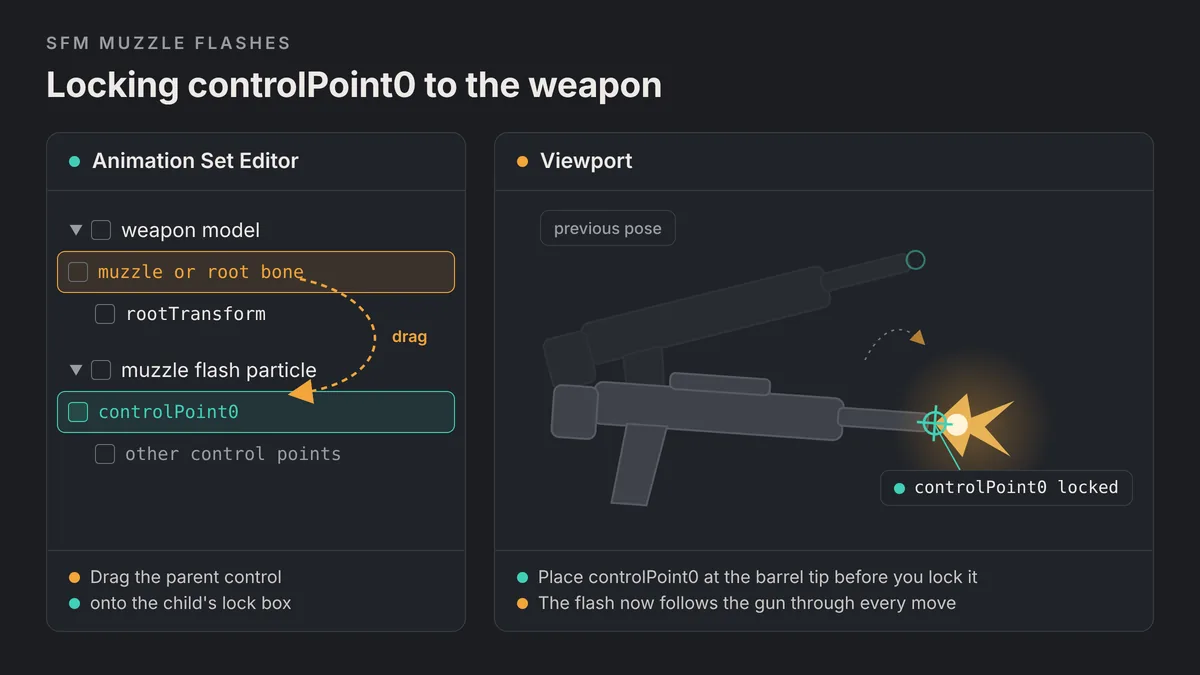
Position the system first, then lock it. Locking a misplaced control point only makes the mistake follow the gun.
- Pose the weapon on the first frame of the shot.
- Select the particle’s
controlPoint0and move it to the tip of the barrel. Rotate it so the flash points along the barrel. - In the Animation Set Editor, drag the weapon’s control onto the lock box beside
controlPoint0. Valve’s lock documentation describes it this way: drag the parent control onto the child’s lock box. The box turns into a padlock. - Scrub through the shot. The flash should stay on the barrel as the character moves.
Which weapon control should be the parent? Community users usually lock controlPoint0 to the weapon’s rootTransform or to a bone near the muzzle. If the weapon is already attached to a hand, locking to the weapon keeps the whole chain together. Our SFM rigging guide explains how rigs change the controls you see.
Time One Flash per Shot
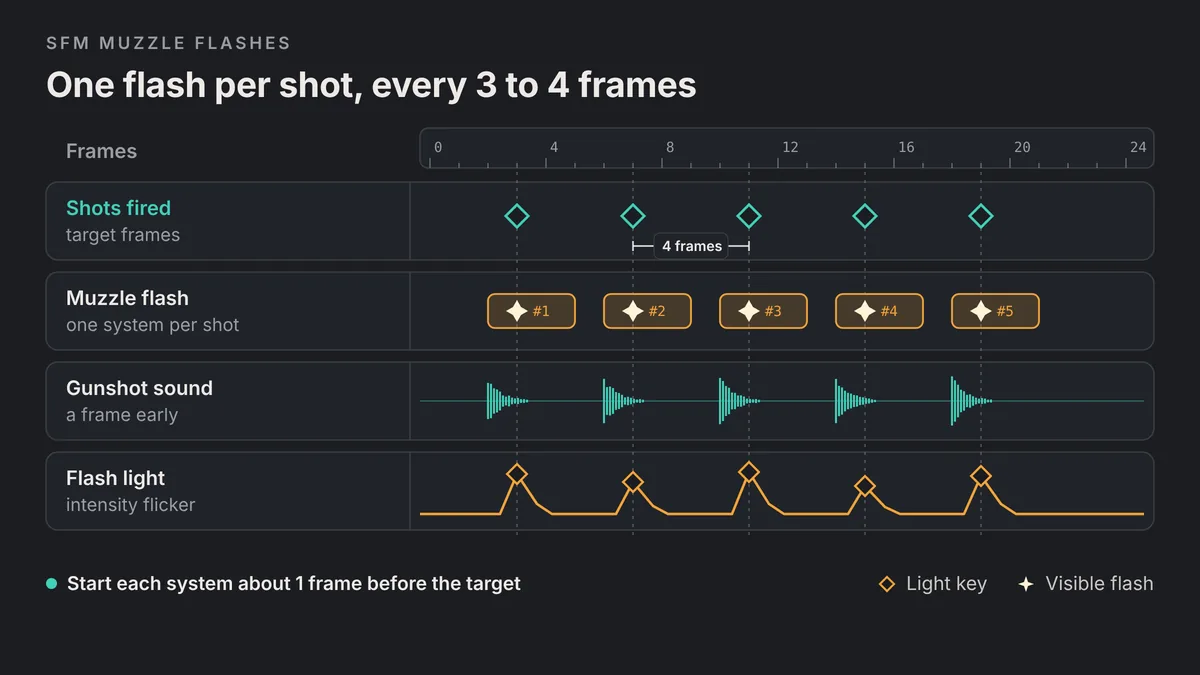
Most muzzle flash systems are built to fire once. They are bursts, not loops. So each shot needs its own particle system with its own start time.
- Find the frame where each shot fires. Scrub slowly, one frame at a time. Community users note that a flash lasts only a few frames and is easy to skip past.
- Set the start time a frame or two before that frame. This community workaround helps the flash appear on the right frame.
- For an automatic weapon, add a separate system for each shot. Space the start times 3 to 4 frames apart, then adjust the gap to match the fire rate you want.
- Keep each lifetime short, so neighboring flashes never blur into one smear.
Constant Flashes for Very Fast Weapons
For very high fire rates, such as the TF2 Minigun, a constant flash can replace single shots. Community users point to muzzle_minigun_constant for this. It is a continuous system, so set the emission duration to cover the whole burst. Make the lifetime a little longer so the last particles fade out.
One community report says this system was missing some operators and initializers in their copy. Preview it in the Particle Editor first. Constant flashes are not synced to individual shots, so they suit wide or fast shots better than close-ups.
Sync the Gunshot Sound
Add the gunshot sound and place each one about a frame before the time you set for the flash. Community animators use this offset to make shots feel tight. Then play the shot at full speed and nudge any shot that feels late.
Selling the Flash With a Flickering Light
A muzzle flash particle is bright, but on its own it rarely lights the gun, the hands or the face. A short burst of light does. That is what makes a scene look lit by gunfire rather than decorated with it.
- Create a light and place it just in front of the muzzle. Lock it to the weapon the same way as
controlPoint0. - Give it a warm orange color and a short range, so it lights the shooter and nearby surfaces only.
- Key the intensity to zero on the frames between shots.
- On each shot frame, key a high intensity, then bring it back to zero within a frame or two.
- Vary the peak a little from shot to shot. Identical spikes look mechanical.
Spikes are easier to shape in the Graph Editor than in the Motion Editor. If curves are new to you, start with our SFM Motion Editor and Graph Editor guide. Also test whether the flash light needs shadows at all. A bright, unshadowed light is often enough for a single frame, and it renders faster.
Using Workshop Particles
The Steam Workshop offers custom particle packs that go far beyond the stock TF2 effects. After you subscribe, community users report that the files land in SourceFilmmaker\game\workshop\particles. Browse there in the particle system dialog, just as you would for game files. Our guide to importing SFM models from the Steam Workshop covers subscribing and finding downloaded content.
- Read the item description first. Many packs list their exact system names.
- Preview each effect in the Particle Editor before you build a shot around it.
- Test a render with motion blur early. Community users report that some Workshop particles break when motion blur is on.
Full SFM Muzzle Flash Workflow, Step by Step
This walkthrough assumes a character holding a weapon and a shot camera that is already framed.
Animate the weapon first
Finish the body and weapon motion, so the firing frames will not move later.
Mark each shot frame
Scrub slowly and note every frame where the weapon fires.
Add the first flash
Create an animation set for a new particle system and pick a flash from muzzle_flash.pcf.
Place and lock it
Move controlPoint0 to the barrel tip, aim it along the barrel, then lock it to the weapon.
Set its times
Start it a frame or two before the shot frame and keep the lifetime short.
Repeat for every shot
Add one system per shot, spaced to match the fire rate, often 3 to 4 frames apart.
Add sound and light
Place each gunshot about a frame early and key a flickering light on every shot frame.
Run a test render
Render the section with your final motion blur settings and fix any missing flashes.
Troubleshooting SFM Particles
Most particle problems come down to time, visibility or position. Work through the checks in order before you rebuild anything.
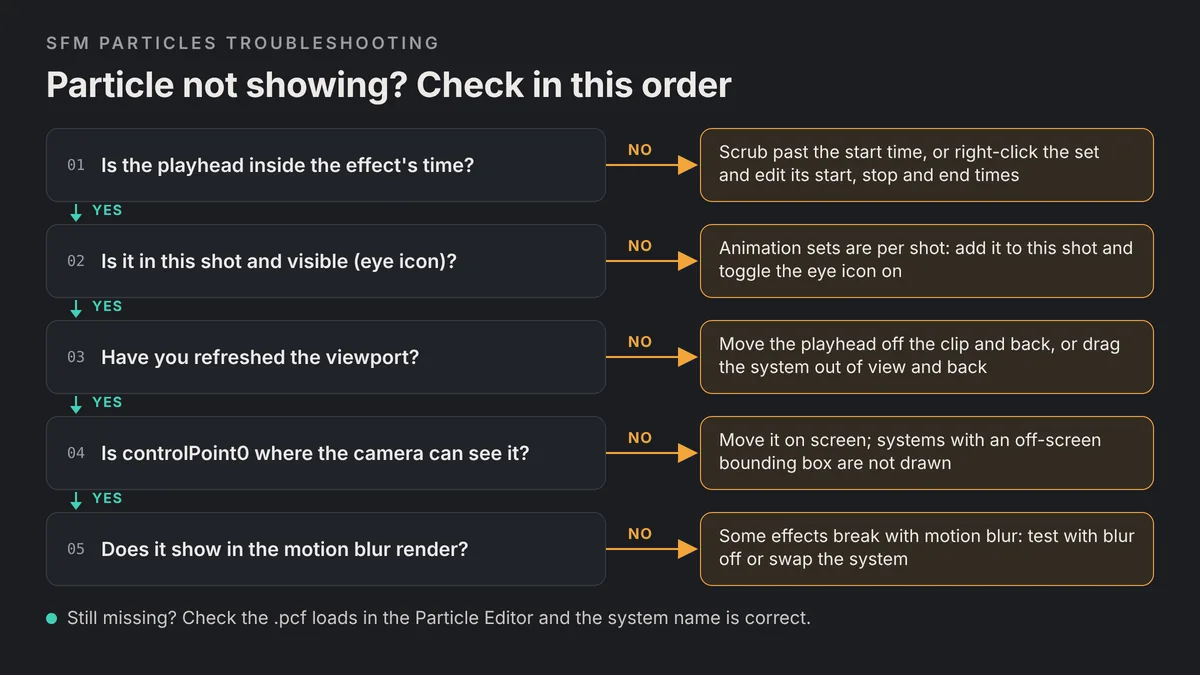
If an effect stops partway, it usually ran out of emission duration or lifetime. Some systems also have a freeze setting that halts the simulation after a set number of seconds, so check it in the Particle Editor. If an effect looks smeared or doubled only in the export, render one frame with motion blur off. A clean result points to an effect that does not handle motion blur well.
| Problem | Likely cause | Fix |
|---|---|---|
| Effect never appears | Playhead is outside the start and end times | Scrub past the start time or edit the times |
| Appears only after scrubbing | The viewport has not refreshed the simulation | Move the playhead off the clip and back |
| Missing in another shot | Animation sets belong to one shot | Add the system to that shot as well |
| Vanishes when the camera turns | Bounding box out of view or past draw distance | Keep the effect on screen and closer to the camera |
| Stops partway through | Emission, lifetime or freeze time ends early | Extend the times or check the freeze setting |
| Flash drifts off the gun | controlPoint0 is not locked | Lock it to the weapon control |
| Flash lands on the wrong frame | Start time equals the shot frame | Start it a frame or two earlier |
| Smeared or broken in the export | Effect reacts badly to motion blur | Test with blur off or swap the effect |
Render Settings and Performance for Particle Scenes
Dense particle scenes can slow down both the viewport and the export. A few habits keep the work fast without hurting the final image.
- Turn off motion blur and depth of field while you time effects. Switch them back on for the final export.
- SFM uses progressive refinement to average many samples per frame for motion blur, depth of field and soft shadows. Every sample costs time, so lower the counts while testing.
- If you edit a system, its maximum particle count caps how many particles can exist at once. Lower it on dense smoke if previews crawl.
- Hide effects you are not working on with the eye icon in the Animation Set Editor.
- Export an image sequence rather than a movie file, so a crash on a heavy frame does not cost the whole shot.
Our best SFM render settings guide explains sample counts and resolution in detail. When the frames are done, follow our guide to rendering SFM to MP4 to turn the image sequence into a video.
SFM Particles FAQs
How do I add particles in SFM?
In the Animation Set Editor, open the Add menu or right-click empty space and create an animation set for a new particle system. Browse to a .pcf file, pick the system name, and set the start time, emission duration and lifetime. Then move the effect into place.
Where are SFM particle files stored?
Particle systems live in .pcf files inside each game’s particles folder, such as tf/particles for Team Fortress 2 effects. Community users report that Workshop particle packs download to the SourceFilmmaker\game\workshop\particles folder.
Why is my particle effect not showing in SFM?
Check that the playhead is inside the effect’s start and end times and that the system was added to the current shot. If it still does not appear, move the playhead off the clip and back to refresh it, and make sure the effect is on screen.
How do I attach a muzzle flash to a gun in SFM?
Move the particle’s controlPoint0 to the tip of the barrel and aim it along the barrel. Then drag the weapon’s control onto the lock box beside controlPoint0 in the Animation Set Editor. The flash will follow the gun as it moves.
How do I make a muzzle flash fire more than once?
Most muzzle flash systems fire once, so add one particle system per shot and space their start times to match the fire rate. For very fast weapons, a constant system such as muzzle_minigun_constant can play for the whole burst.
Why do my particles look wrong in the final render?
Some effects, especially Workshop particles, do not handle motion blur well. Render a test frame with motion blur off. If the effect looks right, lower the blur or replace the effect for that shot.
Can I change the size or color of an SFM particle?
Yes, by editing a copy of the system in the Particle Editor. Size and color usually come from initializers, so adjust those, including any inside child systems. Working on a copy keeps the original effect intact.