
Quick Answer
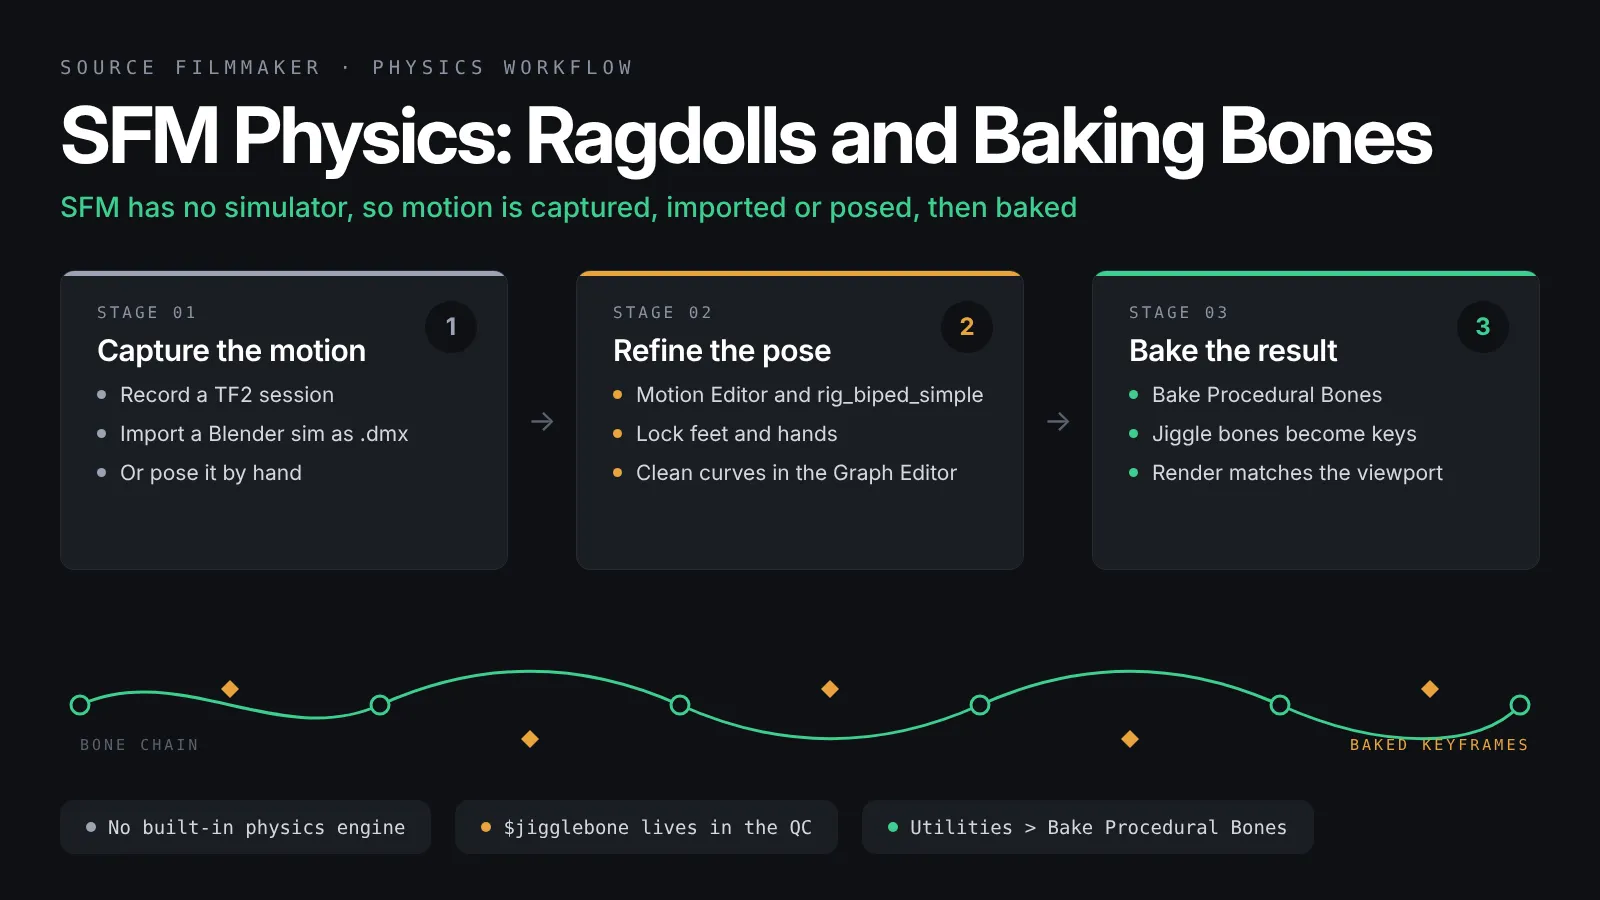
SFM physics is not a built-in simulator, so there is no button that turns on gravity, cloth or rigid bodies. Physics motion is recorded from the Source engine during gameplay, simulated in another program such as Blender and imported, or animated by hand. Jiggle bones add secondary motion, and Bake Procedural Bones turns that live jiggle into editable keyframes.
Ask in any Source Filmmaker community how to “turn on physics” and the honest answer is that there is nothing to turn on. SFM physics does not exist as a simulator inside the program. There is no button that drops a character and lets gravity take over, and there is no cloth or rigid body solver hiding in a menu. What SFM does have is a very good system for recording, importing, posing and baking motion that was simulated somewhere else, plus procedural jiggle bones that come with the model itself. This guide explains where ragdoll motion really comes from, how to shape it in the Motion Editor, and how Bake Procedural Bones turns live jiggle into keyframes you can edit.
Keep one idea in mind throughout. Every physics effect you see in a finished SFM film was either recorded from the Source engine during gameplay, simulated in another program and imported, or animated by hand and then baked.
The short version:
Get the motion from a real source: record a Team Fortress 2 session for ragdolls, import a baked Blender simulation as a .dmx animation, or pose the movement by hand.
Refine it in the Motion Editor with the rig_biped_simple rig, lock the contact points, and clean the curves in the Graph Editor.
Let the model’s $jigglebone definitions add secondary motion, then right-click the animation set and choose Utilities, Bake Procedural Bones so the jiggle becomes editable keyframes.
Bake last, save a copy of the session before you do it, and render at the same frame rate you animated at.
Why SFM Physics Is Not a Built-In Simulator
Source Filmmaker was built as a film tool for the Source engine, not as a physics sandbox. It plays back animation, lights it and renders it. The engine’s physics code runs during a game session, which is why gameplay recording captures ragdolls so well, but the editor itself never simulates anything on the timeline.
What the engine does and does not do inside the editor
Inside a shot, SFM reads keyframes and curves and poses bones from them. The only motion it generates on its own comes from procedural bones, which are small spring systems the model author compiled into the .mdl. Those bones react to the movement of their parent bone, so a tail swings when the hips move, but nothing in SFM calculates collisions, gravity or momentum for the whole character.
Garry’s Mod style posing is a different tool
Many people arrive from Garry’s Mod, where ragdolls can be dragged around under live physics. SFM does not record Garry’s Mod, so that posing workflow does not transfer directly. Community conversion tools exist, but the dependable routes are the three sources below. If you are weighing SFM against a full 3D package for this kind of work, our SFM vs Blender comparison explains where each one wins.
Where Ragdoll Motion Actually Comes From
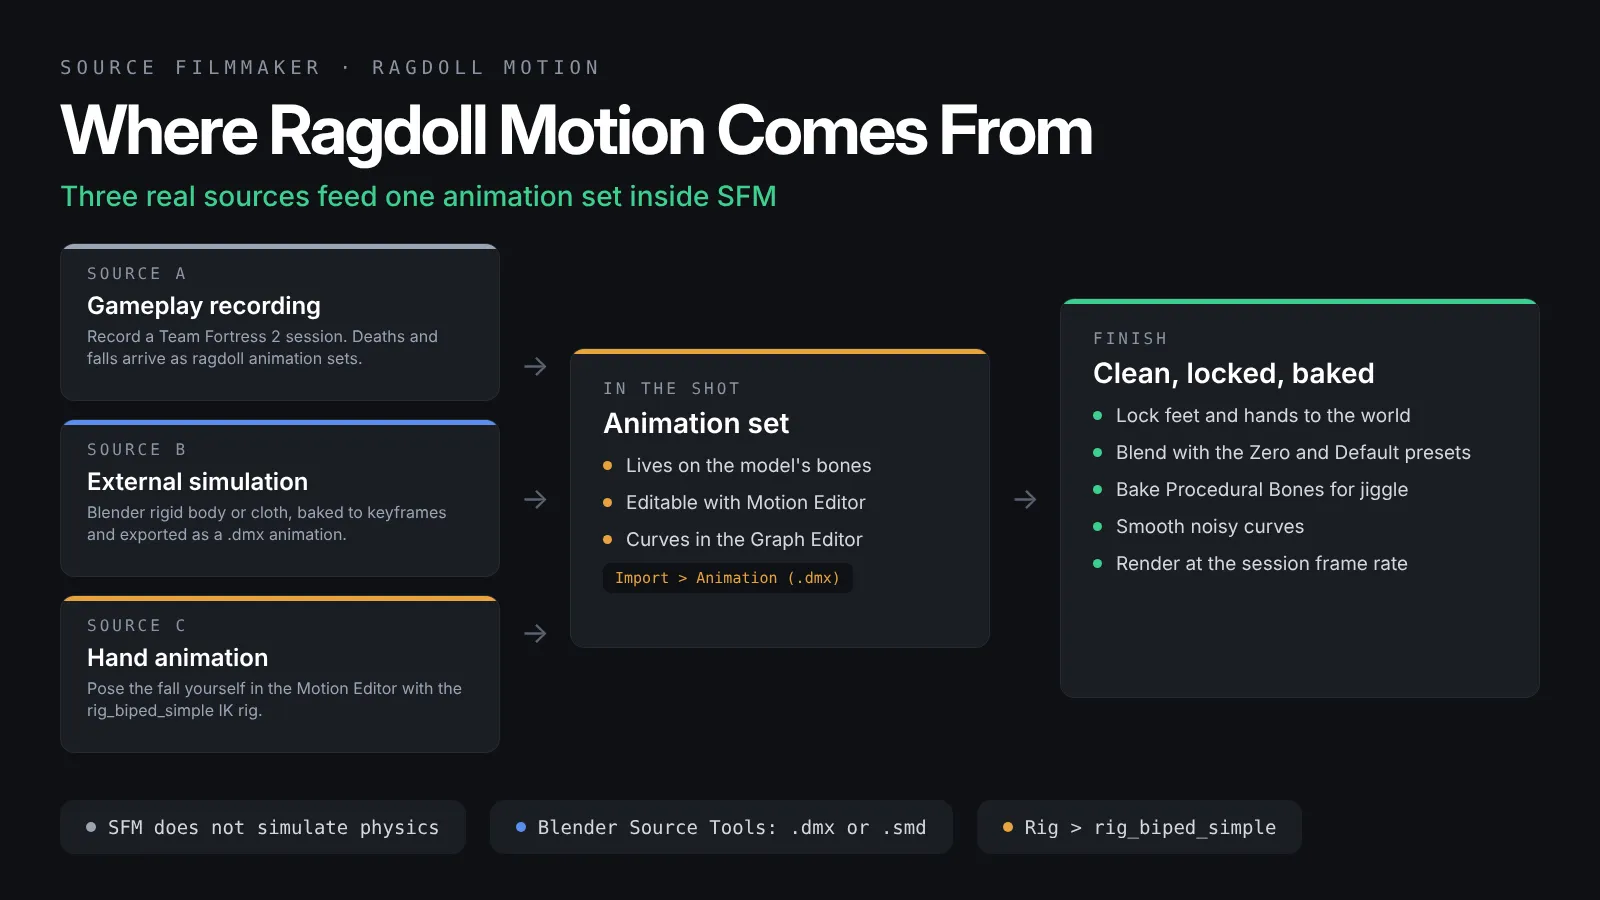
There are three practical sources for SFM physics, and most projects mix at least two of them.
Recording a game session
SFM can launch a mounted game, most often Team Fortress 2, and record what happens. Press the red Record button beside the timeline in the Clip Editor, pick a map, and play. When you stop, SFM turns the session into a shot with an animation set for every player, weapon and ragdoll it saw. Deaths, explosions and falls arrive as real engine physics, already converted to keyframes. The recording can look jittery, since it captures the game’s own interpolation, so expect to smooth it afterwards.
Importing a baked simulation
Any program that can bake a simulation to bone keyframes and export a Source animation can feed SFM. Blender with the Blender Source Tools is the usual choice. The result is a .dmx or .smd file that you load by right-clicking the model’s animation set and choosing Import, then Animation. The pipeline section below covers the details.
Posing the fall by hand
For a single character hitting the floor, hand animation is often faster than any pipeline. Apply the rig_biped_simple rig, block the key poses, and let the Motion Editor’s blending do the in-betweens. Our SFM rigging guide shows how the IK rig is attached and what each handle controls.
| Source | Best for | Effort | Main drawback |
|---|---|---|---|
| Gameplay recording | Deaths, explosions, crowds of ragdolls | Low | Jitter and limited control over the result |
| Blender simulation | Props, debris, cloth, hair chains | High | Setup time and bone naming must match |
| Hand animation | One hero character, stylised falls | Medium | Weight and timing depend on your skill |
| Jiggle bones | Tails, ears, straps, ponytails | Very low | Only moves what the model author defined |
Shaping Ragdoll Poses in the Motion Editor
Whatever the source, the motion ends up as controls in the Animation Set Editor, and the Motion Editor is where you push it around. If the two editors are new to you, read our Motion Editor and Graph Editor guide first.
Rig scripts and IK handles
Right-click the animation set, open Rig, and choose rig_biped_simple. The script adds IK handles for the hands and feet, so a limb stays planted while the body moves. For a collapse, drag the hip control down and the knees fold naturally. Detach the rig again before importing new animation, because imported keyframes land on the bones, not on the rig handles.
Lock and unlock contact points
Sliding feet are the biggest giveaway in a hand-animated fall. Select a foot or hand control, right-click it and choose Lock, and a padlock icon appears next to its name. The locked control holds its world position while you move the rest of the body, which keeps the contact point glued to the floor. Unlock it again when the limb needs to travel. The same trick holds a hand on a railing while the body swings.
Zero, Default and the Offset trick
The Motion Editor’s preset sliders include Zero and Default. Dragging a control group toward Zero returns it to the model’s reference pose, while Default returns it to the model’s default values; sliding partway blends between the current pose and that target. This is the fastest way to calm an over-rotated ragdoll limb recorded from a game. Switch the Motion Editor into Offset mode when you want a change applied on top of the existing animation across the whole time selection, rather than replacing it. Offset mode is how you nudge a whole fall six units to the left without touching its timing.
Smoothing noisy curves in the Graph Editor
Recorded ragdolls and baked simulations produce a key on every frame. Open the Graph Editor, select the shaky channels, and use the Smooth preset over a time selection to soften them. Delete keys only where the motion is obviously wrong, and keep the impact frame sharp, because that one frame sells the hit.
Jiggle Bones and Bake Procedural Bones
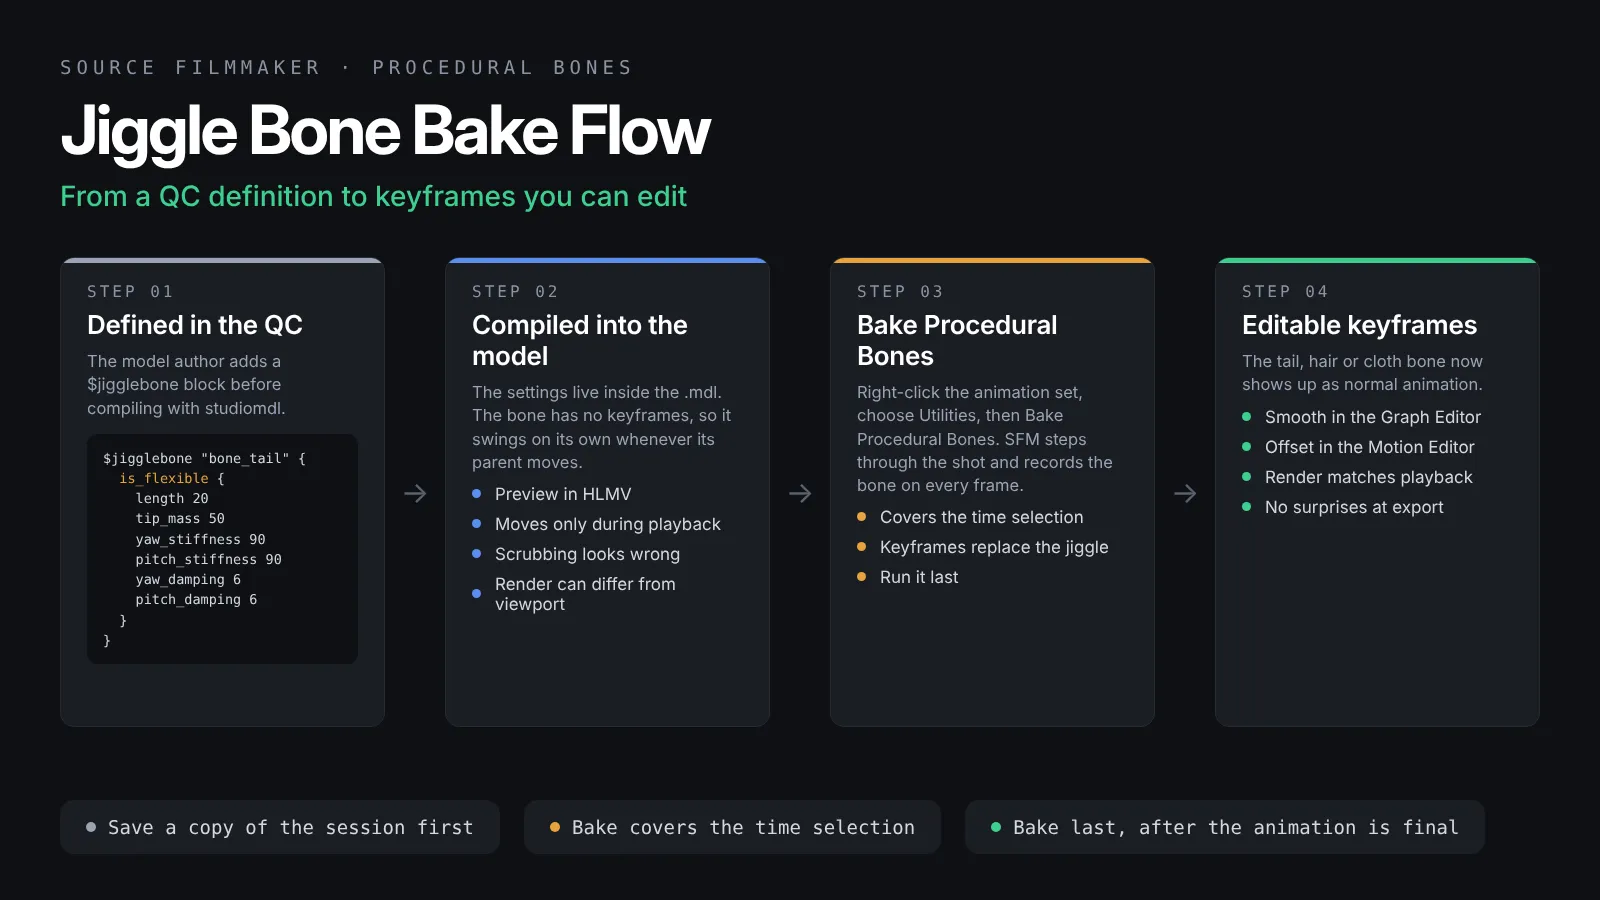
Jiggle bones are the closest thing to live SFM physics. They are defined in the model’s QC file with the $jigglebone command, compiled by studiomdl, and evaluated every frame as the parent bone moves.
How $jigglebone works in the QC
A $jigglebone block names a bone and gives it a spring. The is_flexible section sets length, tip_mass, yaw_stiffness, pitch_stiffness and matching damping values, while is_rigid makes a stiffer pendulum. Higher stiffness snaps the bone back faster, and higher damping kills the bounce sooner. Because these values live in the compiled model, you cannot edit them inside SFM. Changing them means decompiling and recompiling, which our Crowbar tutorial walks through. Half-Life Model Viewer (HLMV) is the quickest place to preview the result before you load the model into a session.
Why jiggle looks wrong when you scrub
Procedural bones are recalculated live, so they only behave when the shot plays forward in order. Scrub backwards or jump the playhead and the spring starts from wherever it was, which makes a tail snap or hang in mid-air. Rendered output can also differ from the viewport, especially with motion blur samples. None of that is a bug in your animation. It is the reason baking exists.
Running Bake Procedural Bones
Set a time selection that covers the whole stretch you care about, then right-click the animation set in the Animation Set Editor, open Utilities, and choose Bake Procedural Bones. SFM steps through the selection, evaluates the jiggle on every frame, and writes the result as keyframes on those bones. From that point they behave like any other animated bone: you can scrub them, smooth them in the Graph Editor, or offset them in the Motion Editor. Bake Procedural Bones is destructive and should be the last step, so save a copy of the session before you run it.
Importing Physics From Blender Into SFM
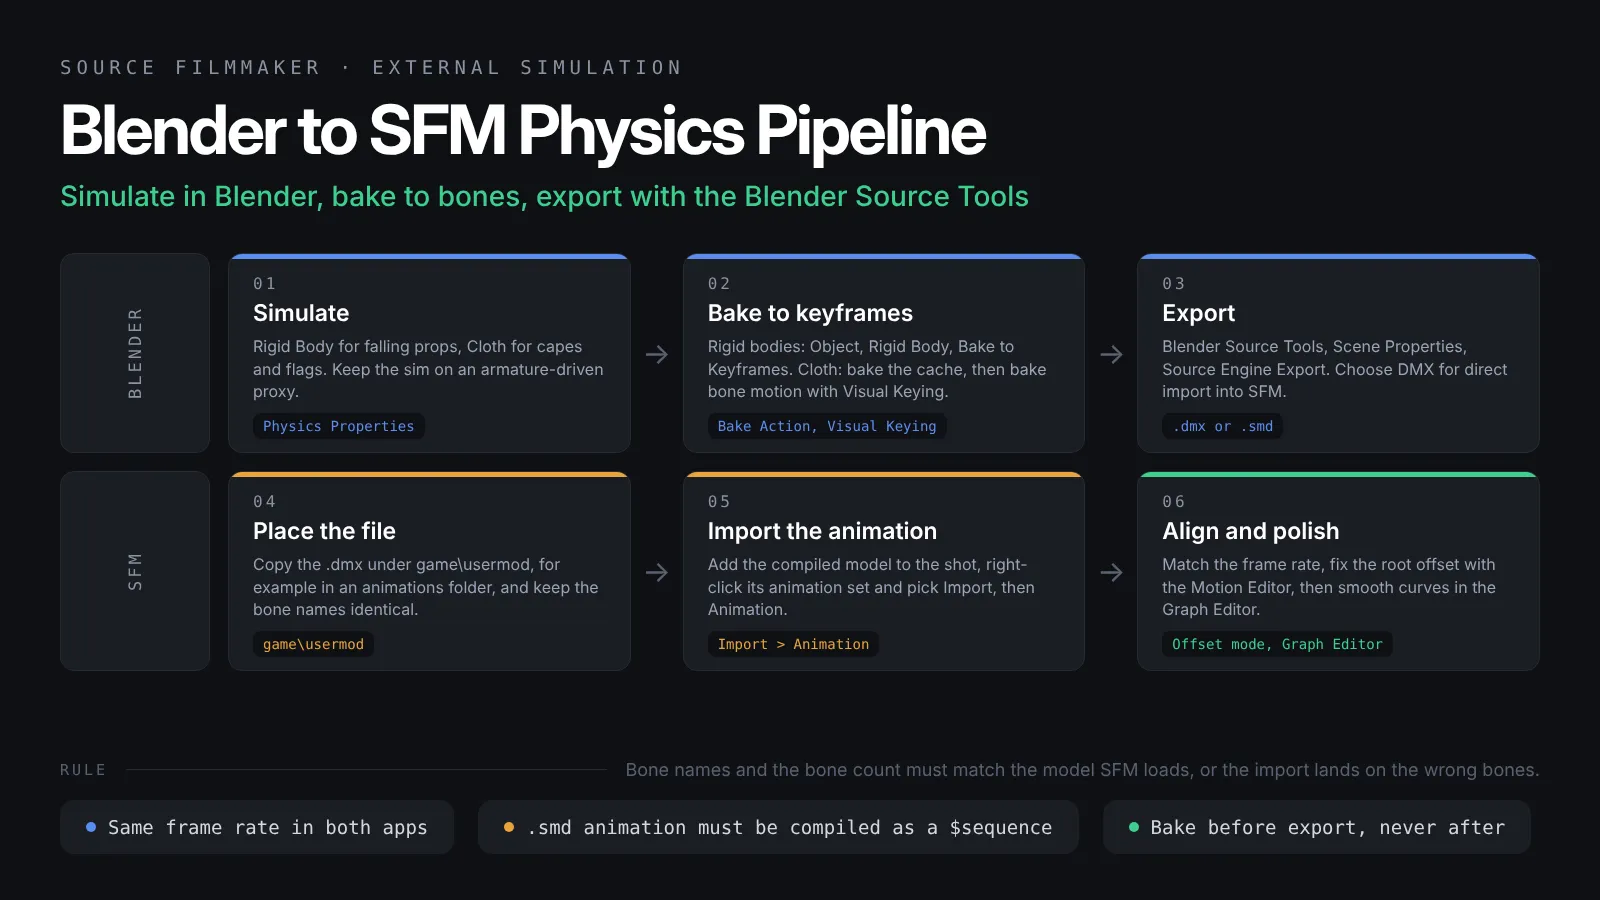
For anything beyond a swinging tail, Blender is the simulator of choice. The rule is simple: simulate, bake to bones, export, import. Our full Blender to SFM porting guide covers the model side; this section is only about animation.
Rigid body and cloth in Blender
SFM only understands bone animation and flexes, not simulated vertices. For falling props, give each object a Rigid Body, run the sim, then use Object, Rigid Body, Bake to Keyframes so the motion becomes ordinary object animation that an armature can follow. For a cape or flag, run the Cloth sim on a mesh and drive a chain of bones from it, then bake the bone motion with Bake Action and Visual Keying turned on. Match Blender’s scene frame rate to your SFM session before you bake, because a 30 fps bake dropped into a 24 fps session plays fast.
Exporting with the Blender Source Tools
With the armature selected, open Scene Properties, find the Blender Source Tools export panel, and export the action. Choose DMX when the target is Source Filmmaker, because a .dmx animation imports straight into a session. An .smd animation has to be compiled into the model as a $sequence first, which is more work and ties the motion to that one model.
Importing and aligning the animation
Copy the .dmx somewhere inside your mod folder, for example a folder you create under SourceFilmmaker\game\usermod. Add the compiled model to the shot, right-click its animation set and choose Import, then Animation, and browse to the file. The bone names and bone count must match the model SFM loads, or the keys land on the wrong bones. If the model appears in the right pose but the wrong place, fix the root in the Motion Editor with Offset mode rather than moving every key.
Common SFM Physics Pitfalls
Most problems come from the same short list.
Symptom, cause and fix
| Problem | Likely cause | Fix |
|---|---|---|
| Tail or hair freezes after baking | Time selection did not cover those frames | Undo, extend the selection, bake again |
| Jiggle snaps when scrubbing | Procedural bones evaluate live | Play forward from the start, or bake |
| Imported .dmx twists the model | Bone names or count differ from the model | Export from the same armature the model was compiled from |
| Animation plays too fast or slow | Frame rate mismatch between Blender and SFM | Match scene fps to the session fps before baking |
| Recorded ragdoll jitters | Game interpolation captured frame by frame | Smooth the channels in the Graph Editor |
| Feet slide during a fall | Contact controls not locked | Right-click the foot control and choose Lock |
| Viewport stutters with many ragdolls | Too many animation sets evaluating at once | Hide finished sets, see our SFM lag fix guide |
Order of operations that avoids rework
Finish the main body animation first, then the camera, then bake procedural bones, and only then add particles or effects that depend on the final pose. Baking early forces you to redo the bake every time the body changes. Keeping the baked bones on a separate saved session also means you can go back to the live jiggle if the director changes the timing.
Frequently Asked Questions
Does Source Filmmaker have a physics engine?
No. SFM has no physics simulator of its own. The Source engine runs physics only during a live game session, which is why recording Team Fortress 2 gameplay captures ragdolls. Inside the editor, the only self-generated motion comes from procedural jiggle bones compiled into the model. Everything else is recorded, imported from a program such as Blender, or animated by hand.
How do I make a ragdoll in SFM?
Pick one of three routes. Record a gameplay session and let the engine produce the ragdoll, import a simulation that you baked to bones in Blender and exported as a .dmx animation, or pose the fall yourself with the rig_biped_simple rig in the Motion Editor. In every case the result is an ordinary animation set that you can smooth, lock and bake.
What does Bake Procedural Bones do in SFM?
It converts the live, recalculated motion of jiggle bones into fixed keyframes. Right-click the animation set, open Utilities and choose Bake Procedural Bones with a time selection active. SFM evaluates the jiggle on every frame in that selection and writes keys, so the bones scrub correctly, render consistently and can be edited in the Graph Editor. The change is destructive, so save first.
Can I change jiggle bone settings inside SFM?
Not directly. Stiffness, damping, length and tip mass are set in the $jigglebone block of the QC file and compiled into the .mdl. To change them you decompile the model with Crowbar, edit the QC, and recompile with studiomdl. Preview the new behaviour in Half-Life Model Viewer before loading the model into a session.
Why does my imported Blender animation look twisted in SFM?
The bone names or the bone count in the exported .dmx do not match the model SFM loaded. Export the animation from the same armature the model was compiled from, keep every bone name identical, and avoid renaming or deleting bones after compiling. A mismatched frame rate can also stretch the timing, so match the Blender scene rate to the SFM session rate.
Why do jiggle bones look different in the render than in the viewport?
Procedural bones are evaluated live, and the renderer samples frames differently from the viewport, especially with motion blur and depth of field samples enabled. Baking the bones removes the difference because the renderer then reads fixed keyframes rather than recalculating the spring. Run Bake Procedural Bones as the final step before export.
Final Thoughts
Think in sources, not switches
SFM physics is a workflow rather than a feature. Record what the engine does well, import what Blender does better, and animate the hero moments by hand. Lock the contacts, blend with Zero and Default, smooth in the Graph Editor, and bake procedural bones as the very last step. Once that order becomes habit, ragdolls stop being a fight and start being a tool, and the keyboard shortcuts cheat sheet will make every one of those steps faster.
1 thought on “SFM Physics: Ragdolls, Simulation and Baking Bones”