
Quick Answer
The best SFM render settings for maximum quality are simple. Render an image sequence instead of a movie file, raise depth of field and motion blur quality only as high as each shot needs, and turn on ambient occlusion. Use the -sfm_resolution launch option for 1440p or 4K, then encode the frames into a video with an external encoder.
SFM does most of its quality work at export time. The viewport shows a fast preview, while the final render combines many samples per frame to smooth blur, edges and soft lighting. That is why the same shot can look rough in the editor and clean in the export.
This guide explains each setting in the export dialog and the render settings panel, which values give the best quality, how long they take and how to avoid common problems such as grainy blur, black frames and crashes on long renders.
Resolution
Pick 1080p, or unlock 1440p and 4K with the -sfm_resolution launch option.
Format
Export an image sequence so every frame is saved at full quality.
Samples
Raise depth of field and motion blur quality for the final frames only.
Encode
Turn the frames into a video with an external encoder for the best file.
How SFM Rendering Works
SFM renders each frame several times and blends the results. Every pass, called a sample, moves the virtual camera or lens slightly. Blending many samples creates smooth depth of field, motion blur and cleaner antialiased edges.
More samples mean better quality but longer render times. Doubling the sample count roughly doubles the time for that effect. A frame that takes two seconds at low quality can take a minute or more at the highest settings.
The viewport uses progressive refinement to preview this. When the playhead stops, SFM keeps adding samples to the still frame, so you can check focus and blur before you commit to a full export.
Resolution Settings
The export dialog offers preset sizes such as 720p and 1080p. By default, SFM caps rendering at 1080p because the internal render target is limited to that height. For most YouTube uploads, 1080p is a solid, fast choice.
To render at a higher resolution, add a launch option in Steam. Right-click Source Filmmaker in your library, open Properties and add the option below to the launch options field. Restart SFM, and larger sizes become available in the export dialog.
-sfm_resolution 2160Use 1440 for 2560 by 1440 output or 2160 for 4K. Higher resolutions use much more video memory and take longer per frame, so test a short section first. If SFM crashes or renders black frames, drop back to a lower value.
Image Sequence vs Movie File
SFM can export directly to a movie file, but the built-in video export compresses heavily and offers little control. A crash partway through can also corrupt the whole file, so you lose every frame you rendered.
An image sequence saves each frame as a separate file, such as PNG or TGA. Nothing is lost to compression, and if SFM crashes you simply restart from the last saved frame. You then combine the frames into a video in an editor or encoder.
For posters and single images, use the Poster export instead. It renders one frame at a high resolution and is the best way to make wallpapers, thumbnails and artwork.
| Export type | Best for | Pros | Cons |
|---|---|---|---|
| Image sequence (PNG or TGA) | Final animations | Lossless frames, safe to resume after a crash | Large folder of files, needs encoding |
| Movie file | Quick tests and drafts | One file, fast to share | Heavy compression, a crash ruins the file |
| Poster | Still images and wallpapers | Very high resolution single frame | Only one frame |
Frame Rate
Set the frame rate in the export dialog to match how you will publish. 24 frames per second gives a classic film look, 30 suits most online video and 60 looks very smooth for fast action and gameplay-style shots.
Higher frame rates mean more frames to render, so a 60 fps export takes about twice as long as 30 fps. Keep the frame rate the same as your session settings so animation timing and motion blur stay correct.
Depth of Field and Motion Blur Quality
These two settings have the biggest effect on both quality and render time. Each one has quality levels that set how many samples SFM uses per frame. You can set them in the export dialog or per shot on the camera.
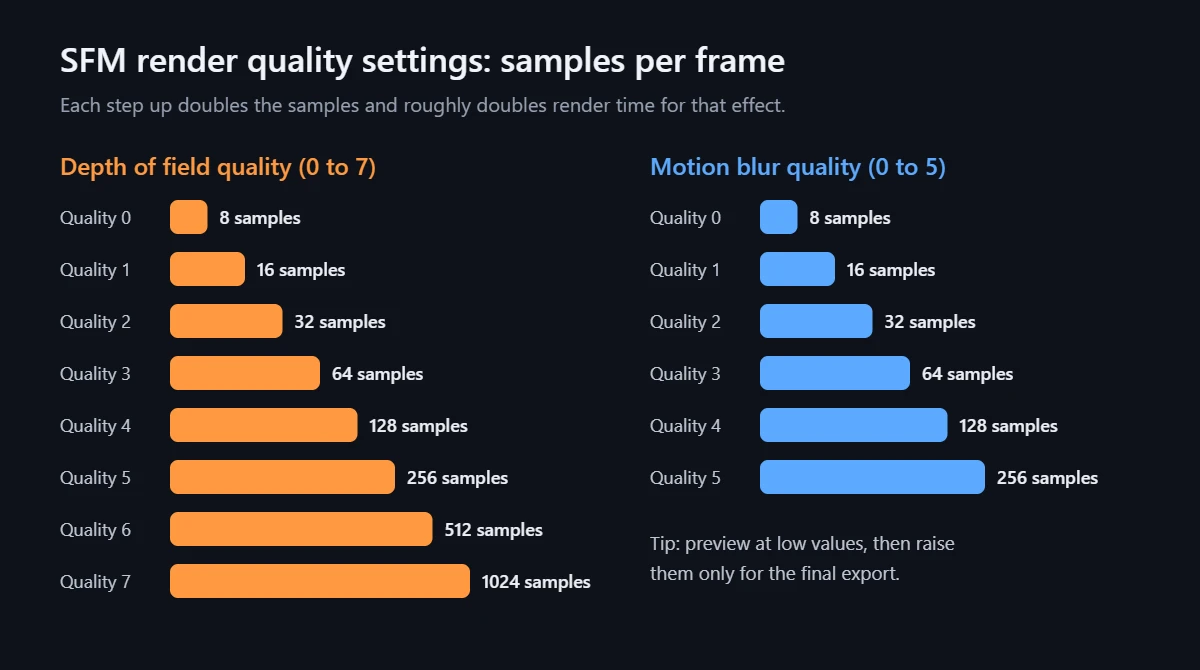
Depth of field quality runs from 0 to 7, which equals 8 up to 1024 samples. Motion blur quality runs from 0 to 5, which equals 8 up to 256 samples. Each step doubles the sample count.
You rarely need the maximum on every shot. A slow, static close-up with strong background blur benefits from high depth of field quality, while a shot with no camera blur can stay low. Raising quality only where it shows saves hours on long projects.
If blur looks grainy or dotted, the quality is too low for that shot. Raise it one or two steps and render a test frame. For camera framing and focus tips, see our guide to SFM camera tips.
Ambient Occlusion and Lighting Quality
Ambient occlusion adds soft contact shadows where surfaces meet, such as in corners, under chins and where feet touch the ground. It makes scenes look more grounded and less flat. Enable it in the render settings and preview it with progressive refinement.
Shadow quality comes from your lights. Each light with shadows enabled needs its own shadow map, and higher shadow map resolution gives sharper shadow edges. You can raise it with the launch option below, though it uses more video memory.
-sfm_shadowmapres 4096Values such as 2048, 4096 and 8192 are common. Turn off shadows on lights that do not need them, because every shadowed light adds an extra render pass. Our SFM lighting guide covers three-point setups and volumetrics.
Recommended Settings by Project Type
| Project | Resolution | Format | DoF quality | Motion blur quality |
|---|---|---|---|---|
| Quick preview | 720p | Movie file | 0 to 1 | 0 to 1 |
| YouTube animation | 1080p | PNG image sequence | 3 to 5 | 3 to 4 |
| High-end short film | 1440p or 2160p | PNG or TGA sequence | 5 to 7 | 4 to 5 |
| Poster or wallpaper | 2160p or higher | Poster | 6 to 7 | Off for still poses |
Encoding Your Image Sequence
After rendering, import the image sequence into a video editor such as DaVinci Resolve, Blender’s video editor or Adobe Premiere. Set the sequence frame rate to match your export, add your audio and export the final video.
For YouTube, H.264 or H.265 at a high bitrate is a good target. Uploading at 1440p or 4K often keeps more detail after YouTube compresses the video, even if most viewers watch at 1080p.
Keep the original frames until the project is finished. If you spot a problem, you can re-render only the affected frames instead of the whole animation.
How to Speed Up Renders Without Losing Quality
Render only what you need. In the export dialog, choose to render selected shots rather than the whole session. Lower quality settings on shots without visible blur, and disable shadows on fill lights that do not need them.
Close other programs to free up memory, and keep SFM’s resolution setting matched to your output size. Preview with a lower resolution and low sample counts, then switch to final settings only for the last export.
Long renders can run overnight. Because image sequences save each frame, you can stop and resume safely. If SFM is not installed yet, follow our guide to install Source Filmmaker on Windows.
Common Render Problems and Fixes
Black or Missing Frames
Black frames usually mean SFM ran out of video memory, often from a very high resolution or shadow map setting. Lower the resolution or shadow map size, close other programs and re-render the missing frames.
Render Looks Different From the Viewport
Check that you are rendering from the scene camera you framed, not the work camera. Also enable progressive refinement in the viewport, because the normal preview hides depth of field and motion blur.
SFM Crashes During Export
Crashes on long exports are common. Use an image sequence so you can resume, lower the quality on the shot that crashes and make sure your graphics drivers are up to date.
Best SFM Render Settings FAQs
What Is the Best Resolution to Render SFM At?
1080p is the best balance for most projects. For extra detail, add the -sfm_resolution launch option and render at 1440p or 4K, then test a short section first to check memory use.
Should I Render SFM as an Image Sequence or a Movie?
Use an image sequence for final work. Each frame is saved separately without heavy compression, and a crash does not ruin the whole render.
What Is the Highest Depth of Field Quality in SFM?
Depth of field quality goes up to level 7, which uses 1024 samples per frame. It gives the smoothest blur but takes much longer to render.
Why Is My SFM Render Grainy?
Grain or dotted blur means the depth of field or motion blur quality is too low for the shot. Raise the quality by one or two steps and render a test frame.
How Do I Render SFM in 4K?
Add -sfm_resolution 2160 to the Source Filmmaker launch options in Steam, restart SFM and choose the larger size in the export dialog.
How Long Should an SFM Render Take?
It depends on resolution, sample counts and scene complexity. Simple 1080p frames may take a few seconds each, while 4K frames with maximum blur quality can take a minute or more.
6 thoughts on “Best SFM Render Settings for Maximum Quality”