
Quick Answer
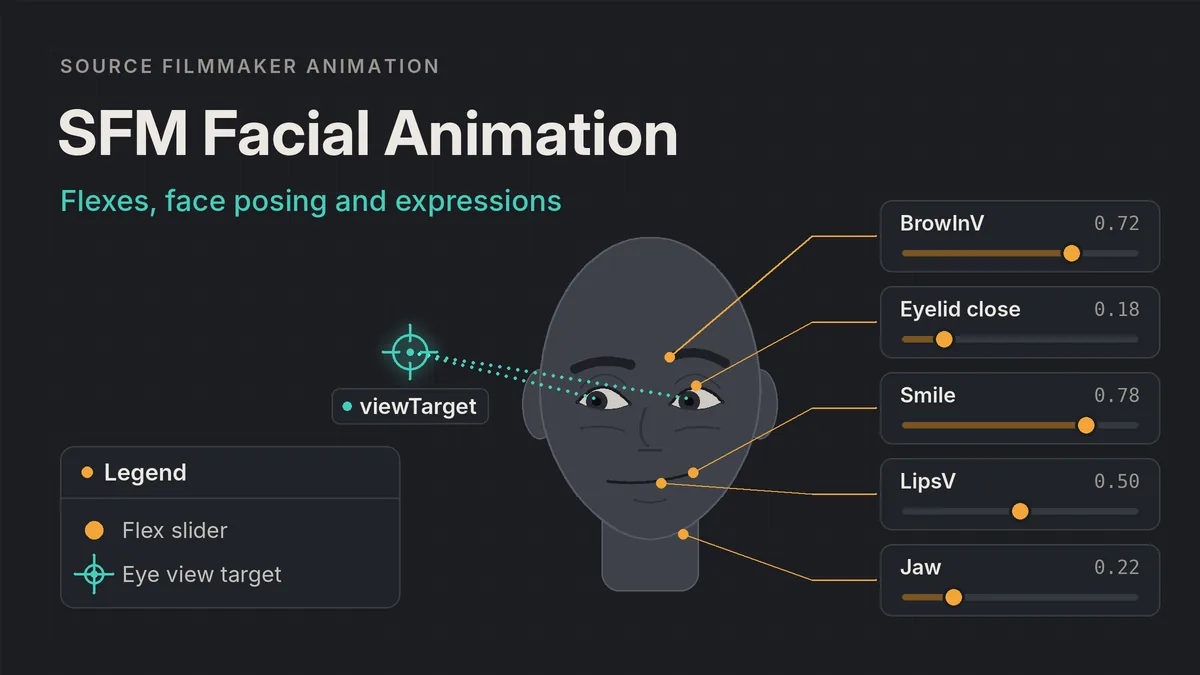
SFM facial animation is driven by flexes, sculpted shapes stored inside the model and exposed as sliders in the Animation Set Editor. Select the face controls, drag those sliders in the Controls panel, and aim the eyes with the view target. Emotion tab presets move many sliders at once. Then key the face over time in the Motion Editor and Graph Editor.
Use a model with flexes
Load a character whose face has flex controls, such as a TF2 HWM class, and frame the face with the work camera.
Select the face controls
Expand the animation set in the Animation Set Editor and select a face group so its sliders appear in the Controls panel.
Pose brows, eyes and mouth
Start from an Emotion preset or from neutral, then shape the brows, lids and mouth by hand and aim the view target.
Key it over time
Set the face at key moments, then smooth the transitions and add blinks in the Motion Editor and Graph Editor.
How Faces Work in Source Filmmaker
Body animation in SFM moves bones. Most facial animation uses flexes instead, known as shape keys or morph targets in other software. Each flex is a sculpted version of the face mesh, such as a raised inner brow, and a slider blends the neutral face toward it. Fan ports such as Fortnite SFM models vary a lot in how many face flexes they include, so check this before you plan close-ups. Flexes are built into a model when it is compiled, and our SFM compile guide explains that process.
Flexes are authored when the model is made. Source Film Making (SFM) cannot add new face shapes at animation time, so your range of expressions depends on what the modeler built.
Flexes and Flex Controllers
The slider you see is a flex controller, not always a single flex. One controller can drive several flexes, and corrective shapes can fire in the background to fix ugly overlaps when two shapes combine. You only ever touch the controller. SFM keeps each controller between 0 and 1, so you cannot push a shape past the strength the modeler gave it. Garry’s Mod faceposing can overdrive flexes. SFM cannot.
Single, Bipolar, Stereo and Multi Sliders
Face sliders do not all behave the same way. Knowing the type tells you where neutral sits before you drag anything.
| Slider type | How it behaves | Example |
|---|---|---|
| Single direction | 0 is neutral, 1 is the full shape | An eyelid close control |
| Bipolar (V or H sliders) | One shape at each end, neutral near the middle | LipsV, which closes the lips one way and opens them the other |
| Stereo | Can hold different values on the left and right side | Smile on HWM models |
| Multi | A selector picks between shapes and a second value sets intensity | multi_smile |
| Combination (preset-style) | One slider drives a whole expression | happyBig or mad on standard TF2 models |
Combination sliders are quick but blunt. Individual sliders take longer and give you real control.
Finding the Face Controls in the Animation Set Editor
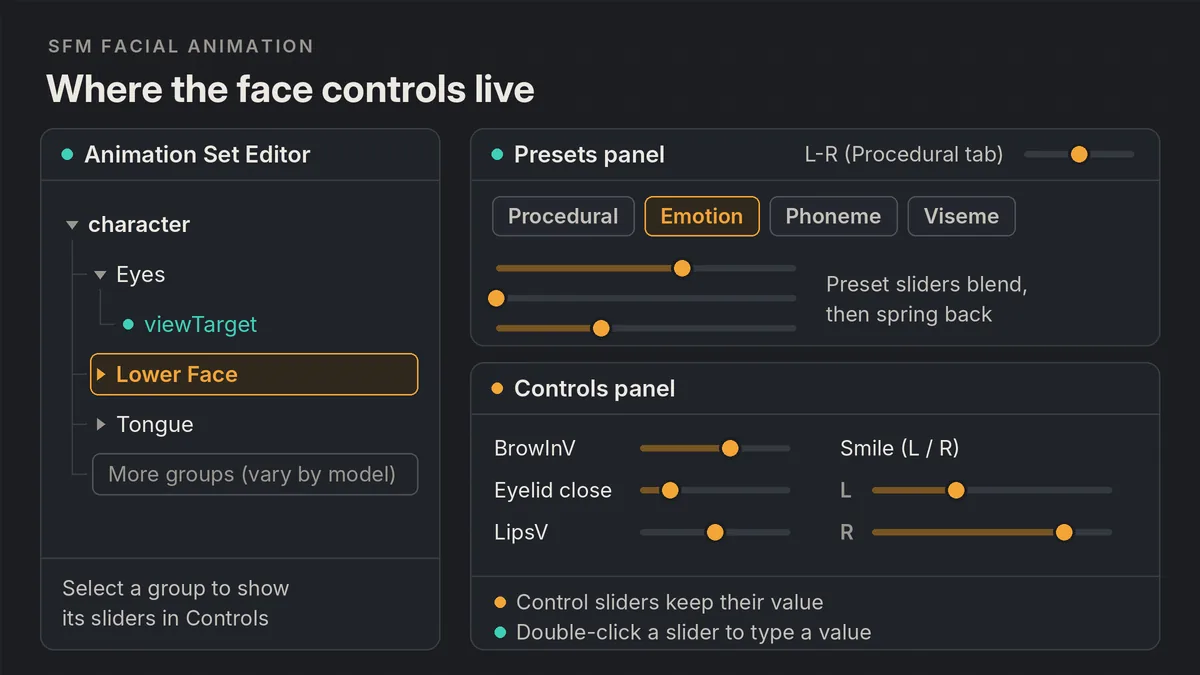
Expand the character’s animation set in the Animation Set Editor. You see a tree of control groups, and selecting a group selects every control inside it. The selected controls appear as sliders in the Controls panel. Above them, the Presets panel holds preset sliders that act on whatever you have selected.
If you select an eye or jaw item and see position and rotation values instead of a slider, it is a bone, not a flex. Bones are posed with the viewport manipulators.
Face Groups Differ by Model
Group names are set by the model, so read what your character offers rather than following a fixed list. The standard TF2 player models show a short face group with combination sliders such as happyBig, mad and painSmall. The HWM versions in the player/hwm/ folder split the face into many individual controls, including Lower Face and Tongue groups for the mouth, brow sliders such as BrowInV, and an Eyes group. Our guide to importing SFM models from the Steam Workshop covers where those models land and how to load them.
| Model type | Face controls | Best use |
|---|---|---|
| TF2 HWM class models | Many individual flex sliders plus Emotion and phoneme presets | Dialog scenes and close-ups |
| Standard TF2 player models | A few combination sliders | Wide shots and quick reactions |
| HL2-style FACS models | Individual flexes following the Half-Life 2 layout | Detailed posing; phoneme presets can be generated |
| Custom or ported models | Whatever flexes the porter built | Check each slider before planning a scene |
| Bone-based faces | Face bones, no flex sliders | Pose with manipulators or bone presets |
The Presets Panel and the Controls Panel
The two panels behave differently, and mixing them up causes confusion. A control slider stays where you drag it. A preset slider blends the selected controls toward a preset, then springs back. The Procedural tab is always there and holds tools such as Default, Smooth and Jitter. Character models add their own tabs, typically Emotion, Phoneme and Viseme. Valve explains the split on its Presets panel and Controls panel page.
For exact values, double-click a control slider and type a number.
Building an Expression From Brows, Eyes and Mouth
Before touching a slider, move the work camera close and check the pose from the angle your shot camera will use. Then work from the top of the face down.
Brows First
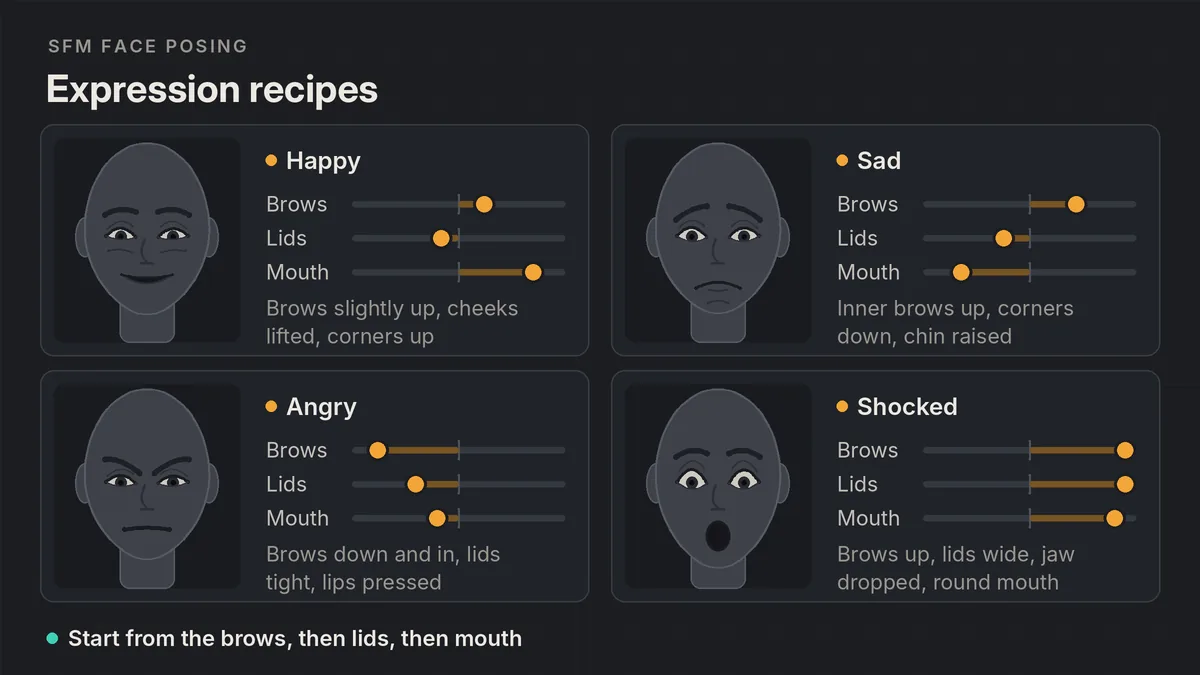
Brows carry more emotion than most beginners expect. Inner brows raised together read as worry or sadness. Brows pulled down and in read as anger or focus. One brow up reads as doubt.
Eyelids and Squint
Eyelids control intensity. Wide lids add fear or surprise. Lids lowered slightly add calm, boredom or contempt. Tightened lids with raised cheeks turn a polite smile into a real one. Look for lid close and squint controls on your model; their names and groups vary from character to character.
Mouth and Cheeks
The mouth confirms what the brows suggest. Lip corners up or down set the basic mood. The jaw adds energy: a slightly open jaw looks relaxed, a clenched jaw looks tense. For a closed-mouth smile, raise the smile control and leave the lip opening sliders near neutral so the teeth stay hidden. A smile without cheek movement looks pasted on.
Asymmetry With the L-R Slider
Perfectly symmetrical faces look like masks. The L-R balance slider in the center of the Procedural tab lets you apply a stereo control to one side more than the other. Drag it toward one side, then adjust the smile and you get a smirk. It only works on stereo controls, so some sliders ignore it, and on some models few controls are stereo at all.
| Expression | Brows | Eyes and lids | Mouth and jaw |
|---|---|---|---|
| Happy | Slightly raised | Cheeks lifted near the nose | Corners up, jaw slightly open |
| Sad | Inner brows raised | Lids slightly lowered | Corners down, chin raised |
| Angry | Lowered and pulled in | Lids tightened | Lips pressed, jaw clenched |
| Scared | Inner brows raised | Lids wide open | Mouth stretched and open |
| Shocked | Raised | Lids wide open | Jaw dropped, mouth rounder than scared |
| Disgusted | Lowered | Lids narrowed | Like anger, with less lip pressure and fewer teeth showing |
Treat these as starting points, then push the face toward the specific moment in the scene.
Aiming the Eyes With the View Target
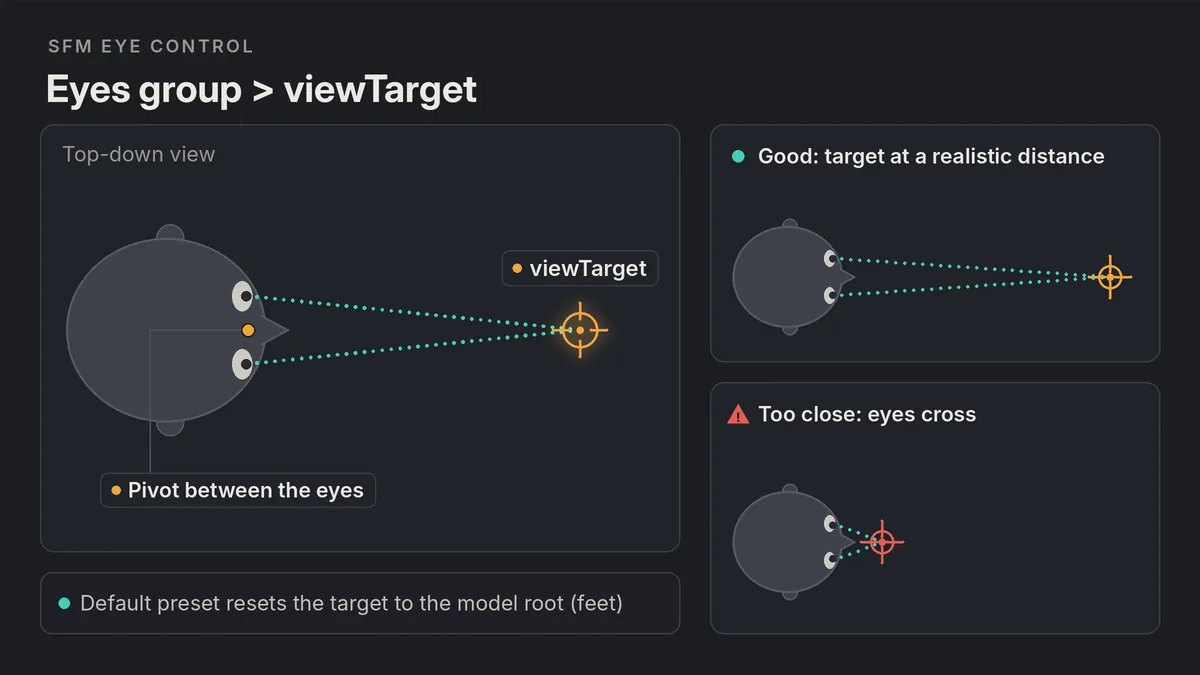
On models built for SFM, the eyes do not need to be rotated one at a time. Under the Eyes group you will find a control called viewTarget. It is a point in the scene, and both eyes turn to look at it. Move the point and the gaze follows.
To aim the eyes, select viewTarget, switch to the move manipulator, and drag the target to where the character should look. Valve’s facial animation page describes selecting the view target, framing it with the work camera and selecting all of time in the Motion Editor with Ctrl+A when you want the change to hold for the whole shot. It also suggests moving the target’s pivot to sit between the eyes, which makes aiming easier to judge.
- Place the target on what the character looks at, not on the camera, unless the shot breaks the fourth wall.
- Keep the target at a believable distance. A target very close to the face makes the eyes cross.
- If the target vanishes, the Default procedural preset sends it back to the model’s root, usually at the feet, so you will need to move it up again.
Models without a view target may have eye sliders or eye bones instead. Eye bones show position and rotation values when selected. Rotate them with the manipulator or type exact values, and rotate both eyes together so they stay parallel.
Using Emotion Presets and Saving Your Own
When face controls are selected on an HWM character, the Emotion tab shows preset sliders for whole expressions. Each preset moves many control sliders at once. Because preset sliders blend and then reset, you can stack two presets, for example a touch of sadness on top of a smile, to get a mixed expression.
Once you have built a face you like, save it as your own preset so you can reuse it across shots. The Presets panel has a Create preset option for this. Community users report that it can be greyed out when a rig script is applied to the animation set, so create face presets before attaching a rig, or on a clean copy of the character. Presets can store bone values as well as flexes, which is how bone-based faces get reusable expressions. If you want to know how rigs change the animation set, our SFM rigging guide explains what a rig adds and hides.
Keyframing Facial Animation in the Motion Editor and Graph Editor
Faces are keyed with the same tools as the body. If either editor is new to you, start with our SFM Motion Editor and Graph Editor guide.
Hold, Change, Settle
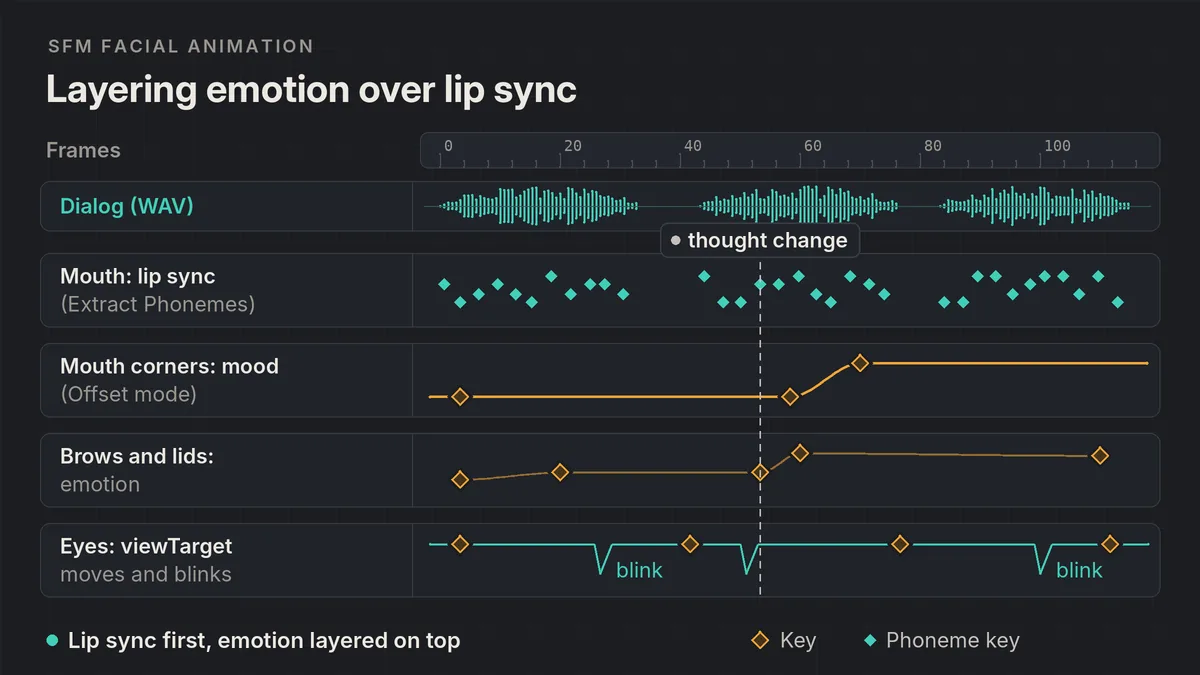
Most facial acting follows a simple pattern. The face holds one expression, changes quickly when a thought changes, then settles into the new expression. In the Motion Editor, make a time selection where the change should happen, add falloffs so it eases in and out, and drag the sliders or a preset. In the Graph Editor, check the curves for each key slider and shape the tangents so the change has a fast middle and soft ends.
Avoid changing the whole face at once. Let the brows react first and the mouth a few frames later, so the change reads as a thought rather than a switch.
Blinks and Eye Darts
A face that never blinks looks dead, even with a perfect expression. Key the eyelid close slider so the lid drops quickly and opens a little slower. Place blinks at moments of change, such as just before a head turn or when a new thought arrives, rather than on a steady beat. During long holds, small quick moves of the view target add life.
Layering Expressions With Lip Sync
Dialog scenes need both speech and emotion on the same face. The cleanest order is to build the lip sync first, then add the expression around it. Extract Phonemes writes animation onto the mouth sliders, so mouth keys you set before running it can be replaced. Our SFM lip sync tutorial covers extraction and mouth cleanup in full.
Once the mouth reads well, split the face into layers of responsibility:
- Upper face for emotion. Brows, lids and eyes carry the feeling of the line, while phoneme extraction works mainly on the mouth.
- Mouth corners for mood. Push smile or frown controls on top of the speech shapes, using Offset mode in the Motion Editor over a time selection so the existing speech motion is kept.
- Jaw for energy. A slightly wider jaw on stressed words reads as louder or more emotional speech.
- Eyes for thought. Move the view target at the start of new sentences or ideas.
Check the result at full speed. A strong smile can stop the lips closing on sounds such as “m” and “b”.
Full SFM Face Posing Workflow, Step by Step
This walkthrough assumes one character with face flexes in a lit map and a shot camera already framed. Our SFM camera tips help you pick a framing close enough for the face to read.
Check the face controls
Expand the animation set and confirm the model has individual face sliders, not only a few combination sliders or bones.
Add lip sync first
If the character speaks, run Extract Phonemes and clean the mouth before posing any emotion.
Aim the eyes
Select viewTarget under Eyes and place it on what the character is looking at.
Block key expressions
At each story beat, pose the face with an Emotion preset or by hand, working brows, lids, then mouth.
Add asymmetry
Use the L-R slider on stereo controls so the two sides of the face differ slightly.
Time the changes
Stagger brows, eyes and mouth by a few frames and ease each change with falloffs in the Motion Editor.
Add blinks and eye darts
Key blinks at moments of change and give the view target small moves during long holds.
Review and save presets
Play the shot at full speed, polish curves in the Graph Editor, and save reusable faces as presets.
When the face is finished, render a short test with our best SFM render settings.
Models Without Flexes: Bone-Based Faces
Some models, especially ports from other games, move the face with bones instead of flexes. You will see items such as jaw, eye or lip bones that show position and rotation values, but no face sliders.
- Pose face bones with the rotate and move manipulators in the viewport, or double-click a bone’s position or rotation entry to type exact values.
- Save useful bone poses as presets. Presets can store bone values, so a set of mouth shapes or expressions can be reused.
- Automatic lip sync needs phoneme presets. On a bone face you would have to build those presets yourself, one per phoneme.
- For real slider control, the face must be rebuilt with shape keys and recompiled, as our Blender to SFM guide explains.
Common SFM Facial Animation Problems
| Problem | Likely cause | Fix |
|---|---|---|
| No face sliders appear | A bone is selected, or the model has no flexes | Select a face group, or pose face bones with manipulators |
| Only a few whole-face sliders | Standard model with combination sliders | Use the HWM version of the character if one exists |
| Emotion preset does nothing | Preset written for controls the model lacks | Build the expression from individual sliders |
| Expression looks too weak | Flex strength is capped at 1 | Combine shapes, add jaw and brows, or edit the model’s flexes |
| L-R slider has no effect | The control is not stereo | Use a stereo control, or accept a symmetrical shape |
| Eyes point at the floor | View target reset to the root | Move viewTarget back in front of the face |
| Create preset is greyed out | A rig script is applied to the animation set | Create the preset before rigging or on an unrigged copy |
| Beard or mask ignores the face | Attached models have their own flexes | Key the matching sliders on the attachment as well |
SFM Facial Animation FAQs
How do I change facial expressions in SFM?
Expand the character’s animation set in the Animation Set Editor and select its face controls. Drag the sliders in the Controls panel to shape the brows, eyes and mouth, or drag an Emotion preset slider to move many controls at once. Key the face over time in the Motion Editor.
Why can’t I see facial sliders on my SFM model?
Either a bone is selected instead of a face control, or the model has no flexes. Standard TF2 player models only offer a few combination sliders, so load the HWM version for full face control. Bone-based faces are posed with the viewport manipulators instead.
How do I make a character look at something in SFM?
Select viewTarget under the Eyes group in the Animation Set Editor and move it with the move manipulator. Both eyes turn to follow it. Place it on the object or character being looked at, at a realistic distance from the face.
How do I make a one-sided smile or smirk in SFM?
Drag the L-R balance slider in the center of the Procedural tab toward one side, then adjust the smile control. This only works on stereo controls, so on some models a slider will still move both sides of the face.
Can I save a facial expression as a preset in SFM?
Yes. Select the face controls with your expression applied and use the Create preset option in the Presets panel. If it is greyed out, check whether a rig script is applied to the animation set, since users report that rigs block it.
How do I add emotion to a lip sync animation?
Run Extract Phonemes and clean the mouth first, then add emotion mostly on the brows, eyelids and eyes. For mouth corners, use Offset mode in the Motion Editor over a time selection so the speech shapes underneath are kept.