
Quick Answer
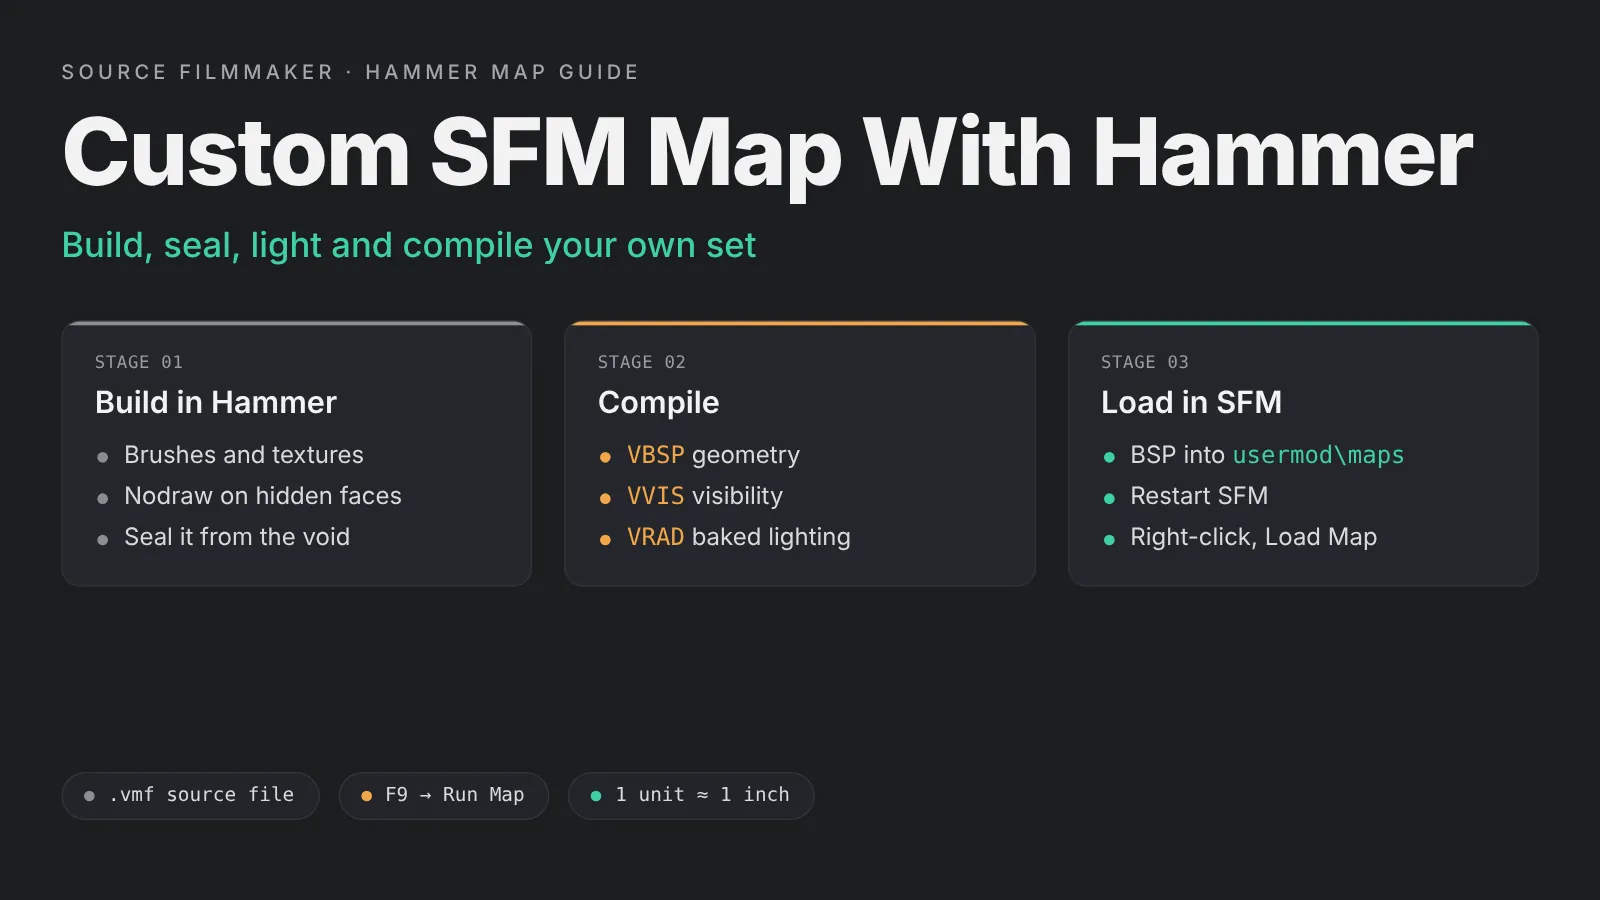
A custom SFM map is built in Valve’s Hammer editor, which already ships with Source Filmmaker, so you need nothing extra to start. The process has three stages: build the map in Hammer, compile it into a .bsp file with VBSP, VVIS and VRAD, and load that file from usermod maps in SFM. Then fix any leaks or fullbright lighting.
The process has three stages. You build the map in Hammer, compile it into a .bsp file, and load that file in SFM. This guide walks through each stage, from choosing the right version of Hammer to fixing leaks and fullbright lighting after your first compile.
Open the SDK
Start Source Filmmaker from Steam, choose Launch SDK, then open Hammer from the launcher.
Check the setup
Confirm the game configuration, FGD file and compile tool paths point at SFM.
Build and light
Block out brushes, texture them, seal the map and place light entities.
Compile and load
Run VBSP, VVIS and VRAD, then load the BSP from usermod\maps in SFM.
Which Hammer Should You Use for SFM?
Several versions of Hammer exist, and they are not interchangeable. Hammer and its compilers differ between engine branches, and Valve’s documentation advises using the version made for your game. SFM runs on the Alien Swarm branch of Source, so your choice of editor and compilers matters more than it first seems.
Source SDK Hammer (The Version Inside SFM)
SFM includes its own SDK launcher. The Valve Developer Community lists two tools inside it: the Hammer editor (build 6585) and Model Viewer. To open it, run Source Filmmaker from your Steam library and pick Launch SDK when Steam asks how to start. If that choice never appears, right-click Source Filmmaker, open Properties and set the launch option back to “Ask when starting game”.
This is the safest choice for beginners. It is already set up for SFM, it uses SFM’s own compilers, and anything you build with it will load in SFM without extra steps. It also explains a note you will see on some Workshop maps: a map compiled with the SFM version of Hammer may not work in other games, and the reverse is also true.
Hammer++ (Community Build)
Hammer++ is a community-made upgrade of the Source Hammer editor by ficool2. It adds an accurate lighting preview, a 2D and 3D skybox preview, a new model browser, better stability and many quality of life tools. Those features are a big help when you are lighting a set for film.
There are two catches for SFM users. First, SFM is not on the list of officially supported games. The Hammer++ page on the Valve Developer Community lists SFM only under “other games tested”. It says Hammer++ should not be installed in SFM’s own bin folder, but that it works when pointed to SFM from another game’s copy. The page names the Garry’s Mod and Portal 2 builds for this and flags the entry as needing a retest. Second, the same page says Hammer++ stopped receiving updates on October 1, 2026, as its creator moves to a full rewrite. The last build still works, but do not expect fixes for SFM-specific problems.
Hammer for Source 2 and S2FM
Source 2 Filmmaker is a different program with a different map format. It loads Source 2 maps saved as VMAP files, and those are built in the Source 2 version of Hammer that comes with each game’s Workshop Tools, such as Half-Life: Alyx Workshop Tools. A map you build for the original SFM will not open in S2FM, and a VMAP will not open in the original SFM. If you plan to move to the newer tool, read our Source 2 Filmmaker guide before you invest hours in a Source 1 set.
How to Set Up Hammer for SFM
Most beginner problems come from a wrong path, not from bad brushwork. Spend five minutes checking the setup before you draw a single brush. If you still need to install SFM itself, start with our guide to installing Source Filmmaker on Windows.
Pick the Mod Before You Open Hammer
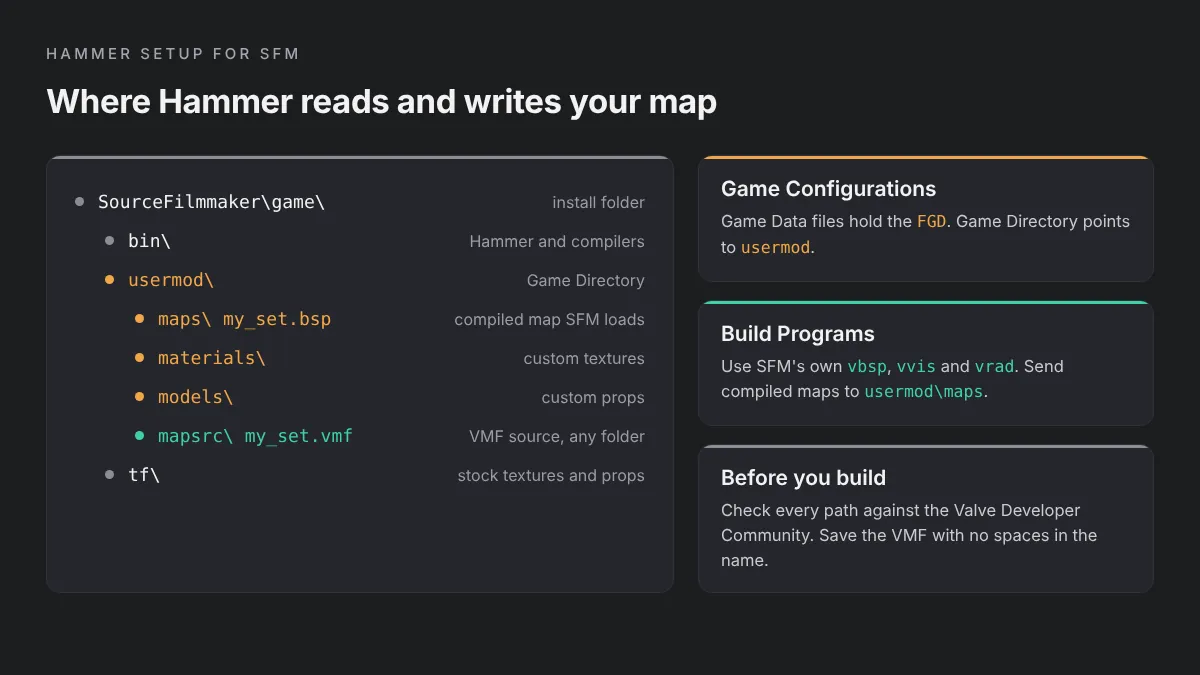
The SDK launcher works on one mod at a time. SFM uses usermod as its default mod for your own content, which makes it the easiest place to build your first map. Choose it in the launcher, then open Hammer from there so the editor loads the right textures and settings.
Check the Game Configuration
In Hammer, open Tools, then Options, and look at the Game Configurations tab. Valve’s documentation describes each field. These are the ones that matter most:
- Game Data files: the FGD file that tells Hammer which entities exist. If the entity list looks empty or wrong, the FGD is missing or incorrect.
- Game Directory: the mod folder your map belongs to. For a first map, this should be
SourceFilmmaker\game\usermod. - VMF Directory: the default folder for your saved
.vmfsource files. Any folder works, but keep it separate from the compiled maps.
Check the Build Programs
The Build Programs tab tells Hammer where to find the compilers. Point it at the vbsp.exe, vvis.exe and vrad.exe files in SFM’s own bin folder, not at another game’s copies. Set the folder for compiled maps to SourceFilmmaker\game\usermod\maps, and create that folder first if it does not exist.
Verify Against the Valve Developer Community
The Valve Developer Community warns that wrong information in Game Configurations can make Hammer behave unpredictably. Compare each field with the Hammer pages on the Valve Developer Community, and screenshot your working settings once everything compiles. That screenshot saves a lot of time after a reinstall.
Plan Your SFM Set Before You Build
A film set is not a game level. Nobody will walk through it, and the camera will only ever see part of it. Planning around your shots keeps the map small, quick to compile and easy to light.
Think in Hammer Units
Hammer measures everything in units. The Valve Developer Community says one Hammer unit is roughly one inch, so 12 units is about a foot and a standing player is 72 units tall. Valve also notes that many doors and props are scaled about a third larger than real life. In practice, place a character model or a reference prop in your room early and judge the scale by eye.
Camera-Only Sets vs Playable Maps
A playable map needs every room finished, clip brushes, spawn points and good performance from every angle. A camera-only set needs none of that. You can build only the walls the camera sees, leave a fourth wall out of shot, and fake distant buildings with simple shapes. The one rule you cannot skip is sealing. Even a camera-only set must be closed off from the void, or the compile will fail.
Sketch Your Shots First
List the shots you plan to film, then draw a rough floor plan with the camera positions marked. This tells you which surfaces need detail, where windows should let light in, and which areas can stay plain. It is much faster to change a sketch than a finished map.
How to Build a Custom SFM Map Step by Step
The steps below build one simple, sealed and lit room. Once it compiles and loads in SFM, you can grow it into a full set. Valve’s own “Your First Map” tutorial on the Valve Developer Community follows a similar order.
Create a new map
Open File, then New. Save right away as a .vmf with no spaces in the name, such as my_set.vmf.
Block out the floor
Use the Block tool to draw a floor brush in a 2D view, then press Enter to create it.
Build walls and ceiling
Add a brush for each wall and the ceiling. Make sure every edge touches, with no gaps.
Apply textures
Pick a texture in the browser and apply it to faces with the Texture Application tool.
Hide unseen faces
Put tools/toolsnodraw on faces the camera will never see, such as the tops of walls.
Seal the sky
Use tools/toolsskybox on any ceiling that should show sky, so the map stays sealed.
Add lights
Place a light or light_spot inside the room, plus a light_environment if you have sky.
Add props
Place models with prop_static, which costs little and casts baked shadows.
Compile and test
Press F9 to open Run Map, compile, then load the map in SFM and check the result.
Brushes and Textures
Brushes are the solid blocks that form your floor, walls and ceiling. Keep them on the grid, because brushes snapped to the grid seal cleanly and compile faster. Hammer’s default texture scale of 0.25 means a 512 by 512 texture covers 128 by 128 units, which suits most walls and floors. You can use any texture SFM already has, including the large Team Fortress 2 library that ships with it.
Nodraw and Tool Textures
Tool textures are special materials that change how the compiler treats a face. The two you will use most are tools/toolsnodraw and tools/toolsskybox. Nodraw is not drawn in the final map and VRAD skips it, so it saves lighting work on faces the camera never sees. You do not need nodraw on faces outside the map or on faces pressed flat against other brushes, because VBSP removes those on its own.
Sealing the Map and Avoiding Leaks
Source maps must be completely sealed from the void outside the world. That includes the sky, which has to be a brush with the toolsskybox texture, not an open hole. If there is any gap, even a fraction of a unit wide, VBSP reports a leak. Props and brush entities do not seal a map, so always close the outer shell with plain world brushes.
Lights: light, light_spot and light_environment
Three light entities cover most film sets. A light is an invisible static point light that shines in all directions, good for lamps and general fill. A light_spot is cone-shaped, which suits ceiling spots, stage lights and window beams. Valve notes it often needs a much higher brightness value than other lights before its effect shows.
A light_environment casts sunlight or moonlight through every toolsskybox face. Only the first light_environment in a map is used, so place one and set its pitch and yaw to match the sun direction you want. These map lights are baked into the map by VRAD. You can still add SFM’s own lights on top, as our SFM lighting guide explains.
Props With prop_static
Most models in a typical Source map are prop_static entities. They cannot move or animate, and they stop existing as separate entities after the compile. In return, they are cheap to render and can cast shadows into the baked lightmaps. Use them for furniture, rubble and set dressing. Use SFM’s own model browser for anything you need to animate during a shot.
Optional 3D Skybox With sky_camera
A 3D skybox is a small model of the distant world, built in a sealed box away from your main set. A sky_camera entity marks the point in that box that matches your map’s origin, and the engine draws it scaled up behind your set. The default scale is 16 to 1. For many film sets, a plain 2D sky is enough, so treat this as an upgrade for wide outdoor shots.
Compiling Your Map With VBSP, VVIS and VRAD
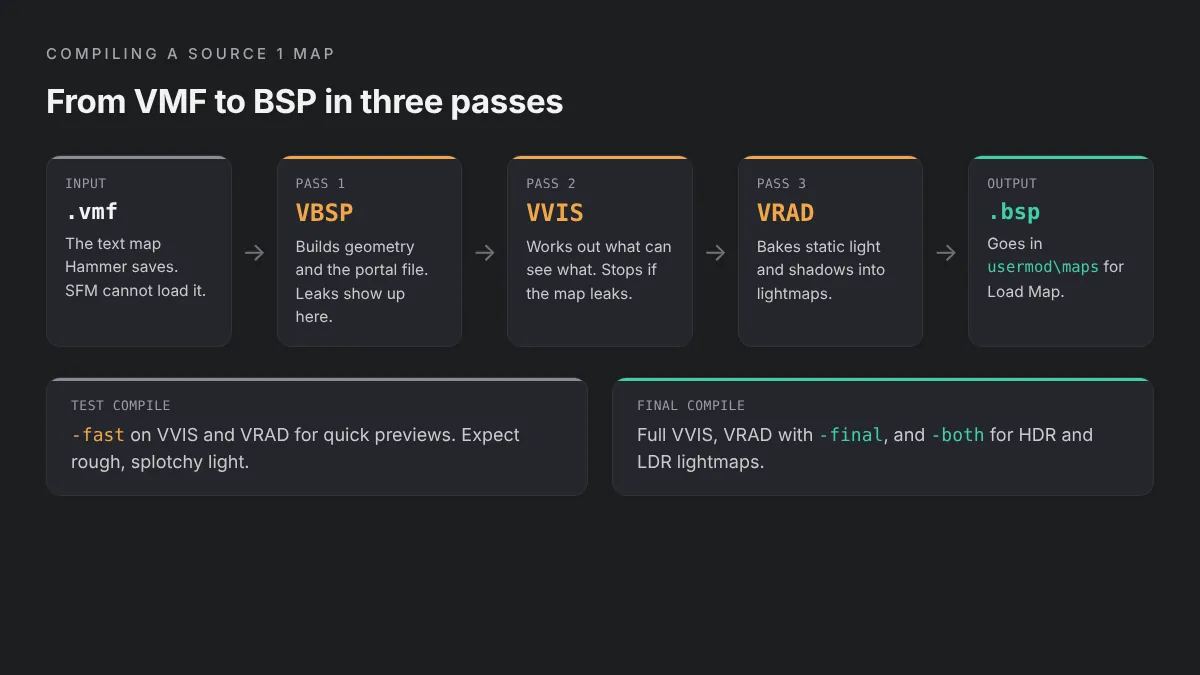
Hammer saves maps as .vmf text files. SFM cannot read those, so you have to compile the VMF into a binary .bsp file. Press F9, or open File and choose Run Map, to start.
What Each Compiler Does
VBSP turns your brushes and entities into the BSP structure and writes a portal file. VVIS uses that portal file to work out which parts of the map can see each other, so the engine only draws what it needs. VRAD then calculates static lighting and shadows from your light entities. The three always run in that order.
Fast vs Full Compiles
Valve’s tutorial warns against running full VVIS and VRAD while you are still shaping the map. For quick tests, set VVIS and VRAD to Fast in the Run Map dialog. The VRAD documentation says -fast causes random, discolored splotches in darker areas, so never judge your final lighting from a fast compile. For the final version, run both at Normal, and add -final to VRAD in Expert mode for cleaner sky and bounce light at the cost of a longer compile.
HDR and LDR Lighting
A BSP can hold two sets of lightmaps, one for HDR and one for LDR. The VRAD options are -hdr, -ldr and -both. Valve warns that on older engine branches, a map compiled with HDR only can force full brightness when HDR is turned off. Compiling with -both in Expert mode avoids that problem. In the normal Run Map dialog, Valve’s tutorial says ticking HDR makes the compile take about twice as long, which is a fair trade for a final build.
Compiling Is Not Rendering
New users often mix up two kinds of “compile”. Compiling a map turns a VMF into a BSP. Rendering turns your finished SFM shots into an image sequence or video. Once your set is lit and loaded, our guide to the best SFM render settings covers the export side.
How to Load Your Custom Map in SFM
If the Build Programs tab was set up correctly, the compiled BSP lands in the right place on its own. Loading it works the same way as loading any other map.
Where the BSP File Goes
SFM reads maps from the maps folder inside an active mod. For your own work, that means SourceFilmmaker\game\usermod\maps. If your map uses custom textures or models, those files go in usermod\materials and usermod\models, at the same paths Hammer used.
Load Map in the Viewport
Restart SFM after a new compile, because it scans its folders at startup. Then right-click the viewport, choose Load Map, type part of your map name into the filter and click Open. Our guide to the best free SFM maps covers Load Map in more detail, including what to do when the list looks empty.
Recompile and Reload
Every change in Hammer needs a new compile before SFM can see it. Save the VMF, compile again, then reload the map in SFM. Keep your SFM session saved, so the camera work you have already done stays safe while you swap map versions.
Fixing Common Hammer Errors in SFM Maps
Read the compile log after every compile. It names most problems before you even open SFM. The four errors below cover most first maps.
Leaks
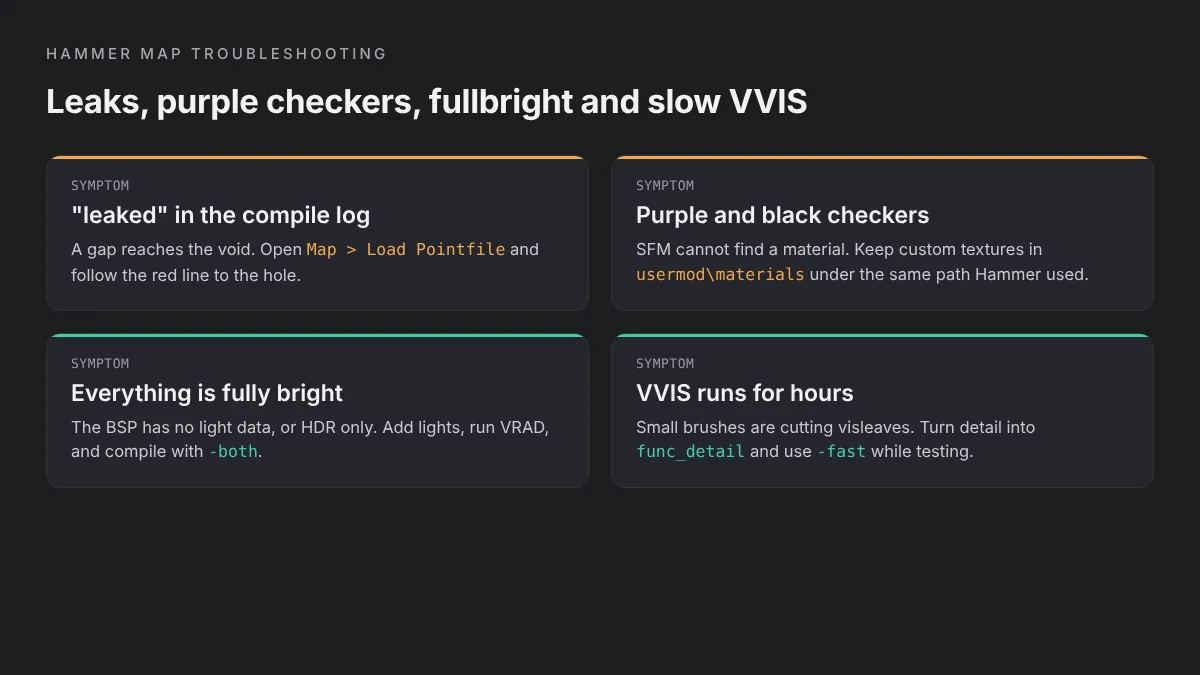
A leak shows up in the log as the word “leaked”, followed by the entity VBSP found first and its coordinates. That entity is usually not the cause, so deleting it will not help. Instead, open the Map menu and choose Load Pointfile. Hammer draws a red line from the entity out through the gap. Follow it, close the hole and compile again. The leak guide on the Valve Developer Community lists other causes, such as entities placed outside the map. On the Alien Swarm branch that SFM uses, a leak also stops VVIS, which halts the whole compile.
Purple and Black Checkers
A purple and black checkerboard means SFM cannot find a material. On custom maps, this usually happens when you used a texture from a folder SFM is not reading, or forgot to copy custom materials into usermod\materials. Our SFM missing textures fix explains how SFM searches for materials. Red ERROR shapes are the model version of the same problem, covered in our SFM red ERROR model fix.
Fullbright Maps
If every surface is evenly lit with no shadows, the map is running fullbright. Valve’s lighting page lists two causes: the BSP has no lighting data, or it was compiled for HDR only and HDR is disabled. Check that VRAD actually ran, that your map contains at least one light entity, and that the compile did not stop early because of a leak. Then compile with both HDR and LDR lighting.
Very Long VVIS Times
VVIS gets slower as your map gets more complex. Small brushes, such as trims, pipes, steps and furniture, cut the map into many tiny visleaves that VVIS must test against each other. Turn those brushes into func_detail so VVIS ignores them. Use Fast VVIS while you work, and save the full pass for the final build.
Optimization Tips for SFM Maps
A lean map compiles faster and plays back more smoothly in SFM. These habits help from the first brush.
Use func_detail for Small Brushes
Valve’s documentation says every brush that does not form the backbone of the world should be func_detail. Keep the outer walls, floors and ceilings as plain world brushes so they seal the map, and tie everything else to func_detail.
Nodraw What the Camera Never Sees
Faces hidden behind walls or above ceilings still get lightmaps unless you nodraw them. Nodraw saves VRAD time and keeps the BSP smaller. On a camera-only set, it also covers the backs of false walls and set pieces.
Keep Lightmap Scale Sensible
Hammer’s default lightmap scale is 16 units per luxel. A lower number gives sharper shadows on that face but adds compile time and file size. Lower it only on surfaces close to the camera, and leave distant walls at the default.
Test With One Character
Load your map with a single character and move the camera through each planned shot. If playback stutters, trim detail the camera does not see. Our SFM lag fix guide covers the SFM settings that also affect speed.
Hammer Options Compared
This table sums up the three ways to build maps for Valve’s filmmaking tools. Pick the one that matches the version of SFM you will film in.
| Editor | Works with | Map format | Status | Best for |
|---|---|---|---|---|
| Source SDK Hammer (in SFM) | Original SFM | VMF to BSP | Ships with SFM | Beginners and reliable SFM compiles |
| Hammer++ | Original SFM, unofficially | VMF to BSP | No updates since October 1, 2026 | Lighting preview and modern tools |
| Hammer for Source 2 | Source 2 Filmmaker | VMAP | Ships with Workshop Tools | S2FM projects only |
Frequently Asked Questions
Is making a custom SFM map free?
Yes. Source Filmmaker is free on Steam, and it includes its own SDK with the Hammer map editor. Run SFM from your Steam library and choose Launch SDK to open it. You can build with the textures and props SFM already has, so a simple custom map needs no paid software or extra downloads.
Where do I save a custom SFM map?
Hammer saves your editable source as a .vmf file in any folder you choose. The compiled .bsp file must go in SourceFilmmaker\game\usermod\maps, or in the maps folder of another mod SFM reads. Set that folder in Hammer’s Build Programs options so every compile lands there automatically.
Do I need Hammer++ to make SFM maps?
No. The Hammer that ships with SFM can build and compile complete maps. Hammer++ adds a better lighting preview and newer tools, but SFM is not one of its officially supported games, and the tool stopped receiving updates on October 1, 2026. Beginners should learn the built-in Hammer first.
Why is my custom SFM map fully bright?
A fullbright map usually has no baked lighting data. VRAD may have been skipped, the compile may have stopped because of a leak, or the map has no light entities. A map compiled for HDR only can also look fullbright with HDR turned off. Fix any leak, add lights and compile with both HDR and LDR.
How big should a custom SFM map be?
Only as big as your shots need. One Hammer unit is roughly one inch, and a standing character is about 72 units tall. Build the areas the camera will see, close everything else off with plain sealed walls, and fake distant scenery. Smaller maps compile faster and play back more smoothly in SFM.
Can I open my SFM map in Source 2 Filmmaker?
No. The original SFM uses Source 1 BSP maps built in the Source SDK version of Hammer. Source 2 Filmmaker uses Source 2 maps saved as VMAP files and built in the Source 2 version of Hammer from a game’s Workshop Tools. You would need to rebuild the set in Source 2 Hammer.