
Quick Answer
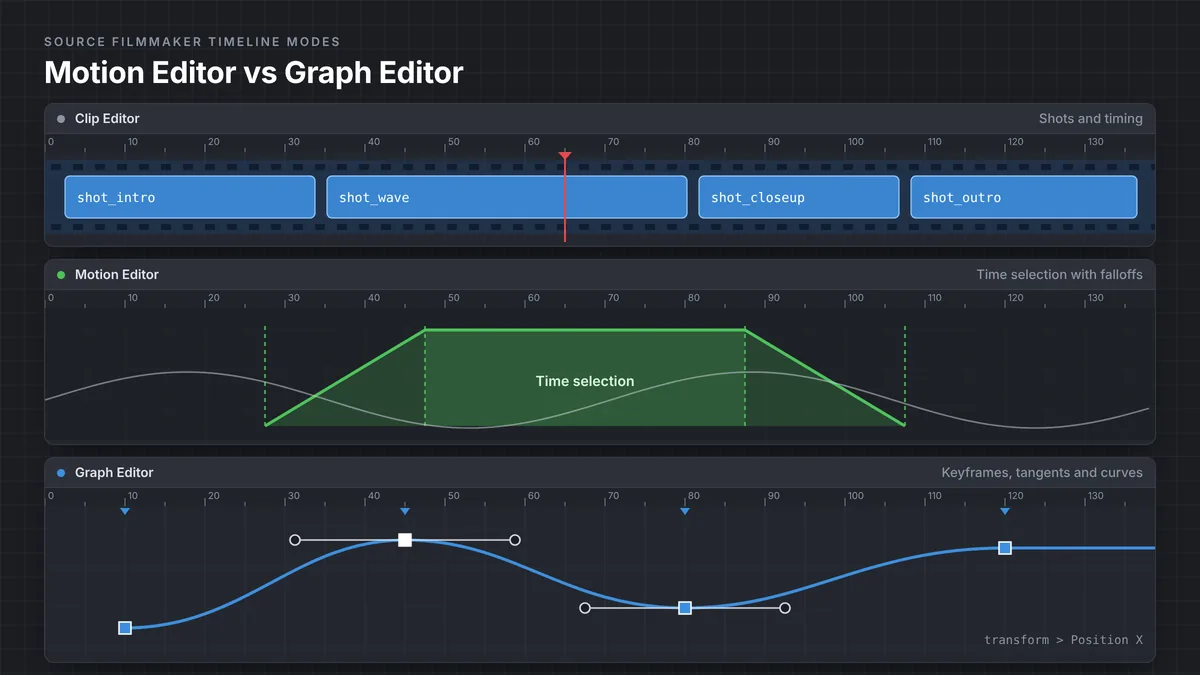
The SFM Motion Editor and Graph Editor are two ways to animate. The Motion Editor works on a selected region of time, so you pose a control and SFM blends the change across the time selection and its falloffs. The Graph Editor works on keyframes, so you set exact values at exact frames and shape the curves with tangent handles.
Pick a control
Select a bone or control group in the Animation Set Editor, or click it in the viewport.
Block in the Motion Editor
Select a region of time, add falloffs, pose the control, and press Enter to keep the change.
Refine in the Graph Editor
Pick a transform channel such as Position X, add keyframes with M, and drag tangent handles to shape the curve.
Review the shot
Press Ctrl+Spacebar to play only the current shot and check timing before you render.
The Three Timeline Modes in Source Filmmaker
The SFM timeline has three modes: the Clip Editor, the Motion Editor and the Graph Editor. You switch between them with the three buttons in the upper-left corner of the timeline. Pressing Tab toggles between the Clip Editor and whichever animation editor you used last.
The Clip Editor is where you scrub playback, blade and retime shots, and manage sound and effects clips. You can select controls in the Animation Set Editor while in the Clip Editor, but you cannot modify them. Valve’s documentation is direct about this: animation changes happen only in the Motion Editor or the Graph Editor.
Every model, camera, light and particle system you add gets an animation set. Whatever controls you select in the Animation Set Editor are what the Motion Editor and Graph Editor will change. If you have not added a character yet, our guide to importing SFM models from the Steam Workshop walks through it.
| Feature | Clip Editor | Motion Editor | Graph Editor |
|---|---|---|---|
| Main job | Shots, sound and effects clips | Blending poses over a time selection | Precise keyframes and curve shapes |
| Can change animation | No | Yes | Yes |
| How time is chosen | Not applicable | Explicit time selection with falloffs | Implicit, set by where keyframes sit |
| Undo safety net | Standard undo | Floating modification layer (Enter keeps, Esc discards) | Standard undo |
| Uses presets | No | Yes, all procedural presets | Some presets only |
| Marks on the timeline | Shot boundaries | Bookmarks (M), can resample at them | Keyframe markers (M), cannot resample |
| Best for | Editing the film | Body motion, lip sync, quick blocking, noise | Timing, single-axis fixes, camera moves |
How the SFM Motion Editor Works
The Motion Editor lets you adjust and blend animation for one or many controls at once, even across several animation sets. You can pose with the 3D manipulators in the viewport, drag control sliders, or drag preset sliders. Any change applies only to the selected controls and only inside the current time selection.
Valve suggests thinking in three parts: what, how and when. Select what to change, make the change, then decide when it applies by adjusting the time selection.
Time Selection
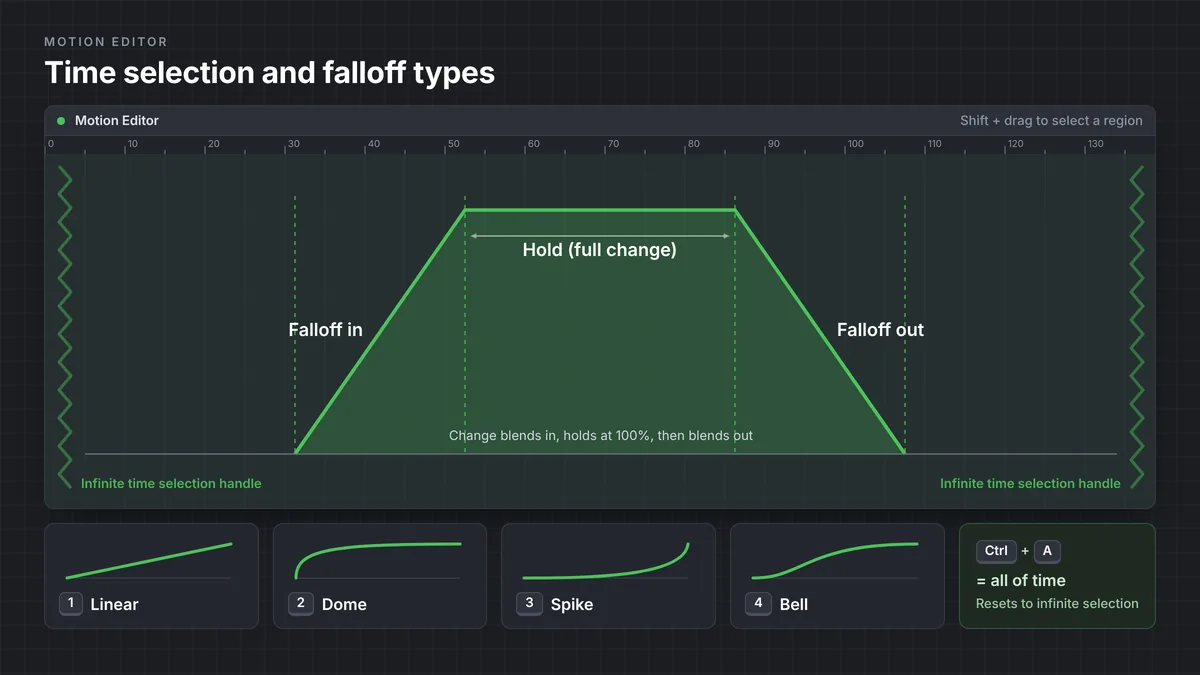
When you first open the Motion Editor, all of time is selected. The whole panel is green, and a vertical green zig-zag handle sits on each side. These are the infinite time selection handles. Any change you make now affects the entire timeline.
- Hold Shift and drag to select a region of time. The selection turns green.
- Drag an infinite handle inward to limit one side.
- Press Ctrl+A to select all of time again.
- Hold Alt and drag an edge to scale the selection.
- Hold Alt and drag inside the selection to retime it, moving it earlier or later.
Falloffs: the Hold and the Ramps
A time selection with falloffs has three parts: a first falloff, a hold in the middle, and a second falloff. The hold gets your full change. The falloffs blend it in and out, which stops a pose from snapping on and off.
To create a falloff, drag the edge of the selection when the pointer becomes a double-headed arrow, or hold Shift and roll the mouse wheel.
Falloffs come in four curve types. Hover over a falloff and press 1 for linear, 2 for dome, 3 for spike or 4 for bell.
The Floating Modification Layer
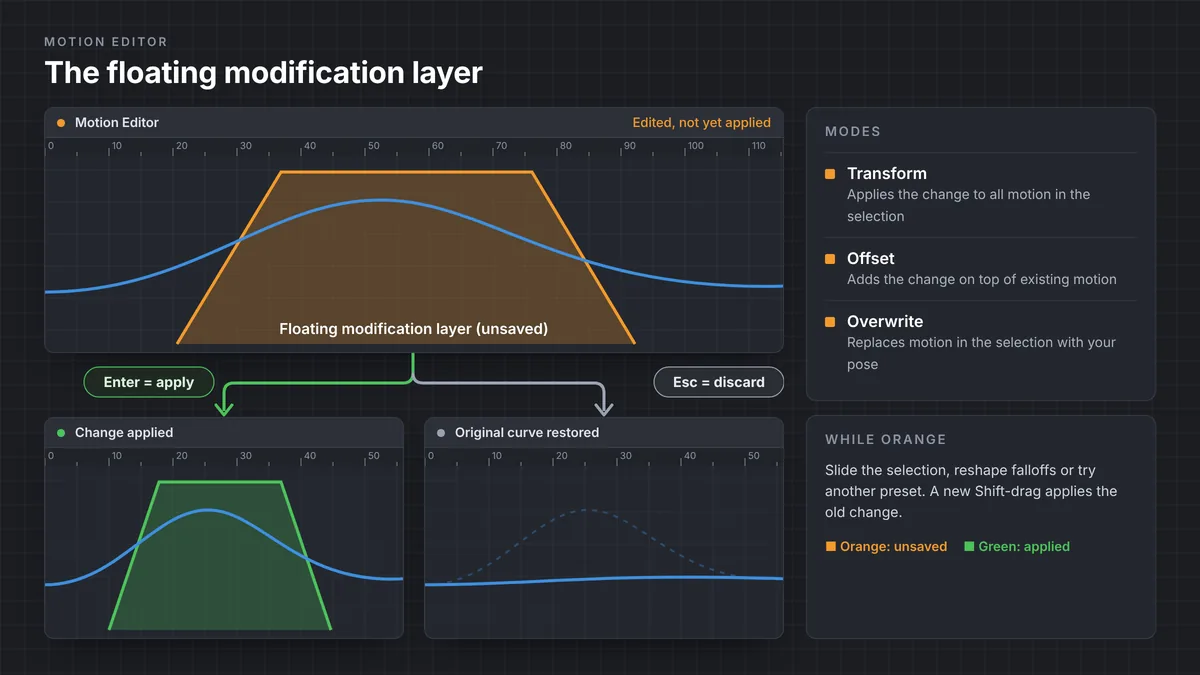
When you change something in the Motion Editor, the time selection turns from green to orange. Orange means your edit sits in the floating modification layer: a temporary state where you can still slide the selection, reshape falloffs or try another preset.
Press Enter to apply the layer, or press Esc to throw it away. Saving, selecting something else, or Shift-dragging a new selection also applies it. If an edit seems to leak into frames you never meant to touch, check whether the layer was still orange when you started your next selection.
The drop-down on the left of the Motion Editor toolbar sets how each change is applied:
- Transform: applies the change to all motion in the selection, rotating the motion path too.
- Offset: adds the change on top of the existing motion.
- Overwrite: replaces the motion in the selection with your current pose.
Presets: Smooth, Jitter, Stagger and More
The preset sliders sit on the right of the Animation Set Editor under the Procedural tab. A preset slider springs back after each use, because it blends the selected controls toward the preset.
| Preset | What it does | Typical use |
|---|---|---|
| Smooth | Flattens peaks and valleys in a curve | Cleaning up jittery puppeteered motion |
| Jitter | Adds random noise to a curve | Shivers, engine shake, nervous hands |
| Stagger | Offsets several controls by random amounts, scaled by falloff size | Breaking up fingers or hair that move in sync |
| Hold | Pulls frames in the falloffs toward the hold | Slow-in, slow-out pauses |
| Release | Pushes frames in the falloffs away from the hold | Fast-in, fast-out, accelerating motion |
| Steady | Spreads frames evenly across the selection | Constant speed along a curved path |
| Playhead | Pulls values toward the value at the playhead | Holding a control still |
Stagger, Hold, Release and Steady change timing without changing the motion path. On a 3D path, clustered frame circles mean slow motion and spread-out circles mean fast motion. Ctrl+click a control in the viewport to show its motion path on that control. Valve’s Motion Editor documentation covers the rest of these tools.
Bookmarks and Previewing
Press M in the Motion Editor to drop a bookmark at the playhead. You can drag them. Right-click and choose Resample, then At Bookmarks, to flatten the curves between them into straight lines.
How the SFM Graph Editor Works
The Graph Editor shows animation as curves you edit directly with keyframes. There is no explicit time selection. The keyframes you place define the region you are working on, and the curve between two keys is shaped by their tangent handles.
Channels and Transform Components
Select controls in the Animation Set Editor first. Then, in the Graph Editor’s list, pick the components to show. Under transform you find position on the X, Y and Z axes and rotation on each axis. Showing one channel at a time keeps the graph readable.
Keyframes and Markers
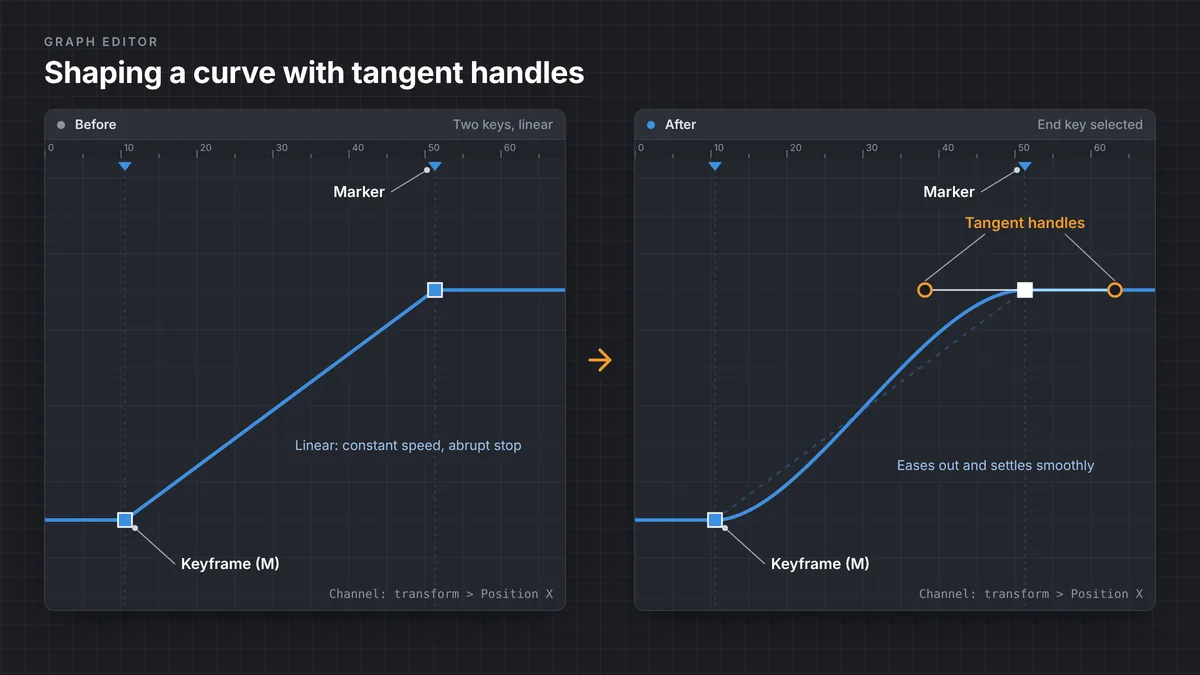
Move the playhead to a frame and press M. SFM adds a keyframe to every visible curve at that frame, plus a small blue marker above the playhead. Moving the control in the viewport also adds keys.
Markers look like Motion Editor bookmarks, but dragging one moves all of its keyframes, and you cannot resample at them.
Tangents and Curve Shape
Rectangle-select a keyframe and two tangent handles appear on either side of it. Rectangle-select a handle and drag with the middle mouse button to bend the curve. A steep curve means fast motion, and a flat curve means slow motion or a hold. Some animators also use a stepped tangent, which holds a value until the next key, while they block out poses.
Exact Values and Offset Mode
The X and Y fields at the top of the Graph Editor take exact values for selected keys. They also take math: +=3 adds 3 to every selected key, while 3 sets the value to exactly 3.
Offset mode, toggled by an icon in the middle of the Graph Editor toolbar, keeps fine detail when you move a section of curve. With it off, the same move flattens the curve between the keys. Valve’s keyframing page shows both results side by side.
Your First SFM Animation, Step by Step
This exercise animates a character raising an arm, using the Motion Editor for the main pose and the Graph Editor for timing. Start with a fresh session and one character in a lit map. If SFM is not set up yet, follow our Source Filmmaker install guide first.
Select the shot and the control
Click the shot, then select the character’s right upper arm control in the Animation Set Editor.
Switch to the Motion Editor
Click the Motion Editor button. The panel turns green because all of time is selected.
Make a time selection with falloffs
Hold Shift and drag across the second half of the shot. Drag the left edge to add a falloff, hover over it, and press 4 for a bell curve.
Pose the arm
Rotate the arm upward in the viewport. The selection turns orange. Hold Shift and move the mouse to preview the ease.
Commit the change
Press Enter to apply the floating modification layer. The selection turns green again.
Open the Graph Editor
Click the Graph Editor button and show a single rotation channel for the arm, so you see just one curve.
Add and adjust keyframes
Press M at the start and end of the raise. Rectangle-select the end key, then drag tangent handles with the middle mouse button to add a soft settle.
Review and save
Press Ctrl+Spacebar to play only this shot, adjust until the timing feels natural, then save.
Once the motion reads well, frame it. Our SFM camera tips and SFM lighting guide help the pose read clearly.
Motion Editor vs Graph Editor: When to Use Each
Neither editor is the right one for everything. Most animators use both on the same shot:
- Use the Motion Editor for broad body movement, blocking a shot fast, lip sync and facial work, and applying presets like Jitter or Smooth over a range of frames.
- Use the Graph Editor for exact timing, single-axis corrections, camera moves that must start and stop on a given frame, and checking that curves have no sudden spikes.
Both editors change the same curves, so big Motion Editor passes after careful keyframing can undo your polish. Finish broad passes first.
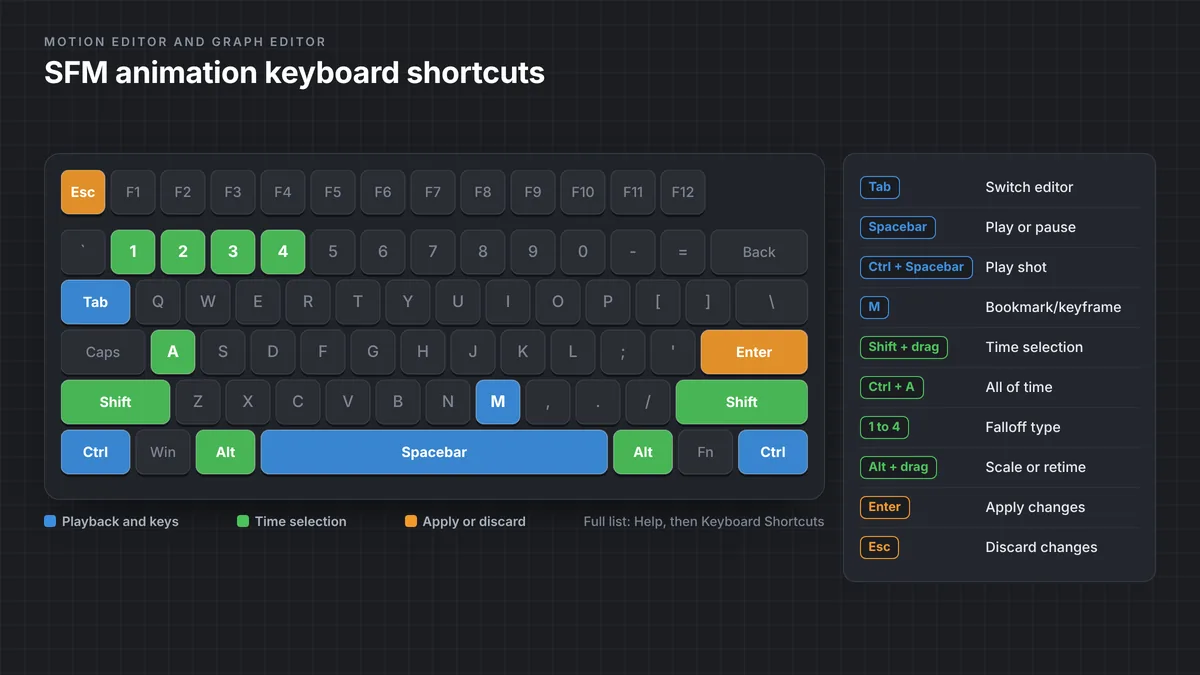
SFM Animation Keyboard Shortcuts
These shortcuts come from Valve’s SFM documentation. For the full list and custom bindings, open Help, then Keyboard Shortcuts.
| Action | Shortcut | Where |
|---|---|---|
| Toggle Clip Editor and last animation editor | Tab | Timeline |
| Play or pause | Spacebar | Timeline |
| Play only the current shot | Ctrl+Spacebar | Timeline |
| Step one frame back or forward | Left or Right arrow | Timeline |
| Select a time region | Shift+drag | Motion Editor |
| Select all of time | Ctrl+A | Motion Editor |
| Create a falloff | Shift+mouse wheel | Motion Editor |
| Falloff type: linear, dome, spike, bell | 1, 2, 3, 4 | Motion Editor |
| Apply or discard changes | Enter or Esc | Motion Editor |
| Preview time without the playhead | Hold Shift and move the mouse | Motion Editor |
| Add bookmark or keyframe marker | M | Both editors |
| Move selected keys or handles | Middle mouse drag | Graph Editor |
| Scale selected keys | Ctrl+right-drag | Graph Editor |
| Pan the graph | Alt+middle mouse drag | Graph Editor |
Common SFM Animation Mistakes
- Trying to animate in the Clip Editor. Controls can be selected there but not changed. Press Tab to jump to an animation editor.
- Forgetting that all of time is selected. A pose made on a fresh Motion Editor view changes the whole timeline, not one frame.
- Leaving the floating layer orange. Starting a new Shift-drag selection applies the old change to the old region.
- Dragging the playhead to preview. Its position affects how a manipulation lands, so use Shift preview or Ctrl+Spacebar.
- Over-smoothing. Apply the Smooth preset in small drags and check the curve.
- Showing every channel at once in the Graph Editor. Overlapping curves hide spikes.
- Using the wrong modification mode. Overwrite deletes motion in the selection, which surprises people who expected Offset.
When the animation is ready, our best SFM render settings guide explains how to export it at full quality.
SFM Motion Editor and Graph Editor FAQs
What is the difference between the Motion Editor and the Graph Editor in SFM?
The Motion Editor changes animation over a selected region of time, while the Graph Editor changes animation through keyframes. In the Motion Editor you blend a pose across a time selection with falloffs. In the Graph Editor you set values at exact frames and shape the curves with tangent handles.
Why can’t I move my model in SFM?
You are probably in the Clip Editor, which cannot modify controls. Press Tab or click the Motion Editor or Graph Editor button on the timeline. If you are animating a scene camera, make sure it has an animation set selected in the Animation Set Editor.
Why did my change affect the whole animation?
All of time was selected. The Motion Editor starts with an infinite time selection, shown as a fully green panel. Hold Shift and drag to select a shorter region before you pose, or drag the green zig-zag handles inward.
What does the orange time selection mean?
Orange means you have unsaved changes in the floating modification layer. Press Enter to apply them to the animation or Esc to discard them. Once applied or discarded, the time selection turns green again.
How do I add a keyframe in SFM?
Move the playhead to the frame and press M in the Graph Editor. SFM adds a keyframe to each visible curve and a marker above the playhead. Moving the control in the viewport while in the Graph Editor also adds keyframes automatically.
What do the 1, 2, 3 and 4 keys do in the Motion Editor?
They change the falloff curve type. Hover the pointer over a falloff and press 1 for linear, 2 for dome, 3 for spike or 4 for bell. The type controls how smoothly your change eases in and out of the hold.
4 thoughts on “SFM Animation Basics: Motion Editor and Graph Editor Explained”