

Quick Answer
To add sound in SFM, convert your audio to 16-bit PCM WAV at 44.1 kHz and save it in game\usermod\sound. In the Clip Editor, right-click a track in the Sound group, choose Add Clip to Track and pick the file. Turn on Show Waveform and frame snapping to sync it, then export with audio or a separate WAV file.
Sound is the half of a Source Filmmaker project that most beginners leave until the end, and then fight with for hours. The workflow is small once you know the rules: a WAV file in the right format, a folder SFM can see, a sound track in the Clip Editor, and a few habits for lining audio up with motion. This guide shows you how to add sound in SFM from conversion to export, following the Valve Developer Community wiki and the fixes that come up most often in Steam Community guides.
Remember the format rule above all. Source Filmmaker wants 16-bit PCM WAV at 44.1 kHz, and almost every “my sound does not play” thread traces back to an MP3, a 48 kHz file, or the wrong bit depth.
The short version:
Convert the audio to 16-bit PCM WAV at 44100 Hz in Audacity and save it into SourceFilmmaker\game\usermod\sound.
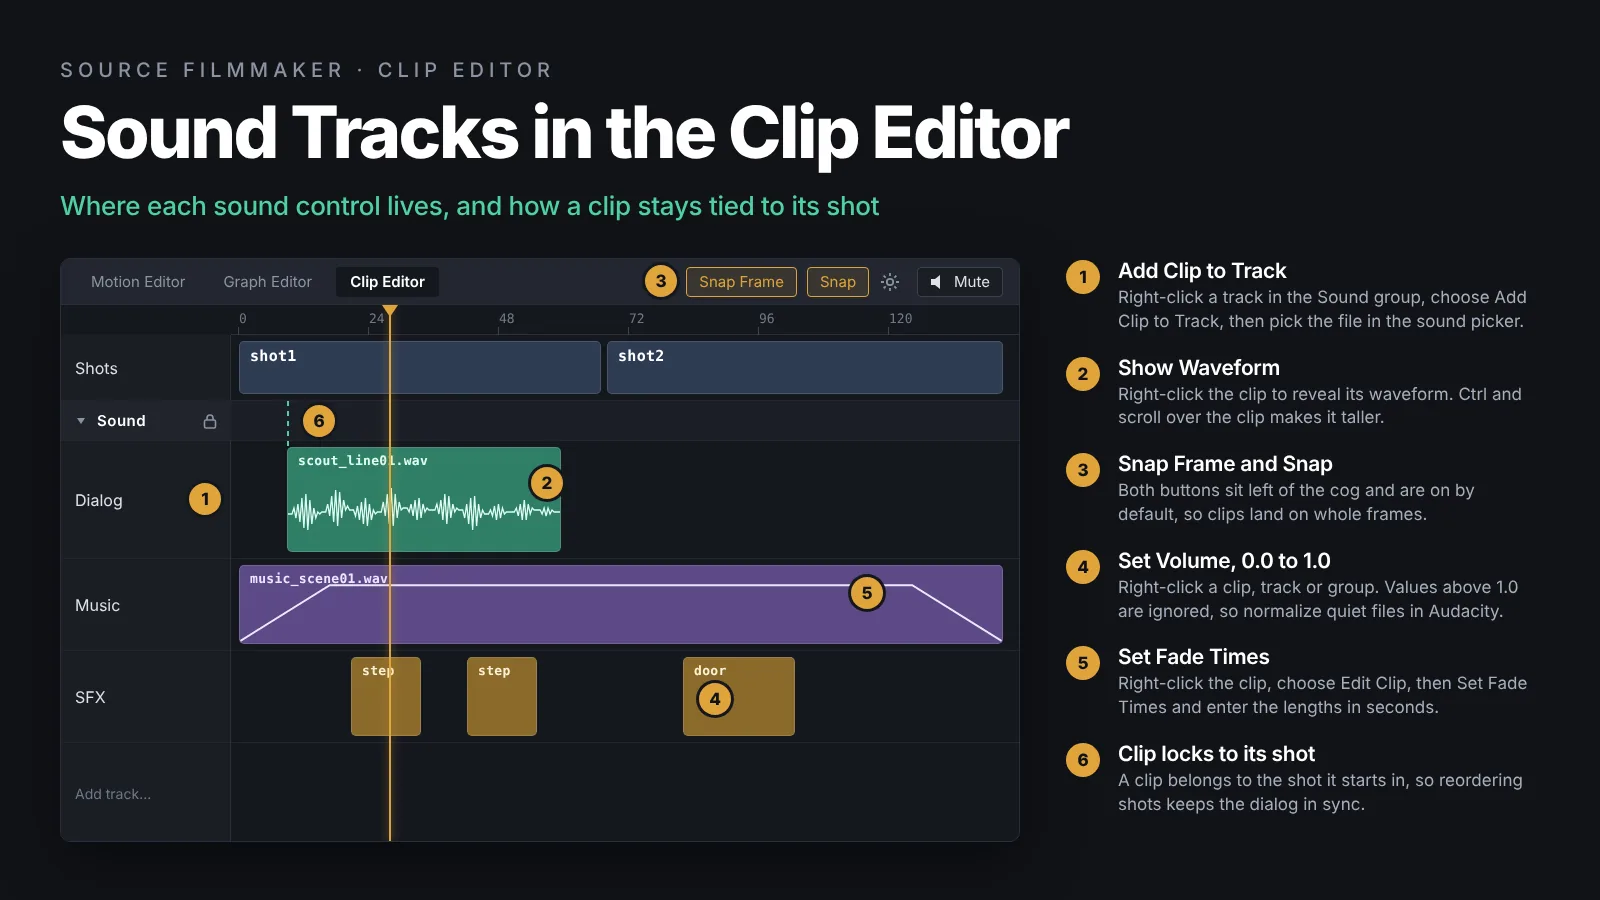
In the Clip Editor, right-click a track in the Sound group, choose Add Clip to Track, and pick the file.
Turn on Show Waveform, enable frame snapping, and drag the clip until the peaks land on the animation beats. Run Extract Phonemes for dialog.
Export as an AVI with audio, or as an image sequence with Separate WAV file ticked, then combine them in your editor.
Which Audio Formats Work When You Add Sound in SFM
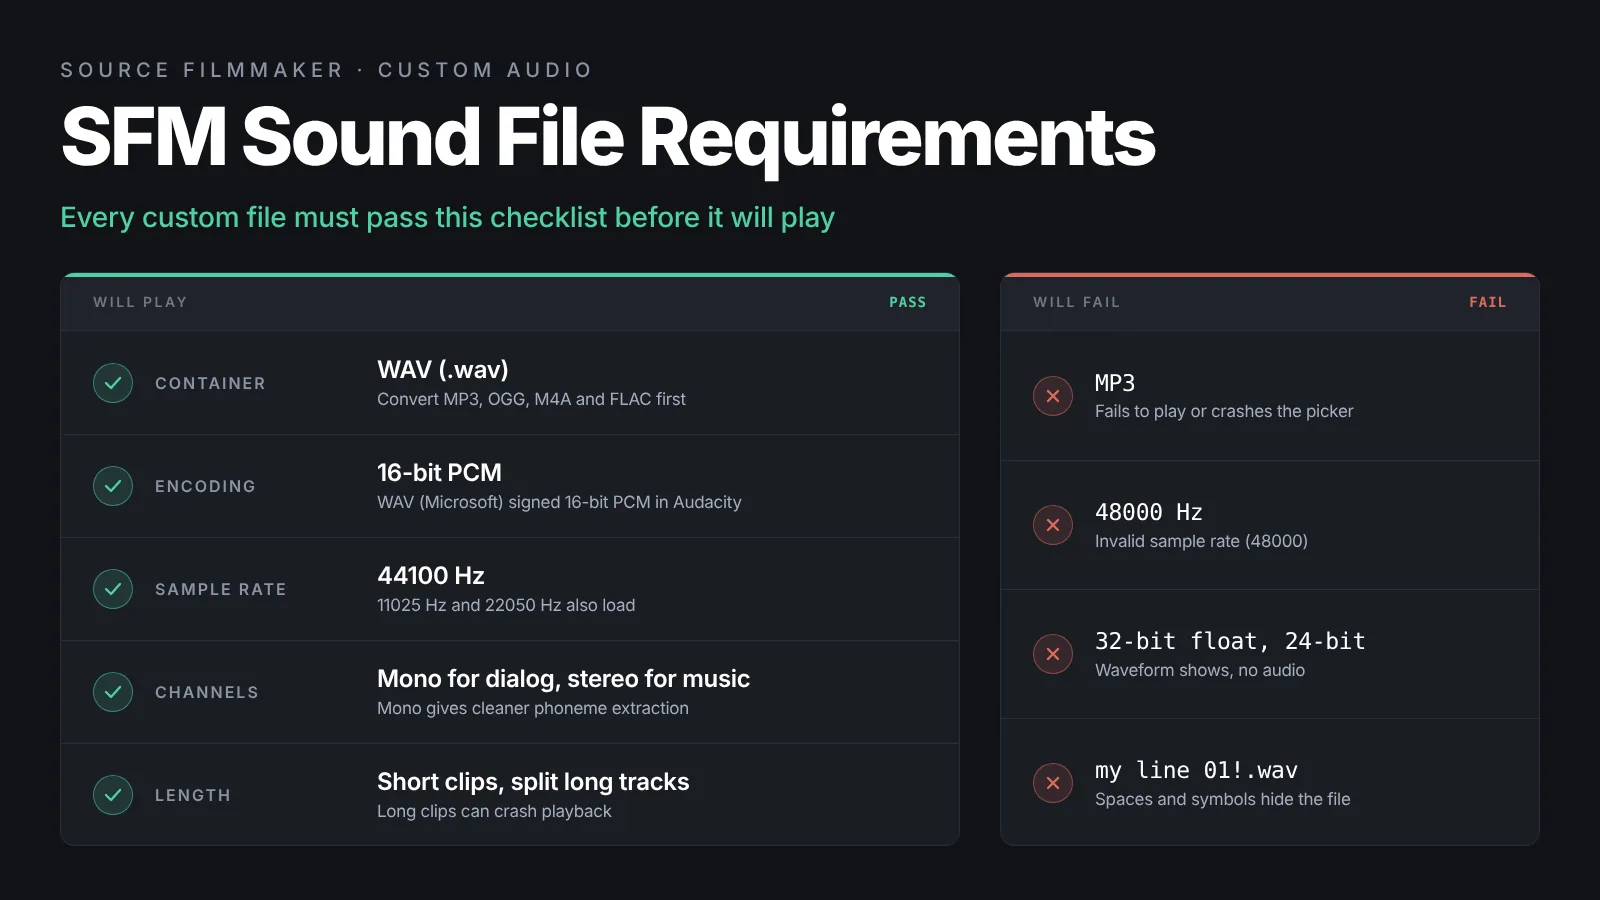
The Valve Developer Community page on adding sound clips names one supported format for custom files: WAV, 16-bit, 44.1 kHz.
Sample rate, bit depth and channels
The engine prefers 44100 Hz. Steam Community helpers report that 11025 Hz and 22050 Hz also load when the recording was made at that rate. A 48000 Hz file, the default from most phones and video editors, triggers the console error “S_StartSound: Invalid sample rate (48000)” and plays nothing. Bit depth must be 16-bit PCM, because float and 24-bit WAVs often show a waveform but stay silent. Mono suits dialog, while stereo suits music beds.
Why MP3 is a dead end
SFM does not handle MP3 well; files either fail on playback or never appear. Convert every MP3, OGG, M4A or FLAC file to WAV first.
| Property | Required or recommended | If you ignore it |
|---|---|---|
| Container | WAV (.wav) | MP3 fails to play or crashes the picker |
| Encoding | 16-bit PCM | Waveform shows, no audio |
| Sample rate | 44100 Hz (11025 and 22050 accepted) | 48000 Hz gives Invalid sample rate |
| Channels | Mono for dialog, stereo for music | Stereo dialog weakens phoneme extraction |
| Clip length | Short clips, split long tracks | Long clips can crash playback |
| File name | Letters and numbers, no spaces | Symbols and spaces hide the file |
Converting Audio in Audacity
Audacity is free and does the job in under a minute. Set the project rate before you export, because Audacity resamples to the project rate, not the rate of the original file.
Export settings that work
- Open the file and set the Project Rate box in the bottom left corner to 44100.
- For dialog, choose Tracks, Mix, Mix Stereo Down to Mono.
- Trim silence from the start so the first word sits near the beginning of the clip, which makes syncing easier.
- Choose File, Export, Export as WAV, and pick WAV (Microsoft) signed 16-bit PCM.
- Name the file with no spaces, for example scout_line01.wav, and save it straight into your sound folder.
Splitting long tracks
The Valve wiki warns that overly long clips crash SFM on playback, so cut a long music track into scene-length pieces and label them in order.
Where SFM Looks for Custom Sound Files
SFM only sees audio inside a mounted game folder under a subfolder called sound. The simplest place to add sound in SFM is the usermod folder that ships with every install.
The usermod sound folder
In your Steam library, right-click Source Filmmaker, open Properties, Installed Files, Browse to reach the game folder. Inside it, open usermod and create a folder named sound if it does not exist. On a default install the full path is:
C:\Program Files (x86)\Steam\steamapps\common\SourceFilmmaker\game\usermod\sound
You can nest subfolders inside sound, such as sound\music, and SFM shows them in the clip picker. Our guide on how to install Source Filmmaker on Windows covers the folder layout in more depth.
Using a separate mod folder
A custom folder next to usermod also works if it has a sound subfolder and is enabled in the SFM SDK under Edit Search Paths For Selected Mod. Unmounted folders are invisible, the same logic behind missing texture errors.
Adding a Sound Clip in the Clip Editor
Switch to the Clip Editor tab at the bottom of the SFM window. Below the shot sequence sit the track groups, usually including a Sound group with a Dialog track. If yours is missing, right-click the empty area under the shots and add one.
Add Clip to Track and the sound picker
Right-click the track and choose Add Clip to Track. SFM opens its sound picker, the dialog many Steam guides call the Sound Browser. Type part of the file name in the Filter box; for stock audio, typing scout lists every Scout voice line in Team Fortress 2. Pick the file and it drops onto the track at the playhead. SFM caches the list, so if a new file is missing, restart SFM or rename it.
Game sounds versus imported files
Game sounds live inside the VPK archives and appear under their script names, while custom files appear under the folder you created. Both behave the same on a track. Engine sounds captured during gameplay recording are different: they land inside the shot’s own Game Sounds track group. To adjust them, double-click the shot, expand Game Sounds, right-click the clip and choose Set Volume, then press the up arrow above the timeline to return.
Placing, Trimming and Layering SFM Sound Clips
Sound clips edit like shots. Drag the body to move, drag an edge to trim, press I and O for in and out points, and use the blade to split. Ctrl+C and Ctrl+V duplicate a clip for repeating footsteps.
Multiple tracks for dialog, music and effects
Keep one track per job: Dialog, Music, SFX and Ambience is a typical layout. Right-click the Sound track group to add tracks. Clips on different tracks play together, so layering is a matter of stacking clips vertically. Right-click a track to mute it, or use the mute button at the top right of the timeline to silence everything. If playback stutters with several tracks active, our SFM lag fix guide will help, since hitching usually means the viewport is struggling.
Volume and fades
Right-click a clip, track or track group and choose Set Volume. The scale runs from 0.0 to 1.0, and higher values are ignored, so you cannot boost a quiet file here. Normalize it in Audacity instead, or stack two copies on separate tracks. For fades, right-click the clip, choose Edit Clip, then Set Fade Times, and enter the lengths in seconds.
How to Sync Audio in Source Filmmaker
To sync audio in Source Filmmaker you need the waveform, which SFM hides by default. Right-click the clip and choose Show Waveform. Hold Ctrl and scroll over a selected clip to make the waveform taller.
Match peaks to motion with snapping
Find the frame where the action happens, such as a foot hitting the ground. Park the playhead there, then drag the sound clip until the spike in the waveform sits under it. Keep Snap Frame and Snap enabled; both buttons sit in the timeline toolbar left of the cog icon and are on by default. With snapping on, clips and the playhead land on whole frames, which removes the half-frame drift that makes effects feel late. Alt+Shift drag gives sub-frame nudges.
Scrub and check at the session frame rate
Scrubbing the playhead across a waveform plays the audio under it, so you can hear which frame an impact falls on. Loop a short time selection around the beat while you adjust. The session frame rate sets your precision: a frame is about 42 ms at 24 fps, 33 ms at 30 fps, and 17 ms at 60 fps. Decide the frame rate before you place keys, because changing it later shifts every clip. Our Motion Editor and Graph Editor guide explains how to tighten keyframes once the audio is locked.
Shots carry their sound with them
A clip locks to the shot in which it begins, so reordering shots keeps dialog in sync. Unlock a track with its lock icon when a music bed spans several shots.
SFM Lip Sync With Extract Phonemes
Once a dialog clip is in place, SFM can build a first pass of mouth animation with Extract Phonemes. The Valve Developer Community lip-sync page documents it for Team Fortress 2 HWM classes and Half-Life 2 FACS models.
Running the extraction
- Right-click the dialog clip and choose Show Waveform. Hide every other waveform, because only visible ones are used.
- In the Animation Set Editor, right-click one of the character’s controls.
- Choose Extract Phonemes, keep the defaults, and click Extract.
- Play the shot and check the jaw and lips move with the line.
A clean mono recording gives far better SFM lip sync results than a stereo file with music underneath.
Cleaning up the result by hand
Automatic phonemes are a starting point, not a finish. Select the Lower Face and Tongue controls, open the Motion Editor with the waveform showing, and apply the Smooth preset to calm jittery curves. Then switch to the Phoneme tab and paint mouth shapes over frames the extraction guessed wrong, usually closed consonants such as m, b and p. Our SFM lip sync tutorial goes deeper into cleanup, and the facial animation guide covers expressions around the mouth.
Common SFM Sound Problems and Fixes
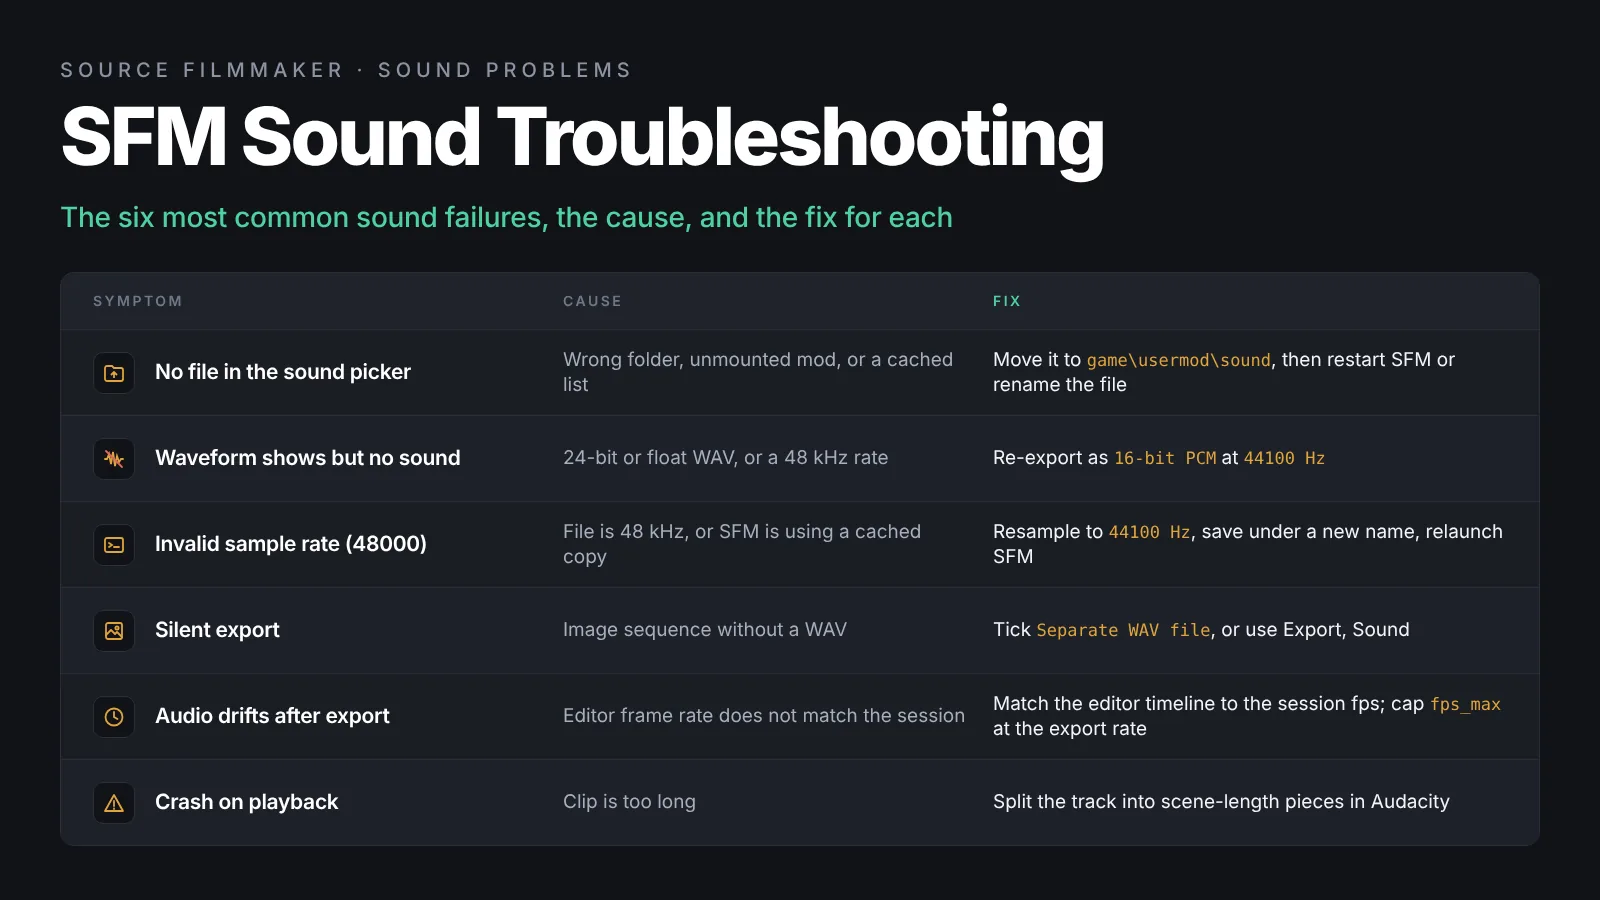
Most SFM sound faults come from a short list of causes.
Symptom, cause and fix
| Problem | Likely cause | Fix |
|---|---|---|
| File not in the sound picker | Wrong folder, unmounted mod, or cached list | Move it into game\usermod\sound, check SDK search paths, restart or rename |
| Waveform shows but no sound | 24-bit or float WAV, or 48 kHz rate | Re-export as 16-bit PCM at 44100 Hz |
| Invalid sample rate (48000) in the console | File is 48 kHz or SFM is using a cached copy | Resample to 44100 Hz, save under a new name, relaunch SFM |
| Crackling or popping during playback | Viewport dropping frames, too many tracks active | Mute unused tracks, lower viewport quality, close other apps |
| Silent export | Image sequence without Separate WAV | Re-export with Separate WAV file ticked, or use Export, Sound |
| Audio drifts out of sync after export | Editor frame rate mismatch, or fps_max above the export rate | Match the editor timeline to the session rate; cap fps_max at the export rate |
| Game sound missing from a recorded shot | Game Sounds group muted or at volume 0 | Open the shot, enable Game Sounds, reset volume |
Export Settings That Keep Your Audio
Open File, Export, Movie and look at the Export dropdown. It offers Movie, Sound and Image Sequence, and each handles audio differently.
Movie export with embedded audio
Movie with the AVI format writes an uncompressed video with the mixed sound tracks embedded. It is the only one-click route to a file that plays with sound, but files are huge and the export stops partway at the 4 GB AVI limit. MP4 and MOV depend on QuickTime, which is no longer practical on Windows. For a short preview, AVI is fine.
Image sequence plus Separate WAV file
Image sequences have no audio by design, since each frame is a PNG or TGA file. Pick Image Sequence and tick Separate WAV file, and SFM writes one WAV of the full mix next to the frames. Combine the two in a video editor or on the command line; our guide on how to render SFM to MP4 with FFmpeg shows the exact muxing command.
Exporting sound on its own
To export audio alone, tick the tracks or clips you want and change the Export dropdown from Movie to Sound. Whatever route you choose, keep the editor timeline at the same frame rate as the SFM session, because a mismatch is the most common reason audio drifts after export.
Frequently Asked Questions
Why does my WAV file not show up in the SFM sound picker?
SFM only lists files inside a sound folder within a mounted game directory, usually SourceFilmmaker\game\usermod\sound. Check the file is there, that the name has no spaces or special characters, and that the mod folder is enabled in the SDK search paths. SFM also caches the sound list, so restart the program or rename the file if it still refuses to appear.
Can I add MP3 files directly to Source Filmmaker?
No, not reliably. The Source engine expects WAV, and MP3 files either fail to play or crash the clip picker. Open the MP3 in Audacity, set the project rate to 44100 Hz, and export it as a 16-bit PCM WAV. The conversion takes a few seconds and removes the most common cause of silent sound clips in SFM.
What does the Invalid sample rate (48000) error mean?
The console message means SFM loaded a file recorded at 48 kHz, which the engine does not support. Resample the file to 44100 Hz in Audacity, making sure the project rate itself is set to 44100 before export. If the error continues after resampling, SFM is probably using a cached copy, so save the file under a new name and relaunch.
How do I make the sound louder than 100 percent in SFM?
You cannot. Set Volume accepts values from 0.0 to 1.0 and ignores anything higher. If a clip is too quiet, normalize or amplify it in Audacity and re-export, which gives a cleaner result. As a quick fix inside SFM, place a second copy of the same clip on another track at the same frame, which doubles the level.
Why is my audio out of sync after exporting an image sequence?
The frames and the WAV were rendered at the session frame rate, so the editor timeline must use the same rate. A 24 fps sequence dropped onto a 30 fps timeline drifts steadily. Set the project to match before importing. If drift still appears, open the SFM console and set fps_max to a value no higher than the export frame rate, then export again.
Does Extract Phonemes work on custom models?
Out of the box it supports the Team Fortress 2 HWM classes and Half-Life 2 FACS models. Custom models need a phoneme preset table mapped to their flex controls, which you create through the Element Viewer or by using the Create Phoneme Presets option on an HL2 FACS compliant set. Without that table, the extraction runs but the face stays still.
Final Thoughts
Build the habit, not the fix
Learning to add sound in SFM stops being painful once the file format becomes a habit. Convert everything to 16-bit 44.1 kHz WAV, keep it in usermod\sound, and give each type of audio its own track. Show Waveform and frame snapping handle sync, Extract Phonemes starts the lip sync, and Separate WAV file carries the mix to the final MP4. Pair that with solid camera work and picture and sound will feel like the same film.