

Quick Answer
The cleanest way to render SFM to MP4 is to skip Source Filmmaker’s built-in video export. Render a PNG or TGA image sequence instead, save the audio as a WAV file, and join both with FFmpeg using libx264. You get sharper frames, fewer crashes and an MP4 that plays everywhere, including on YouTube.
FFmpeg is a free command-line tool. It reads numbered frames like shot_0000.tga, encodes them to H.264, and adds your sound track in one command.
This guide covers the export, the FFmpeg install on Windows, every flag in the main command, and the common errors.
Export an image sequence
In SFM, open File > Export > Movie, pick an image sequence format such as PNG or TGA, and export the sound as a WAV file.
Install FFmpeg
Download a Windows build, extract it to C:\ffmpeg, and add the bin folder to your PATH.
Run one command
Point FFmpeg at the numbered frames and the WAV file, set the frame rate, and encode with libx264.
Check the MP4
Play the file, confirm the audio lines up, and upload it to YouTube or share it.
Why Not Export MP4 Straight From SFM?
SFM can write video files, but the options are dated. Its AVI export is uncompressed, so files grow very large. Animators on the Steam forums report corrupted AVI files once they pass 4 GB, and some say the AVI exporter fails outright.
The MP4 and MOV options depend on Apple QuickTime for Windows. Apple stopped supporting QuickTime for Windows in 2016, so installing it now is a security risk. Users also report shifted contrast and dull colors in SFM’s MP4 output.
An image sequence avoids all of this. Each frame is a separate file, so a crash at frame 900 leaves frames 0 to 899 safe. You can also re-encode without rendering again. Before exporting, check our best SFM render settings guide.
Step 1: Export an Image Sequence From SFM
Open your session and go to File > Export > Movie. In the export dialog, choose an image sequence instead of a movie file. SFM offers several still formats:
- TGA: SFM’s native format. It writes slightly faster, but files are large.
- PNG: lossless and widely supported. This is the best pick for most people.
- JPEG: lossy. Avoid it, because FFmpeg will compress the frames a second time.
- PFM: 32-bit float per channel for heavy color grading. Files are huge and few tools read them.
Use a short file name with no spaces, such as shot, and an empty output folder. Note the frame rate in the dialog. SFM sessions usually run at 24 fps, and FFmpeg must use the same number later.
Tick the option to export sound. SFM saves the audio as a WAV file next to the frames. Afterward, check the file names. You should see a padded counter like shot_0000.png, shot_0001.png and so on. Count the digits and note the first number, because both go into the FFmpeg command.
Framing and light decide how the final video looks, not the encoder. Our SFM camera tips and SFM lighting guide cover both.
Step 2: Install FFmpeg on Windows
FFmpeg.org only publishes source code. For Windows, its download page links to ready-made builds from gyan.dev and BtbN. Either works. The gyan.dev “release essentials” ZIP is small and includes libx264, libx265 and libvpx.
- Download the ZIP and extract it.
- Rename the extracted folder to
ffmpegand move it toC:\ffmpeg. - Search Windows for “Edit the system environment variables” and open Environment Variables.
- Under your user variables, select Path, click Edit, then New, and add
C:\ffmpeg\bin. - Open a fresh Command Prompt window.
Type this and press Enter:
ffmpeg -versionA version number means FFmpeg is ready. “Not recognized” means the PATH entry is wrong or the window was opened too early.
Step 3: The FFmpeg Command to Render SFM to MP4
Open Command Prompt in your frames folder: type cmd in the File Explorer address bar and press Enter. Then run:
ffmpeg -framerate 24 -i shot_%04d.tga -i audio.wav -c:v libx264 -crf 18 -preset slow -pix_fmt yuv420p -c:a aac -b:a 192k -shortest output.mp4Here is what each part does:
| Flag | What it does |
|---|---|
-framerate 24 | Tells FFmpeg how fast to read the frames. Without it, the image reader assumes 25 fps. |
-i shot_%04d.tga | The frame pattern. %04d means a four-digit, zero-padded number. |
-i audio.wav | The second input: your SFM sound track. |
-c:v libx264 | Encodes video as H.264, the most compatible MP4 codec. |
-crf 18 | Constant quality. Lower means better quality and bigger files. |
-preset slow | Spends more time to get a smaller file at the same quality. |
-pix_fmt yuv420p | Uses 4:2:0 color, which every player and website supports. |
-c:a aac -b:a 192k | Encodes audio to AAC at 192 kbps. |
-shortest | Ends the file when the shorter input runs out. |
Matching the Number Pattern
Match %04d to the digits in your file names. Five digits need %05d. FFmpeg looks for the first frame between 0 and 4. If your sequence starts higher, say at 120 because you exported part of a shot, add -start_number 120 before the -i for the frames.
-framerate vs -r
Put -framerate before the frame input to time the stills. A -r after the inputs sets the output rate, and FFmpeg drops or duplicates frames to hit it. Use -r only when you want a different output rate.
CRF and Preset: Picking Quality and File Size
The FFmpeg H.264 guide gives libx264 a CRF scale of 0 to 51. Zero is lossless, 23 is the default, and 51 is the worst. The guide calls 17 or 18 visually lossless or close to it. The scale is exponential: raising CRF by 6 roughly halves the file size, and lowering it by 6 roughly doubles it.
| CRF | Quality | Relative file size | Good for |
|---|---|---|---|
| 12 | Near lossless | About 4x the CRF 24 size | Master copies for later editing |
| 14 to 18 | High, visually lossless | About 2x to 3x the CRF 24 size | YouTube uploads, portfolio pieces |
| 20 to 23 | Standard | About 1.1x to 1.6x | Sharing, Discord, previews |
| 24 to 28 | Visible softness | About 0.6x to 1x | Quick tests, drafts |
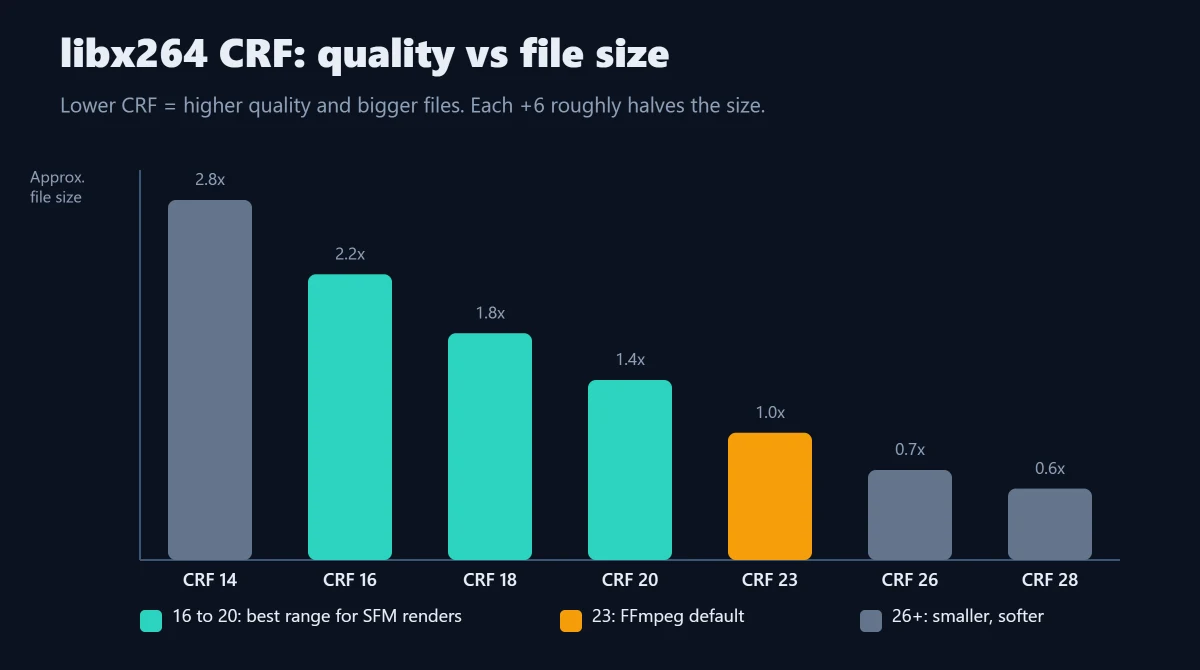
Presets change speed, not the quality target. In order, they run ultrafast, superfast, veryfast, faster, fast, medium, slow, slower and veryslow. Medium is the default. For SFM work, slow is a good balance. You can also add -tune animation, which the x264 guide lists for animated content.
Smaller Files With H.265
Swap libx264 for libx265 to cut file size. The FFmpeg H.265 guide says its default CRF of 28 should look like x264 at CRF 23 at about half the size. Add -tag:v hvc1 so Apple players accept the file. Older PCs decode H.265 slowly, so keep an H.264 copy too.
ffmpeg -framerate 24 -i shot_%04d.png -i audio.wav -c:v libx265 -crf 22 -preset slow -pix_fmt yuv420p -tag:v hvc1 -c:a aac -b:a 192k -shortest output_hevc.mp4YouTube-Ready Settings and Scaling
YouTube’s upload guide asks for MP4 with the moov atom at the front, H.264 High Profile, 4:2:0 chroma and AAC-LC audio at 48 kHz. Its suggested SDR bitrate at 24 to 30 fps is 8 Mbps for 1080p and 16 Mbps for 1440p.
ffmpeg -framerate 24 -i shot_%04d.png -i audio.wav -vf scale=1920:-2 -c:v libx264 -crf 18 -preset slow -profile:v high -pix_fmt yuv420p -c:a aac -b:a 192k -ar 48000 -movflags +faststart -shortest youtube.mp4-vf scale=1920:-2 resizes the width to 1920 and picks an even height that keeps the aspect ratio. Use scale=2560:-2 for 1440p. -movflags +faststart moves the index to the start so playback begins before the file fully loads.
Fixing Audio Sync
Most sync problems come from a wrong -framerate. If SFM rendered at 30 fps and you read the frames at 24, the video runs 25 percent long and drifts away from the sound. If the audio needs a fixed nudge, put -itsoffset 0.5 before -i audio.wav to delay it by half a second.
GIF, WebM and Transparent Backgrounds
For a GIF, build a custom palette in the same pass for cleaner color:
ffmpeg -framerate 24 -i shot_%04d.png -vf "fps=15,scale=640:-1:flags=lanczos,split[a][b];[a]palettegen[p];[b][p]paletteuse" clip.gifFor WebM, use VP9 in constant quality mode. The FFmpeg VP9 guide says CRF runs from 0 to 63, with 15 to 35 the useful range, and -b:v 0 is required for true constant quality.
ffmpeg -framerate 24 -i shot_%04d.png -i audio.wav -c:v libvpx-vp9 -crf 30 -b:v 0 -c:a libopus -shortest clip.webmSFM cannot render a transparent background on its own. The usual workaround is to light your subject against a flat green or blue backdrop, then key the color out. FFmpeg’s chromakey filter can do this, and the result can go to VP9 WebM with alpha or to ProRes 4444 for editors:
ffmpeg -framerate 24 -i shot_%04d.png -vf "chromakey=0x00FF00:0.12:0.05,format=yuva420p" -c:v libvpx-vp9 -crf 30 -b:v 0 alpha.webm

ffmpeg -framerate 24 -i shot_%04d.png -vf "chromakey=0x00FF00:0.12:0.05" -c:v prores_ks -profile:v 4444 -pix_fmt yuva444p10le alpha.mov
Adjust the similarity and blend numbers until edges look clean. ProRes 4444 files are huge, so use them as editing masters only.
A Reusable Batch File
Save the text below as render.bat in Notepad and drop it in your frames folder. Double-click it to encode. Inside a .bat file, every % in the pattern must be doubled, so %04d becomes %%04d.
@echo off
cd /d "%~dp0"
set FPS=24
set NAME=shot
ffmpeg -framerate %FPS% -i %NAME%_%%04d.png -i audio.wav -c:v libx264 -crf 18 -preset slow -pix_fmt yuv420p -c:a aac -b:a 192k -movflags +faststart -shortest %NAME%.mp4
pause
Troubleshooting SFM to MP4 Errors
| Error or symptom | Likely cause | Fix |
|---|---|---|
| “No such file or directory” or “Could find no file with path” | Wrong name, digit count or start number | Check the real file names, match %04d, add -start_number |
| “height not divisible by 2” | Odd width or height with yuv420p | Add -vf scale=1920:-2 or scale=trunc(iw/2)*2:trunc(ih/2)*2 |
| Washed-out or shifted colors | Color matrix or range mismatch | Add -vf scale=out_color_matrix=bt709:out_range=tv and -colorspace bt709 -color_primaries bt709 -color_trc bt709 |
| Video stops early | A missing frame number in the sequence | Re-render or rename the missing frame; FFmpeg stops at the first gap |
| Audio drifts out of sync | Frame rate mismatch | Set -framerate to the SFM export rate |
| “ffmpeg is not recognized” | PATH not set | Add C:\ffmpeg\bin and reopen Command Prompt |
Always check your frame count before you encode: a single missing number in the sequence makes FFmpeg stop at that point, and the MP4 simply ends early. Sort the folder by name and compare the last frame number with your shot length.
Missing textures are an SFM problem, not an FFmpeg one. Our guides to importing SFM models from the Steam Workshop and decompiling SFM models with Crowbar fix those.
Alternatives to FFmpeg
Prefer a timeline? Several free editors import image sequences directly:
- DaVinci Resolve: shows a numbered sequence as one clip in the Media Pool.
- Blender Video Sequencer: use Add > Image/Sequence and select all frames. Handy if you already use our Blender to SFM workflow.
- Shotcut: open the first frame and tick the image sequence option.
- HandBrake: does not open image sequences. Make an MP4 with FFmpeg first, then use HandBrake if you want to re-compress it.
Render SFM to MP4 FAQs
Should I export PNG or TGA from SFM?
PNG is the safer default. It is lossless, smaller on disk than TGA, and almost every editor reads it. TGA is SFM’s native format and writes a little faster. FFmpeg handles both, so choose PNG unless disk speed matters more to you than folder size.
What CRF should I use for YouTube?
CRF 18 with the slow preset is a strong choice for YouTube. The FFmpeg H.264 guide treats 17 to 18 as visually lossless. YouTube re-encodes every upload, so giving it a clean, high-quality source helps your video survive that second compression with fewer blocky artifacts.
Why does my MP4 look washed out?
The RGB to YUV conversion is using a different color matrix or range from the one your player expects. Add the BT.709 scale options and color tags shown in the troubleshooting table. Always keep -pix_fmt yuv420p as well, because some players mishandle other pixel formats.
Why is my video shorter than the SFM shot?
FFmpeg stops reading at the first gap in the numbering. A crash, a deleted frame or a mixed export can leave a hole. Sort the folder by name, find the missing number, and render that frame again. Also confirm that -start_number matches your first frame.
Do I need QuickTime to make MP4 files from SFM?
No. QuickTime is only needed for SFM’s own MP4 and MOV export, and Apple no longer supports it on Windows. Export an image sequence instead and let FFmpeg build the MP4. FFmpeg includes its own H.264 and AAC encoders, so nothing else is required.
Can FFmpeg make a 60 fps video from 24 fps frames?
It can, but it only repeats frames to fill the gaps, so motion will not look smoother. For real 60 fps motion, set SFM to 60 fps and render again. Then use -framerate 60 in the FFmpeg command so the timing and audio stay correct.
3 thoughts on “How to Render SFM to MP4: Image Sequences to Video With FFmpeg”