

Quick Answer
Blender to SFM porting needs a middle step, because SFM only loads compiled MDL files. Export the mesh as SMD or DMX with Blender Source Tools, write a QC file, and convert textures to VTF with VMT materials in VTFEdit. Then compile the QC with Crowbar into usermod and load the model with Create Animation Set for New Model.
Moving a model from Blender to Source Filmmaker looks simple, yet SFM cannot open a .blend file directly. Instead, every mesh must pass through Blender Source Tools, a QC file and the studiomdl compiler first. Once your export is ready, our SFM compile guide walks through the QC file and studiomdl step that turns it into a working model. Blender Source Tools targets the original SFM, while Source 2 Filmmaker uses a different asset pipeline.
This Blender to SFM guide covers the whole route. First, you prepare and export the model. Then you write the QC, build VTF and VMT materials, compile with Crowbar and load the result inside SFM.
The steps below assume a static prop or a simple rigged character. However, the same rules apply to complex models. Once a basic port compiles cleanly, adding flexes, bones and better materials becomes far easier.
How the Blender to SFM Pipeline Works
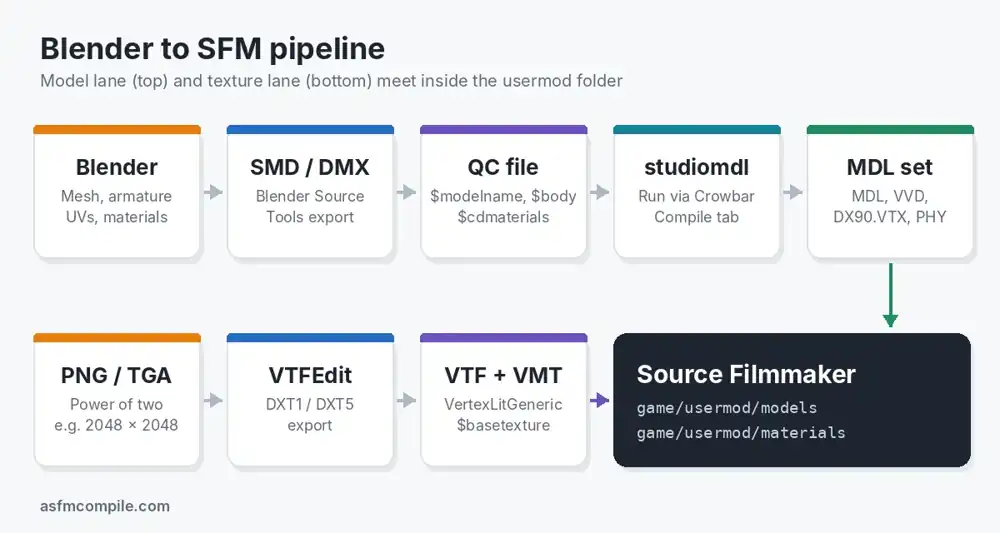
Source Filmmaker only loads compiled MDL files. Therefore, Blender exports an intermediate format, either SMD or DMX, that holds the mesh, skeleton and animation data. A text script then tells the compiler what to build.
That script is the QC file. It lists the reference mesh, material folders, animation sequences and physics settings. Next, studiomdl.exe reads it and writes the MDL, VVD, VTX and PHY files that SFM actually uses.
Textures follow a separate path. For example, a PNG becomes a VTF texture in VTFEdit, and a small VMT text file tells the engine how to shade it. Both must sit inside the materials folder.
Prerequisites: Blender, Source Tools, Crowbar and Studiomdl
Start with Blender 4.1 or newer, because the current Blender Source Tools 3.4.3 release requires it. Older Blender builds need older add-on versions, which lack recent fixes. The free Steam version of Blender works too.
Next, install Source Filmmaker from Steam. It already ships with its own SFM SDK tools, including studiomdl.exe inside the game\bin folder. Consequently, you do not need a separate Source SDK download to build SFM models.
Finally, download Crowbar from its official GitHub releases page and VTFEdit for converting textures. A plain code editor such as Notepad++ or VS Code also helps, since QC and VMT files are both simple text.
How to Install Blender Source Tools
Download the add-on zip file from the official Blender Source Tools page, but do not extract it. Then open Blender, go to Edit > Preferences and select the Add-ons tab in the left sidebar menu.
Open the dropdown arrow in the top corner and choose Install from Disk. Next, pick the downloaded zip and tick the checkbox beside Import-Export: Blender Source Tools to enable it for every future Blender project.
After that, a Source Engine Export panel appears in the Scene Properties tab. This panel holds the export path, the export format setting and the engine path. You will return to it several times later.
Setting Up Crowbar for Source Filmmaker
Open Crowbar and click the Set Up Games tab. Then choose Source Filmmaker from the game list, or add it manually if it is missing. Each entry needs a gameinfo.txt path and a studiomdl path.
For SFM, point the game setup at usermod\gameinfo.txt inside SourceFilmmaker\game. Similarly, point the compiler at SourceFilmmaker\game\bin\studiomdl.exe. Steam usually installs SFM under steamapps\common, so start browsing from there. Afterwards, Crowbar remembers both paths for future compiles.
Crowbar decompiles models, which helps when you study how Valve built theirs. If you want that workflow, our guide on decompiling SFM models with Crowbar covers it. For now, you only need the Compile tab.
Fixing Scale and Applying Transforms
Source measures space in Hammer units, and one unit is roughly one inch. By default, Blender Source Tools exports one Blender unit as one Source unit. Therefore, a human should stand about 72 units tall.
Check the height with the N panel dimensions. If the model is tiny, scale it in Object Mode rather than Edit Mode. Alternatively, keep the Blender size and add a $scale line to the QC.
Next, select the mesh and the armature, press Ctrl+A and choose All Transforms. This bakes location, rotation and scale into the data. Otherwise, the exported model may appear rotated, offset or strangely stretched inside SFM.
Triangulating and Cleaning the Mesh
Studiomdl only understands triangles internally. It does split quads on its own, yet the result can twist shading on bent faces. Instead, add a Triangulate modifier or press Ctrl+T in Edit Mode before you export.
Meanwhile, remove hidden faces, loose vertices and n-gons with Merge by Distance and Select All by Trait. Also check normals with the face orientation overlay, because flipped faces render invisible from one side in Source.
Keep the overall polygon budget sensible. A single mesh should stay well under the 65,536 vertex limit, and the model should use 32 materials or fewer. If needed, split heavy parts into separate bodygroups later.
Bone Naming, Vertex Groups and Weight Limits
Every bone in the armature becomes a Source bone, so name them clearly and avoid spaces or odd symbols. For humanoids, standard ValveBiped names such as ValveBiped.Bip01_Pelvis let SFM rigging scripts like rig_biped_simple work automatically.
Next, each vertex group must match a bone name exactly. Use weight painting to assign influence, then run Normalize All so weights add up to one. Any unweighted vertices stay frozen while the skeleton moves.
Source keeps at most three bone weights per vertex and drops weights below 0.05. Therefore, run Limit Total with a limit of 3 rather than 4. Otherwise, studiomdl trims extra influences unpredictably and joints spike.
Assigning Materials That Source Can Read
In Source, the material name in Blender becomes the VMT file name the engine searches for. Therefore, rename Blender’s default “Material.001” to something clear, such as crate_robot, and also avoid spaces, capitals and special characters.
Each material needs a proper UV map, since Source reads only the first UV layer for basic shading. Also, keep texture images square or rectangular in power of two sizes, such as 1024 or 2048.
Shader nodes do not transfer at all. Instead, Source rebuilds the look from the VMT you write later. So simply think of Blender materials as simple name tags that link each face to a texture.
Exporting SMD or DMX From Blender
Open Scene Properties and set the export path to a work folder, for example, a dedicated “modelsrc” directory. Then choose the export format. SMD suits static props, while DMX supports flexes and offers better precision.
Next, set the engine path to SFM’s game\bin folder. As a result, Blender Source Tools picks the matching DMX version for SFM automatically. Keep Target Up Axis on Z unless the model was built differently.
Finally, click Export and select the Scene option, or export single objects from the list. The add-on then writes one file per object or collection. Name the main reference mesh file clearly, for example crate_robot_ref.
Writing the QC File
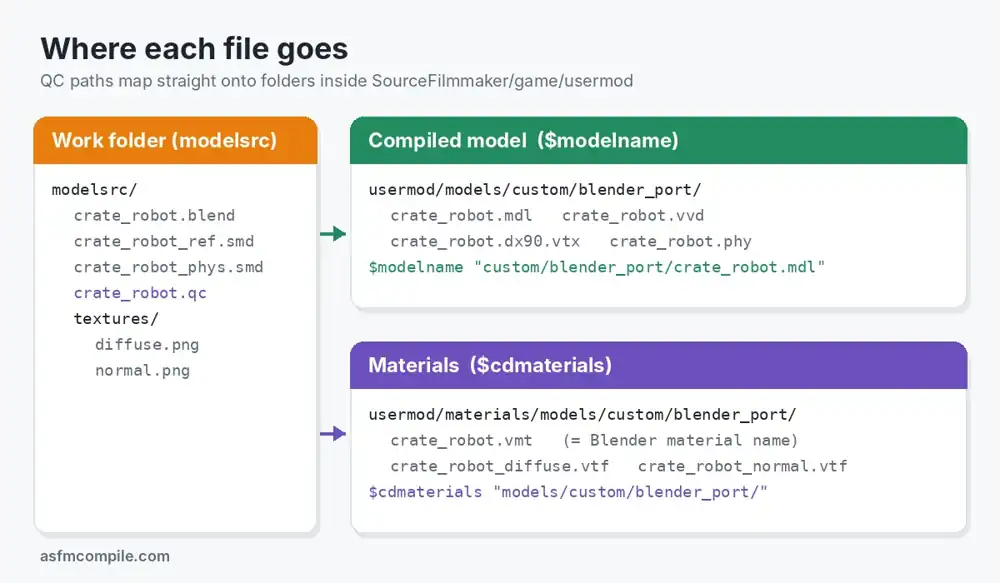
Create a plain text file named crate_robot.qc in the same folder as your exports. $modelname sets where the MDL lands inside the models folder. $body loads the reference mesh, while $cdmaterials says where materials live.
Next, $surfaceprop sets the physical surface type, such as metal or wood. $sequence idle gives SFM a default pose, and $definebone locks bone positions. $collisionmodel builds the PHY file for physics, collisions and viewport selection.
The example below compiles a rigged prop with a simple collision hull. Copy it, then change file names and paths to match your own project. Every quoted path uses forward slashes, which studiomdl reads reliably.
// crate_robot.qc
$modelname "custom/blender_port/crate_robot.mdl"

$body "body" "crate_robot_ref.smd"

$cdmaterials "models/custom/blender_port/"

$surfaceprop "metal"

$definebone "root" "" 0 0 0 0 0 0 0 0 0 0 0 0

$sequence "idle" "crate_robot_ref.smd" fps 30 loop

$collisionmodel "crate_robot_phys.smd"
{
    $mass 20
    $concave
}
Making VTF Textures and VMT Materials
Open VTFEdit, choose File > Import and pick a PNG or TGA texture. Then select DXT1 for opaque images, or DXT5 and RGBA8888 for textures with alpha, and save the VTF using the same name.
Next, create a VMT text file beside the VTF. The VertexLitGeneric shader suits almost every character or prop. $basetexture points to the VTF path, written relative to the materials folder and without the file extension.
Place both finished files in usermod\materials, following the exact folder path set by $cdmaterials. For example, the sample QC above expects materials/models/custom/blender_port/. A single mismatch here causes the familiar purple and black checkerboard inside SFM.
"VertexLitGeneric"
{
    "$basetexture"        "models/custom/blender_port/crate_robot_diffuse"
    "$bumpmap"            "models/custom/blender_port/crate_robot_normal"
    "$phong"              "1"
    "$phongexponent"      "20"
    "$phongboost"         "1"
    "$phongfresnelranges" "[0.5 0.75 1]"
}
Compiling With Crowbar Into Usermod
In Crowbar, open the Compile tab and browse to crate_robot.qc. Then set Game that has the model compiler to Source Filmmaker. Leave Output to on the game’s own models folder so files land inside usermod.
Click Compile and watch the compile log closely. A successful run lists the MDL, VVD, DX90.VTX and PHY files it wrote. However, any line starting with ERROR stops the build before any output files appear.
Read the first error, fix it in Blender or the QC, then compile again. Meanwhile, check usermod\models\custom\blender_port to confirm every file exists. Copying only the MDL file to another PC later breaks the whole model.
Loading Your Model in SFM
Launch SFM and open a new or existing session. In the Animation Set Editor, click the plus button and choose Create Animation Set for New Model. Then browse to the custom/blender_port folder and pick crate_robot.mdl.
The model appears at the origin in its idle pose. Next, select bones in the Animation Set Editor to pose them. For ValveBiped skeletons, right click the set and run rig_biped_simple for handy IK controls.
If you plan to share the port, test it in a fresh session first. Our guide to importing models from the Steam Workshop shows how players load community content, which helps you spot packaging mistakes.
Adding Flexes With Shape Keys and DMX
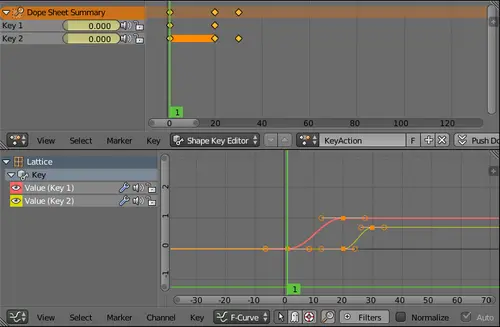
Facial expressions in SFM come from flexes, and Blender creates them as shape keys. Keep the Basis key completely untouched, then sculpt each expression, such as smile or blink, as its own separate relative key.
Flexes need DMX export, since SMD would require extra VTA files. In the object data tab, set flex controller mode to Simple, so each shape key becomes exactly one slider running from zero to one.
Then replace $body with $model in the QC, because only $model compiles flex data. After compiling, the new sliders appear in the Animation Set Editor, ready for lip sync and facial animation work in SFM.
Common Blender to SFM Errors and Fixes
Most failed ports come from paths, names and weights rather than genuinely bad modeling. Therefore, read the compile log from the top, because one early error often triggers a long chain of confusing later warnings.
Also keep a tiny test model, such as a simple cube with one bone, that you know compiles. If it fails too, the problem sits in your Crowbar setup rather than in the new model.
The table below lists common studiomdl errors and visible SFM symptoms. Match the message or symptom, then apply the fix. In most cases, one small change in Blender, VTFEdit or the QC solves it immediately.
| Error or symptom | Cause | Fix |
|---|---|---|
| Purple and black checkerboard in SFM | VMT not found: material name or $cdmaterials path does not match | Rename the Blender material to the VMT name and fix the $cdmaterials path |
| “could not load file” for an SMD or DMX | QC points to a wrong file name or folder | Keep the QC beside the exports and check spelling and extensions |
| “too many materials used, max 32” | More than 32 materials on the model | Merge materials or pack textures into an atlas |
| “COSTLY COLLISION MODEL” or too many convex pieces | Collision mesh is too detailed | Use a simple low poly hull, or add $maxconvexpieces |
| Spiky or stretched mesh when posed | More than 3 weights per vertex, unnormalized weights or unapplied transforms | Limit Total to 3, Normalize All, then apply all transforms |
| Model lies on its side | Wrong up axis or unapplied rotation | Apply rotation and keep Target Up Axis on Z |
| Model is tiny or huge | Scale mismatch between Blender and Hammer units | Scale to about 72 units for a human, or use $scale |
| Model missing from the SFM browser | Compiled into another game folder | Set Crowbar to Source Filmmaker and check usermod/models |
| No flex sliders in SFM | Used $body or SMD without VTA files | Export DMX and replace $body with $model |
Blender to SFM Step by Step: Quick Checklist
Use this quick checklist once you understand each stage above. It follows the same order as the guide, so you can port a new model in one sitting without skipping a step that breaks compiling.
Most simple props take about 45 minutes from a finished Blender file to a working SFM model. However, rigged characters with flexes often need several hours, mainly for careful weight painting and facial expression tuning.
Keep your modelsrc folder together with the blend file, exports, QC file and source textures. Consequently, later edits only need a fresh export and a recompile, rather than rebuilding the whole port from scratch again.
- Install Blender 4.1 or newer, Blender Source Tools, Crowbar and VTFEdit.
- Scale the model to Source size, then apply all transforms.
- Triangulate the mesh, remove loose geometry and fix normals.
- Name bones, match vertex groups and limit weights to 3 per vertex.
- Rename each material to the VMT name you plan to use.
- Set the export path, export format and engine path, then export SMD or DMX.
- Write the QC file with $modelname, $body, $cdmaterials, $sequence and $collisionmodel.
- Convert textures to VTF and write VMT files inside usermod/materials.
- Compile the QC in Crowbar with Source Filmmaker selected.
- Load the model in SFM with Create Animation Set for New Model.
Frequently Asked Questions
Can Blender Export Directly to MDL for SFM?
No. Blender Source Tools exports SMD or DMX files only. You still need a QC file and studiomdl, usually through Crowbar, to compile them into the MDL, VVD and VTX set that SFM loads.
Should I Use SMD or DMX for SFM Models?
Use DMX for characters with shape keys, because it carries flex data in one file. SMD works well for simple static props and is easier to read when you debug a compile.
Which Blender Version Works With Blender Source Tools?
Blender Source Tools 3.4.3 requires Blender 4.1 or newer. If you must stay on an older build, download an older add-on release that matches it from the GitHub releases page.
Do I Need Crowbar if SFM Already Has Studiomdl?
No, you can run studiomdl.exe from a command line. However, Crowbar adds a simple interface, saves game setups and shows a readable compile log, so most beginners find it faster.
Why Is My Ported Model Purple and Black in SFM?
SFM cannot find the material. Check that the Blender material name matches the VMT file name, and that the VMT sits inside the folder set by $cdmaterials under usermod/materials.
Why Is My Model Missing From the SFM Model Browser?
Crowbar probably compiled it into another game folder. Confirm the MDL sits in usermod/models, then restart SFM or refresh the model browser. Also check the compile log for an error near the end.