
Quick Answer
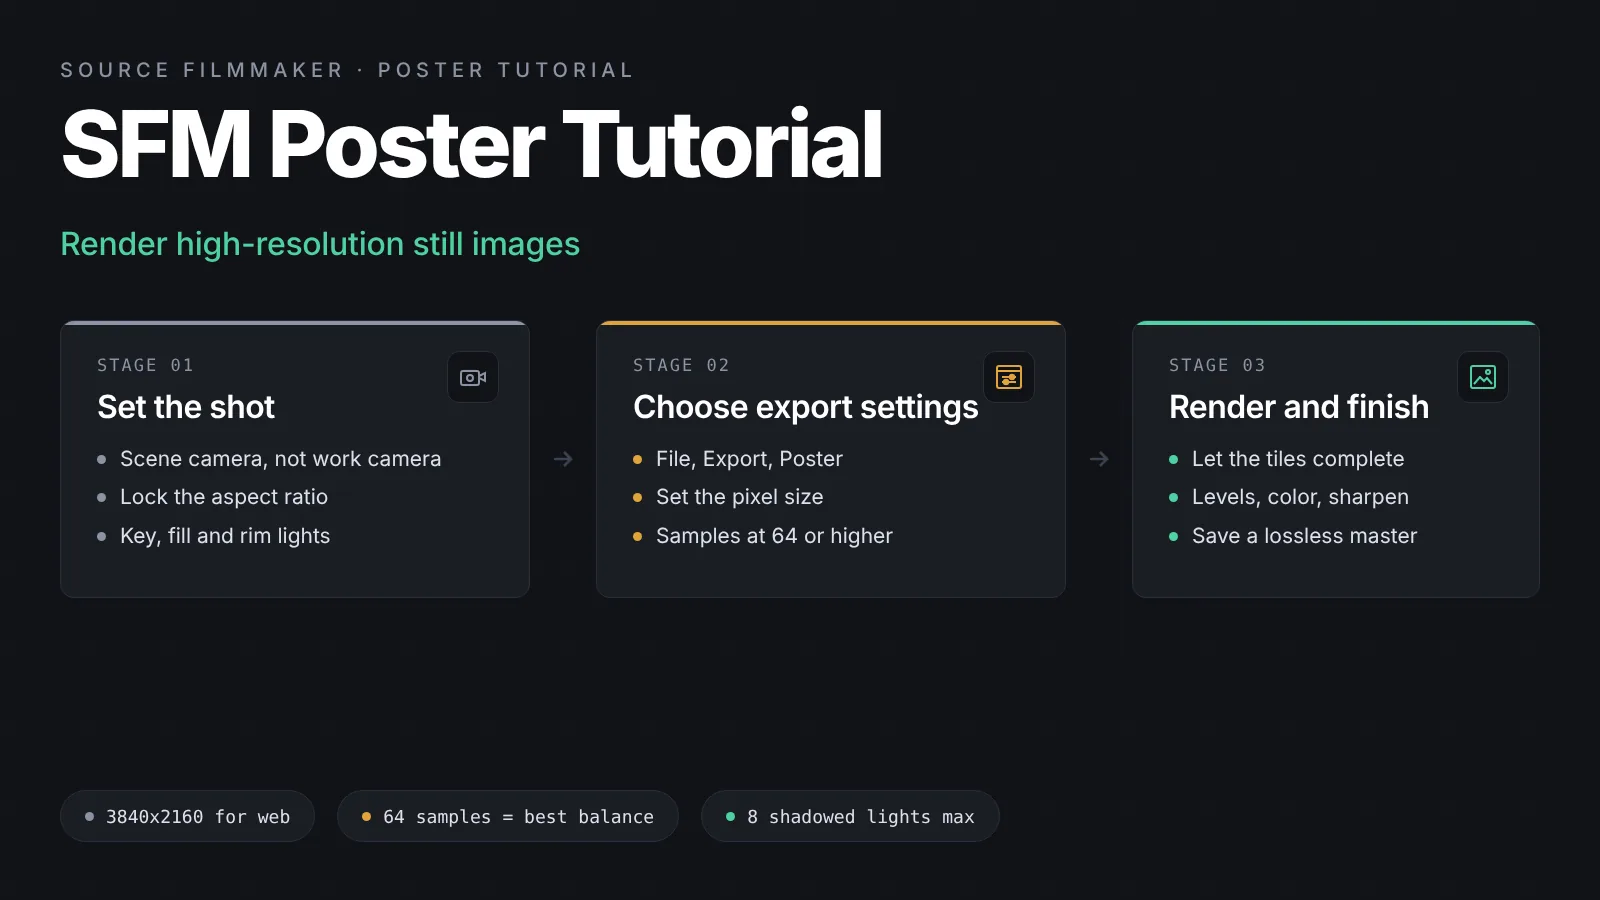
An SFM poster is a single frame of your Source Filmmaker scene rendered as a high-resolution still image. Set the shot with the scene camera, light it with a key, fill and rim setup, then open File, Export, Poster, set the pixel size and raise samples to 64 or higher. Finish color and sharpness in GIMP or Photoshop.
An SFM poster is a single frame of your Source Filmmaker scene rendered as a still image, usually at a far higher resolution than your monitor can display. Posters are how most hobbyist animators share their best work, from Steam Artwork and wallpapers to prints. The exporter has quirks, though, and a careless render can come out dark, grainy or blurry.
This guide walks through the real workflow, from setting the shot to choosing export settings and finishing the file. It draws on the Valve Developer Community wiki pages for progressive refinement, exporting and lighting, plus Steam Community discussions where experienced users have documented the exporter’s limits.
Everything here applies to the standard Steam release on Windows. If you have not set the program up yet, start with our guide on how to install Source Filmmaker on Windows 10 and 11.
Quick Start: Render an SFM Poster in Four Steps
Set the shot
Pose your models, place the scene camera (not the work camera), and lock the aspect ratio.
Light for a still
Build a key, fill and rim setup, and keep shadowed lights at eight or fewer.
Choose export settings
Open File, then Export, then Poster, set the pixel size, and raise samples to 64 or higher.
Render and finish
Let the tiles complete, then adjust color and sharpness in GIMP or Photoshop and save a copy sized for upload or print.
What you need before you begin
You need a saved session with a scene camera, at least one light, and a map that loads without errors. Close other GPU heavy programs so the renderer has all the video memory available.
What an SFM Poster Is and When to Use One
Inside Source Filmmaker, a poster is a still render of the current frame produced by the File, Export, Poster command. The exporter renders the image in tiles and stitches them together, which is why a poster can be much larger than your screen. Because it renders only one moment, you can afford hundreds of samples per pixel.
Poster export vs image export
SFM also offers File, Export, Image. That command saves exactly what the viewport shows, including bloom and color correction, but it is capped at the viewport resolution: 720p unless you add a launch option such as -sfm_resolution 1080 or 2160. The poster exporter has no such cap, although Steam Community guides warn that it can skip some post effects. So use the poster exporter for a large, clean base image, and add grain, vignette and grading afterwards.
Set Up the Shot for a Still Image
A poster forgives nothing. In a video the eye glides past a stiff hand, but in a still that flaw sits on screen forever. If you are new to posing, our introduction to the Motion Editor and Graph Editor covers the tools you will use.
Work camera vs scene camera
The work camera is the free floating view you use while building a scene, and it never renders. The poster exporter uses the active scene camera, so create one by right clicking the viewport and choosing Change Scene Camera, then New Camera. Depth of field, motion blur and light radius only preview in the Clip Editor with the scene camera active, so judge your final look there, not in the Motion Editor.
Aspect ratio: 16:9 or custom
The viewport is 16:9, and most wallpapers stay at that ratio. For portrait or square posters, compose at 16:9 with extra room, render larger than needed, and crop in post. If you use a custom map built in Hammer as a backdrop, keep its sightlines in mind when you choose the framing.
Lighting for a Poster
Lighting is where an SFM poster earns its quality, and it is also where most render time goes. Our SFM lighting guide covers the fundamentals, so this section focuses on what changes when you render a single frame.
Key, fill and rim
Start with a three point setup. The key light defines the main shadows and should be the brightest. The fill sits opposite at lower intensity to lift the dark side, and the rim comes from behind to separate the subject from the background. For a shortcut, right click a joint control, open the Dag Utilities Menu and choose create_lights to add all three plus a bounce light.
Shadows, light radius and volumetrics
Each shadow casting light adds an extra render pass, so turn shadows off on lights that only add color or glow. Light radius controls how soft a shadow edge becomes, and that softness is built from the same samples as depth of field. A flashlight should sit near zero radius; a window or fire source can go higher. Volumetric lights look stunning in stills, but low sample counts produce visible banding or noise in the beams.
The eight shadowed light limit
According to the Valve Developer Community wiki, a shot can hold many lights, but only eight can cast shadows. Add a ninth and an earlier one silently drops its shadow, which users often report as a light “disappearing” in the poster. Give shadows to the key and strongest rims, and disable them on props such as screens and muzzle flashes.
Camera Settings That Decide Sharpness
The scene camera carries the settings that matter most for a still. Our article on SFM camera tips for depth of field and motion blur goes deeper; here are the poster specific points.
Focal length
Longer focal lengths flatten perspective and flatter faces. Short focal lengths exaggerate hands and weapons held toward the camera, which suits action posters but not portraits. Set this first, because changing it later shifts the whole composition.
Depth of field: aperture and focal distance
Aperture controls how much background blur you get, and focal distance sets where the sharp plane sits. Place that plane on your subject’s eyes. Keep the aperture modest, since a wide aperture at low sample counts turns into a grainy halo. If you want everything sharp, set the aperture to 0 and separate the subject with lighting instead.
The File, Export, Poster Dialog Explained
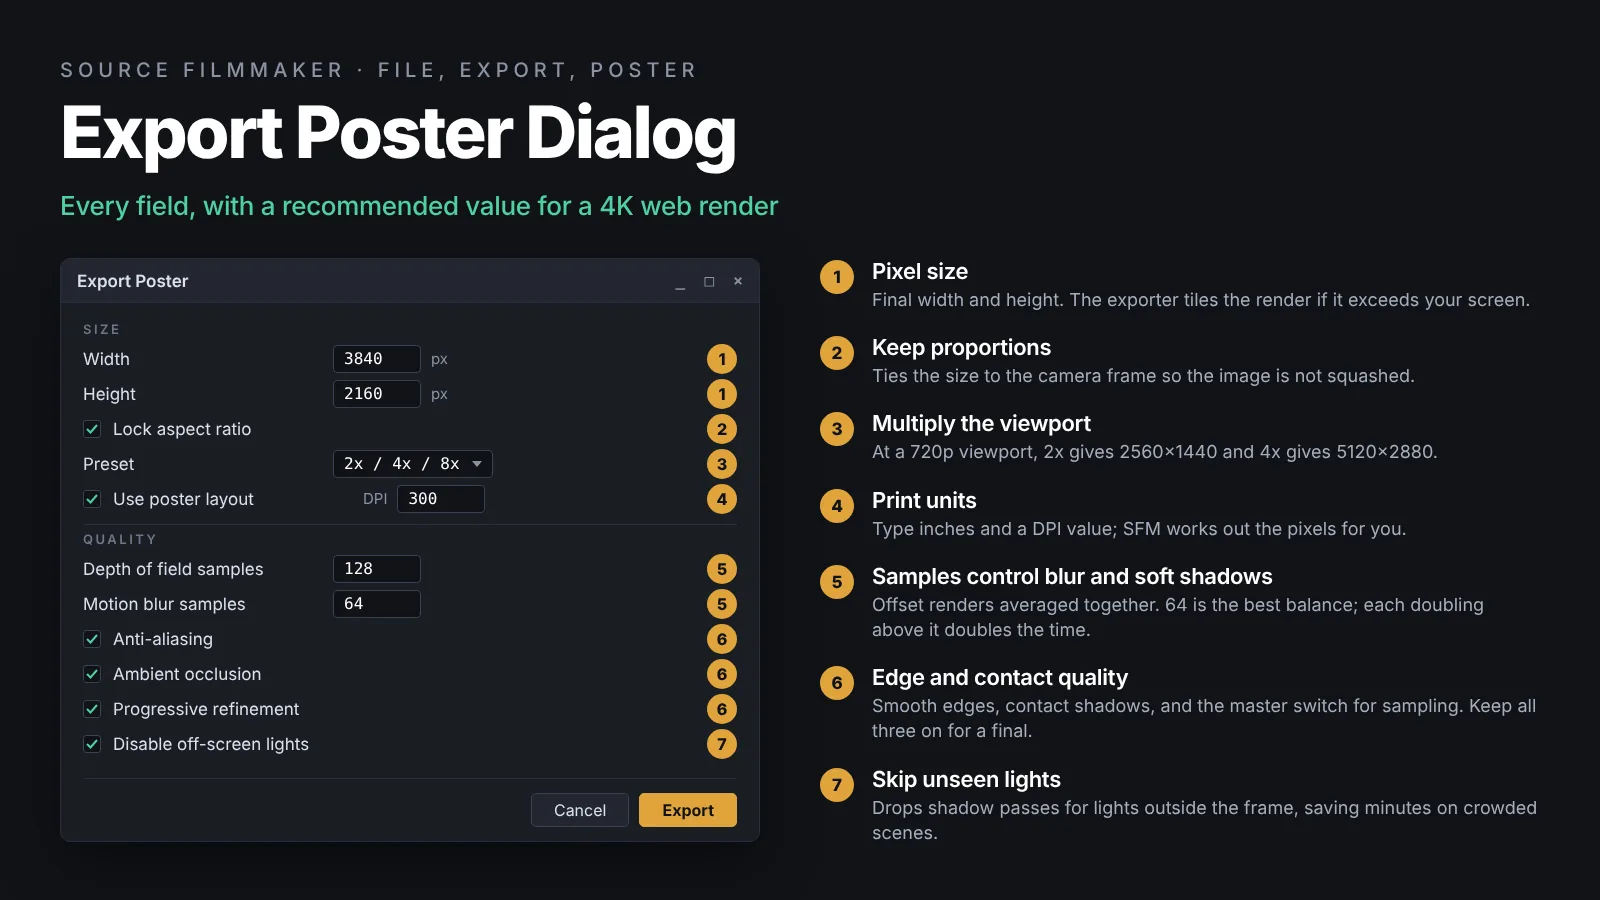
Open File, then Export, then Poster. The Valve wiki notes that the dialog has no hidden advanced options, so what you see is what controls the render.
Size fields and presets
- Width and height: the final pixel dimensions. Type any value; the exporter tiles the render if the size exceeds your screen.
- Lock aspect ratio: keeps width and height tied to the camera frame so you do not squash the image.
- Presets (2x, 4x, 8x): multiply the current viewport resolution. At a 720p viewport, 2x gives 2560×1440, 4x gives 5120×2880 and 8x gives 10240×5760.
- Use poster layout: switches the size fields to physical units and a DPI value, so you can type 11.69 by 16.54 inches at 300 DPI and let SFM work out the pixels for an A3 print.
Quality settings
- Depth of field samples: how many offset renders are averaged to form blur and soft shadows. The wiki lists steps of 8, 16, 32, 64, 128, 256, 512 and 1024.
- Motion blur samples: the same idea for movement, with a ceiling of 256. A frozen pose needs few of these.
- Anti-aliasing: smooths jagged edges on geometry. Leave it on for every final render.
- Ambient occlusion: adds contact shadows where surfaces meet. It costs time and relies on the DoF samples to look clean.
- Progressive refinement: the master switch for sampling. With it off, you get a single raw pass with no blur or soft shadows.
- Disable off-screen lights: skips shadow passes for lights outside the frame, which can save minutes on crowded scenes.
These controls mirror the viewport Render Settings menu. The Valve Developer Community exporting page recommends setting anti-aliasing, ambient occlusion and motion blur there before you export, so check that both places agree.
Recommended Settings: Draft, Final and Print
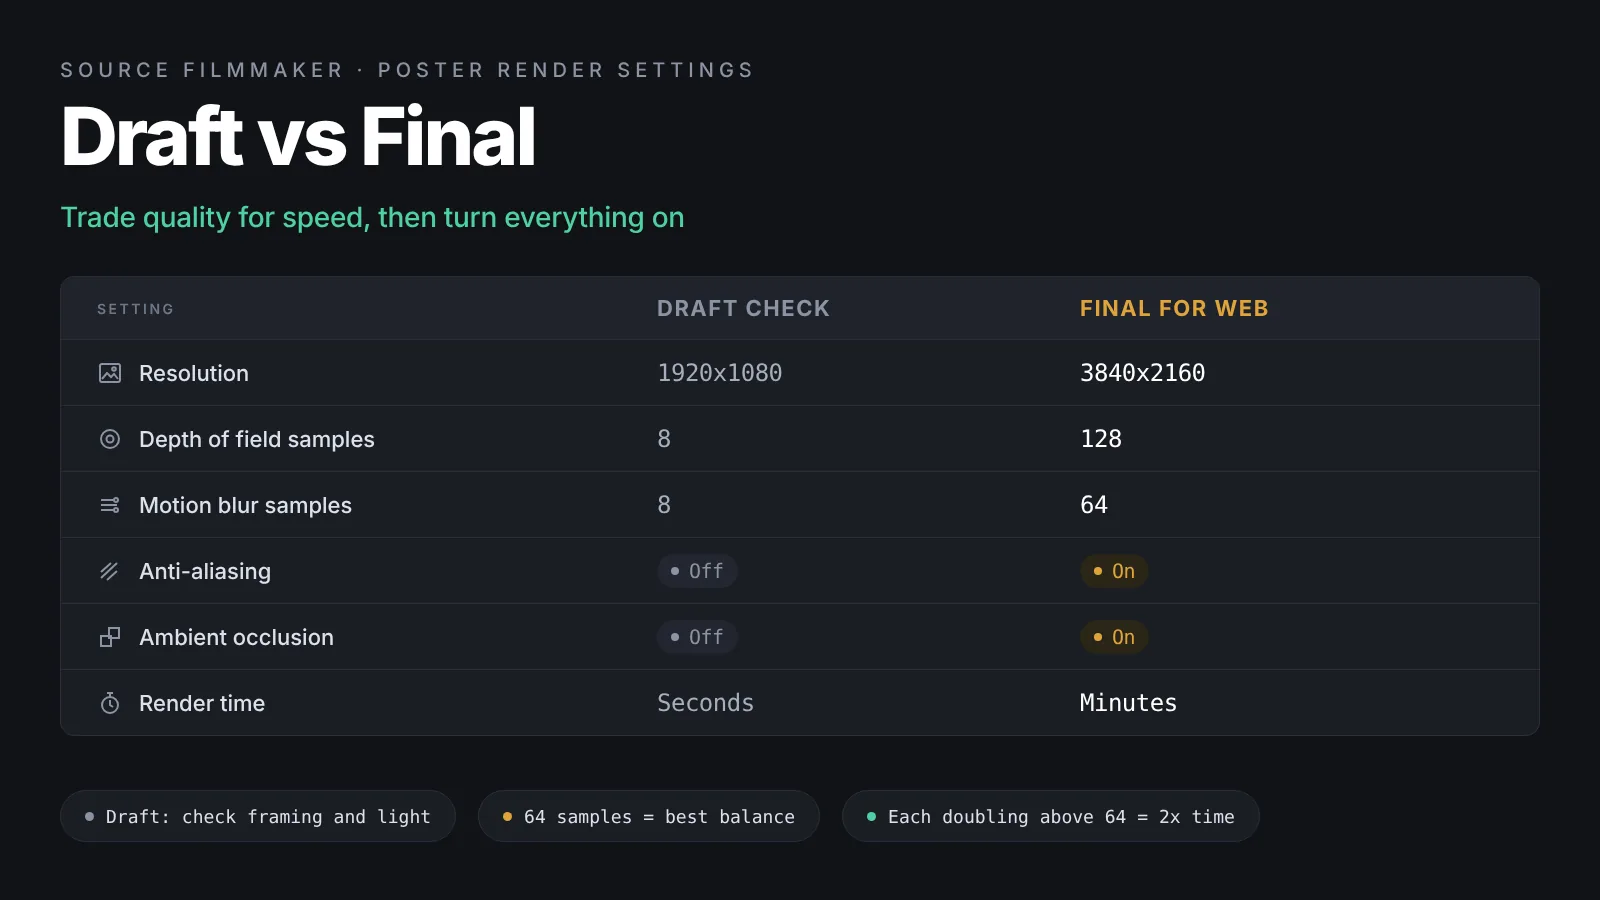
Use a draft to check framing and lighting, a final for upload, and a print preset only when the image goes on paper. The Valve wiki page on progressive refinement calls 64 samples the best balance, because sampling runs in parallel up to 64 and each doubling above that takes twice as long. Our article on the best SFM render settings explains the same trade offs for video.
| Setting | Draft check | Final for web | Print quality |
|---|---|---|---|
| Resolution | 1920×1080 | 3840×2160 | Paper size at 300 DPI |
| Depth of field samples | 8 to 16 | 64 to 128 | 256 or higher |
| Motion blur samples | 8 | 32 to 64 | 64 |
| Anti-aliasing | Off | On | On |
| Ambient occlusion | Off | On | On |
| Shadowed lights | Key only | Up to 8 | Up to 8 |
| Typical time | Seconds | 2 to 15 minutes | 15 minutes to over an hour |
How long renders take and memory limits
Render time scales with pixels times samples times shadowed lights. A 4K poster with 128 DoF samples and six shadowed lights can take ten minutes on a mid range GPU, while an 8K print render with 512 samples can run for an hour or more. Tiling means the size limit is set by system memory rather than your screen, but each tile still needs VRAM. If SFM crashes or tiles come back missing, halve the resolution and upscale in post. If the program already feels sluggish, our SFM lag fix guide covers settings that free up resources.
Common SFM Poster Problems and Fixes
Most poster failures come from a handful of causes.
Image quality problems
- Black image: the scene camera is inside geometry, every light is off, or the tone map scale is far too low.
- Pink and black checkerboards: a material is missing. Our missing textures fix explains how to track down the absent VMT and VTF files.
- Jagged edges: anti-aliasing is off, or the render is too small. Turn it on and render at least 2x your display size.
- Grainy blur: DoF samples are too low for the aperture you chose. Raise samples to 64 or more, or narrow the aperture.
- Noise or banding in volumetric beams: the same cause. Keep progressive refinement on and raise samples.
- A light vanished: you exceeded the eight shadowed light limit, or its radius was so high that it diffused into nothing.
- Post effects missing: the poster exporter can skip bloom, grain and color correction. Apply those in GIMP or Photoshop instead.
Transparent and alpha backgrounds
Source Filmmaker does not write an alpha channel in a poster. To isolate a character, place a flat green or magenta plane behind it, light it evenly, and key the color out in your editor. Alternatively, render one pass with the character and one without, then build a mask from the difference.
File Formats, Post-Processing and Print Sizing
The render is only half of a finished SFM poster. The format, the edits and the delivery size all shape how the image reads.
Choosing a format
Save the master as PNG or TGA, which are lossless. JPG is fine for the upload copy at a quality of 90 or above. BMP works but produces huge files with no advantage.
Editing in GIMP or Photoshop
Work in order. First set levels or curves so blacks sit just above pure black and highlights do not clip. Second, adjust color balance; cool shadows against a warm key is a classic poster look. Third, apply gentle sharpening such as unsharp mask at a low radius, then add grain and a vignette if you want them. If you need a larger file than SFM could render, upscale by no more than 200 percent and sharpen lightly afterwards.
Print size math at 300 DPI
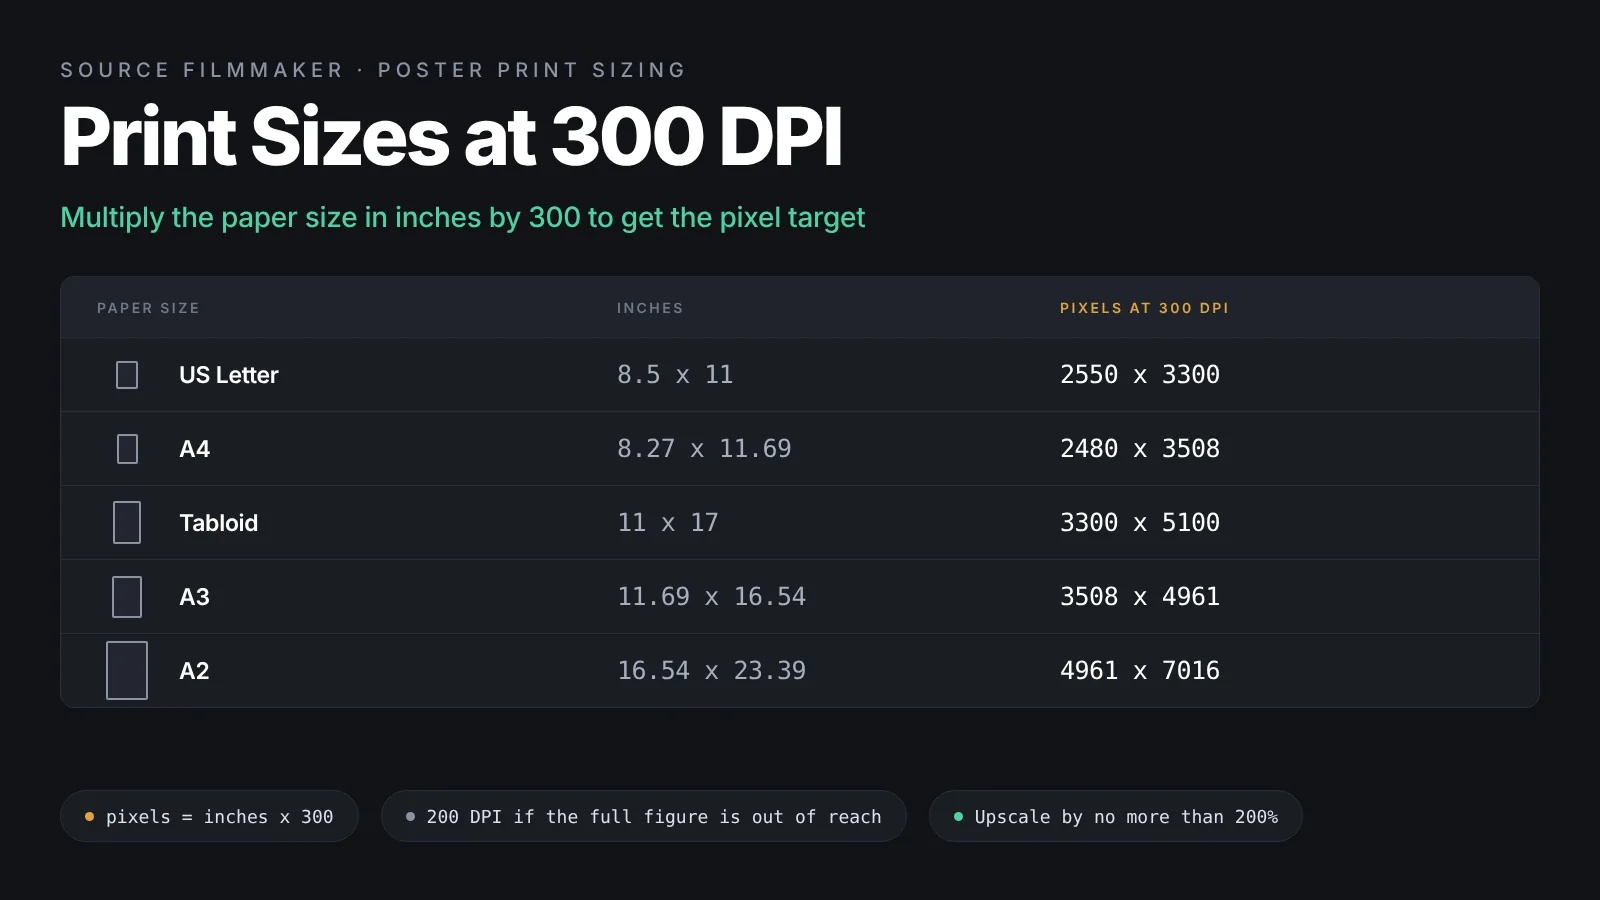
Multiply the paper size in inches by 300 to find the pixel target, and accept 200 DPI if the full figure is out of reach.
| Paper size | Inches | Pixels at 300 DPI | Pixels at 200 DPI |
|---|---|---|---|
| US Letter | 8.5 x 11 | 2550 x 3300 | 1700 x 2200 |
| A4 | 8.27 x 11.69 | 2480 x 3508 | 1654 x 2339 |
| Tabloid | 11 x 17 | 3300 x 5100 | 2200 x 3400 |
| A3 | 11.69 x 16.54 | 3508 x 4961 | 2339 x 3307 |
Steam Artwork and DeviantArt sizes
Steam Artwork accepts PNG and JPG and compresses large files, so a 3840×2160 JPG at high quality is the practical sweet spot. DeviantArt shows a scaled preview and keeps your original for download, so upload the full PNG if the size allows. Once you are happy with stills, the same scene can become a video; see how to render SFM to MP4 with FFmpeg for that workflow.
Frequently Asked Questions
How do I render a poster in SFM at 4K?
Set your scene camera, open File, then Export, then Poster, and type 3840 for width and 2160 for height with the aspect ratio locked. Raise depth of field samples to 64 or 128, keep anti-aliasing and ambient occlusion on, and export as PNG. The exporter tiles the image, so you do not need a 4K monitor.
Why does my SFM poster come out black?
A black poster usually means the scene camera sees nothing lit. Check that the active camera is the scene camera rather than the work camera, that at least one light points at the subject, and that the camera tone map scale is not near zero. Preview in the Clip Editor with sampling running before you export again.
How many depth of field samples should I use for a poster?
The Valve Developer Community wiki recommends 64 samples as the best balance, because sampling runs in parallel up to that count. For a final upload, 64 to 128 samples give smooth blur and soft shadows. Reserve 256 or more for prints, and expect each doubling above 64 to double the render time.
Why are some of my lights missing in the final Source Filmmaker poster?
Source Filmmaker allows only eight lights to cast shadows in a single shot. Add more and earlier lights lose their shadows, which can make them look like they vanished. A very high light radius can also spread a light so thin that it disappears. Turn shadows off on minor lights and reduce the radius.
Can I export an SFM poster with a transparent background?
The poster exporter does not save an alpha channel. Render the character in front of a flat green or magenta plane lit evenly, then remove that color in GIMP or Photoshop. Alternatively, render one pass with the character and one without, and build a mask from the difference between the two images.
What size should I export a poster for printing?
Multiply the paper size in inches by 300 to find the pixel dimensions. An A4 print needs about 2480 by 3508 pixels, US Letter needs 2550 by 3300, and A3 needs 3508 by 4961. If your hardware cannot reach that, render at 200 DPI and upscale modestly in an editor.
Final Thoughts
Your first clean render
A strong SFM poster comes from a deliberate shot, a lighting rig that respects the eight shadowed light limit, and sample counts matched to the output size. Render a quick draft first, fix what you see, then commit to a final with 64 or more samples and every quality option on. Finish in an editor, save a lossless master, and export copies sized for each destination. Treat the draft render as part of the process, not a shortcut, and your final poster will rarely surprise you.